1. clone项目
git clone https://github.com/oceanbase-devhub/ai-workshop-2024.git
2. 安装python
疑似需要的版本区间是大于3.9且小于4.0,我使用的版本是3.9.6
yum install python39
3. poetry的操作
安装poetry
python3 -m pip install poetry
安装依赖
进入clone的项目后安装
cd ~/ai-workshop-2024
poetry install
如果下载非常慢可以把官方源换为国内源
vi pyproject.toml
删除下面的部分
[[tool.poetry.source]]
name = "PyPI"
priority = "primary"

[[tool.poetry.source]]
name = "tuna"
url = "https://mirrors.tuna.tsinghua.edu.cn/pypi/web/simple"
priority = "supplemental"
添加国内源
[[tool.poetry.source]]
name = "ali"
url = "https://mirrors.aliyun.com/pypi/simple/"
priority = "primary"

[[tool.poetry.source]]
name = "tuna"
url = "https://mirrors.tuna.tsinghua.edu.cn/pypi/web/simple"
priority = "supplemental"
poetry lock使配置生效
设置环境变量
cp .env.example .env
vi .env
把API_KEY替换为 智谱AI开放平台的key.
4. ob的操作
启动docker
systemctl start docker
启动ob
docker run --ulimit stack=4294967296 --name=ob433 -e MODE=mini -e OB_MEMORY_LIMIT=8G -e OB_DATAFILE_SIZE=10G -e OB_CLUSTER_NAME=ailab2024 -p 127.0.0.1:2881:2881 -d quay.io/oceanbase/oceanbase-ce:4.3.3.1-101000012024102216
检查ob启动日志
docker logs -f ob433

check tenant connectable
tenant is connectable
boot success!
看到最后输出以上日志,基本上成功了.
测试连接
mysql -h172.17.0.2 -P2881 -uroot@test -Doceanbase -A
5.BGE-M3和数据的操作
准备BGE-M3模型
poetry run python utils/prepare_bgem3.py

===================================
BGEM3FlagModel loaded successfully!
===================================
有以上输出表示成功
clone数据
cd doc_repos
git config --global http.postBuffer 16000M  // 增加buffer大小
git config --global core.compression -1 // 启动压缩

git clone --single-branch --branch V4.3.3 https://github.com/oceanbase/oceanbase-doc.git --depth 1  //如果git报错,添加后面的参数
git clone --single-branch --branch V4.3.0 https://github.com/oceanbase/ocp-doc.git
git clone --single-branch --branch V4.3.1 https://github.com/oceanbase/odc-doc.git
git clone --single-branch --branch V4.2.5 https://github.com/oceanbase/oms-doc.git
git clone --single-branch --branch V2.10.0 https://github.com/oceanbase/obd-doc.git
git clone --single-branch --branch V4.3.0 https://github.com/oceanbase/oceanbase-proxy-doc.git
cd ..
把文档的标题转换为标准的 markdown 格式
poetry run python convert_headings.py \
  doc_repos/oceanbase-doc/zh-CN \
  doc_repos/ocp-doc/zh-CN \
  doc_repos/odc-doc/zh-CN \
  doc_repos/oms-doc/zh-CN \
  doc_repos/obd-doc/zh-CN \
  doc_repos/oceanbase-proxy-doc/zh-CN
生成文档向量和元数据
poetry run python embed_docs.py --doc_base doc_repos/oceanbase-doc/zh-CN
poetry run python embed_docs.py --doc_base doc_repos/ocp-doc/zh-CN --component ocp
poetry run python embed_docs.py --doc_base doc_repos/odc-doc/zh-CN --component odc
poetry run python embed_docs.py --doc_base doc_repos/oms-doc/zh-CN --component oms
poetry run python embed_docs.py --doc_base doc_repos/obd-doc/zh-CN --component obd
poetry run python embed_docs.py --doc_base doc_repos/oceanbase-proxy-doc/zh-CN --component odp
这个步骤耗时很长,具体取决于硬件和配置
保存加载数据
poetry run python utils/extract.py --output_file ~/my-data.json
加载预处理的文档数据
poetry run python utils/load.py --source_file ~/data.json
6. 启动web界面
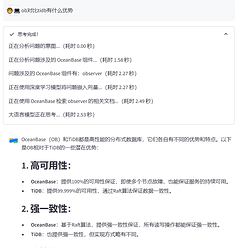
上面的准备工作已经全部完成,接下来就是激动人心的时刻了,原神启动!!!(走错片场了)
poetry run streamlit run --server.runOnSave false chat_ui.py

		  You can now view your Streamlit app in your browser.

		  Local URL: http://localhost:8501
		  Network URL: http://172.xxx.xxx.xxx:8501
		  External URL: http://xxx.xxx.xxx.xxx:8501 # 这是您可以从浏览器访问的 URL
刚好streamlit提供服务的IP都不是对外的,修改.streamlit/config.toml,指定对外服务的IP和端口
		[server]
		port = 8501
		enableCORS = false

		[browser]
		serverAddress = "192.168.56.110"
		gatherUsageStats = false
接下来就是一个尖锐的问题
初次体验了使用OB存储向量数据,期待广州周六的活动,希望能现场更加深入的了解.
AI 时代的数据栈建设探索与跨行业应用实践-OceanBase社区活动
参考文档:
【创意工坊】试用 OceanBase 4.3.3 构建《黑神话:悟空》智能游戏助手-数据库技术博客-OceanBase分布式数据库
ai-workshop-2024/README_zh.md at main · oceanbase-devhub/ai-workshop-2024


