使用说明
一键集群巡检
使用 obdiag check 命令可帮助 OceanBase 数据库集群相关状态巡检,目前支持从系统内核参数、内部表等方式对 OceanBase 的集群进行分析,发现已存在或可能会导致集群出现异常问题的原因分析并提供运维建议。
巡检场景清单
一键巡检
check 命令组
# 默认执行除filter组里的所有巡检项
obdiag check

# 部署环境检查
obdiag check --cases=build_before

# 执行sysbench时的巡检任务集合
obdiag check --cases=sysbench_run

# 执行sysbench前的巡检任务集合
obdiag check --cases=sysbench_free

# obproxy 版本检查
obdiag check --obproxy-cases=proxy

# 针对ob-operator部署在k8s中的OB集群
obdiag check run --cases=k8s_basic
obdiag check run --cases=k8s_performance
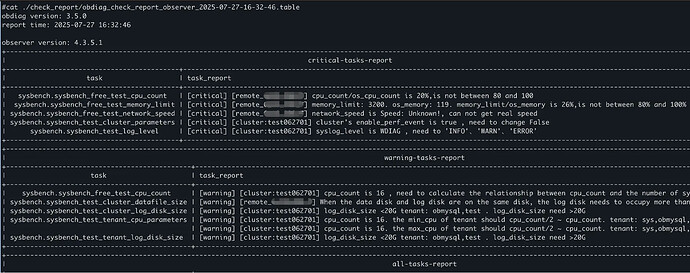
巡检报告样例
obdiag check run
sysbench 压测
obdiag check run --cases=sysbench_free/obdiag check run --cases=sysbench_run
一键分析功能
使用方法
obdiag analyze <analyze type> [options]
analyze type 包含如下:
- log:一键分析 OceanBase 的日志。
- flt_trace: 一键全链路诊断。
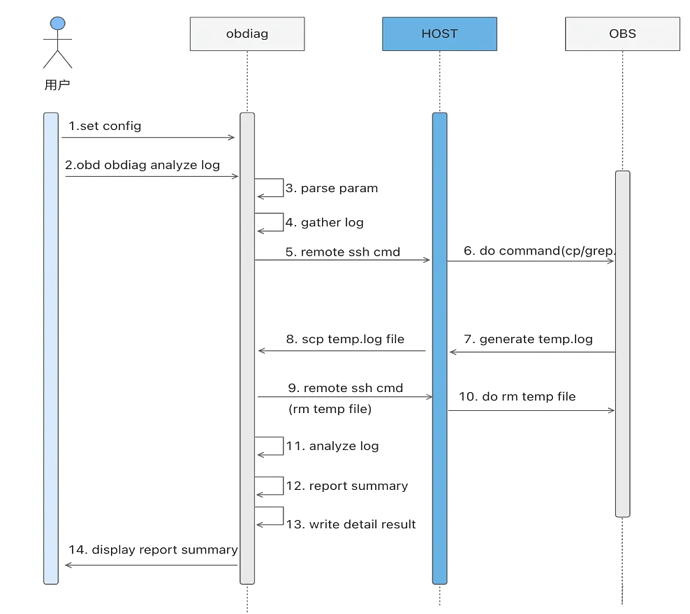
一键日志分析
使用该命令可以一键在线分析 OceanBase 集群的日志,或者通过 --files 开启离线分析模式。
使用示例
# 在线分析最近一小时的日志
# 该指令执行的时候会从远程主机上拉取最近一小时的日志进行分析,诊断出出现过的错误
obdiag analyze log --since 1h

# 在线分析最近 30 分钟的日志
# 该指令执行的时候会从远程主机上拉取最近 30 分钟的日志进行分析,诊断出出现过的错误
obdiag analyze log --since 30m

#一键日志分析指定时间区间的日志
obdiag analyze log --from “2023-10-08 10:25:00” --to “2023-10-08 11:30:00”

#一键离线分析本地文件夹中所有 observer 的日志
obdiag analyze log --files test/

# 一键离线分析指定的日志文件
obdiag analyze log --files observer.log.20230831142211247

# 一键离线分析日志文件夹
obdiag analyze log --files ./test/
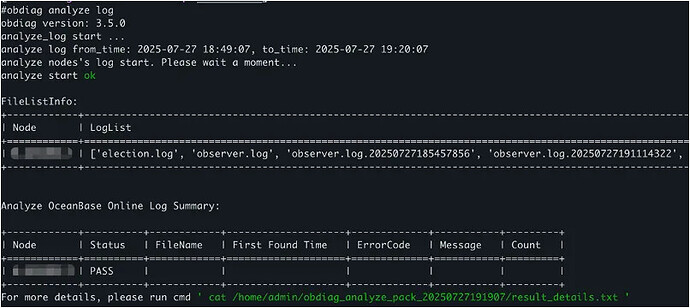
报告样例
未能发现问题的集群日志分析报告。
发现问题的集群日志分析报告。
一键全链路诊断
全链路诊断是什么:OceanBase 数据库是分布式数据库,因此调用链路复杂,当出现超时问题时,往往无法快速定位是 OceanBase 内部组件或是网络的问题,运维人员只能根据经验和 observer 日志进行分析。
OceanBase 内核在 4.0 新增了 trace.log 日志,可以用于分析全链路诊断。全链路有两条路径,一条是从应用通过客户端(JDBC 或 OCI 等)下发请求给 ODP(代理服务器)访问 OBServer,访问结果返回给应用;另一条是从应用通过客户端(JDBC 或 OCI 等)直接访问 OBServer,访问结果返回给应用。全链路诊断是对全链路所有组件进行问题定位的诊断。
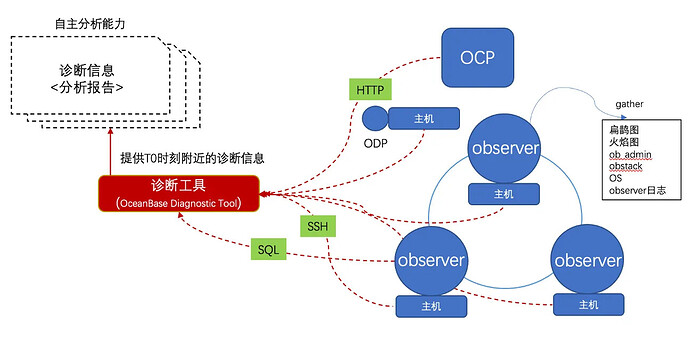
obdiag 全链路诊断做了什么:
obdiag 全链路诊断用法
obdiag analyze flt_trace [options]
Step 1: 查找疑似慢的 SQL
在 gv$ob_sql_audit 中,如果有明确的 SQL 语句可以通过 query_sql 查到疑似慢 SQL 的 flt_trace_id , 例如:
select query_sql, flt_trace_id
from oceanbase.gv$ob_sql_audit
where query_sql like 'select @@version_comment limit 1';
+----------------------------------+-------------------------------+
| query_sql                        | flt_trace_id                  |
+----------------------------------+-------------------------------+
| select @@version_comment limit 1 | 00060aa3-d607-f5f2-328b-388e  |
+----------------------------------+-------------------------------+
1 row in set (0.001 sec)
其中 flt_trace_id 为 00060aa3-d607-f5f2-328b-388e17f687cb 。
或者你也可从 OBProxy、OceanBase 的 trace.log 日志中找到 flt_trace_id 。
head trace.log

[2023-12-07 22:20:07.242229] [489640][T1_L0_G0][T1]
[YF2A0BA2DA7E-00060BEC28627BEF-0-0]
{"trace_id":"00060bec-275e-9832-e730-7c129f2182ac",
 "name":"close_das_task","id":"00060bec-2a20-bf9e-56c9-724cb467f859",
 "start_ts":1701958807240606,"end_ts":1701958807240607,
 "parent_id":"00060bec-2a20-bb5f-e03a-5da01aa3308b","is_follow":false}
其中 00060bec-275e-9832-e730-7c129f2182ac 就是其 flt_trace_id 。
Step 2: 执行全链路诊断命令
obdiag analyze flt_trace --flt_trace_id 000605b1-28bb-c15f-8ba0-1206bc
一键全链路诊断报告
root node id: 000605b1-28bb-c15f-8ba0-1206bc

TOP time-consuming leaf span:
+---+----------------------------------+-------------+------------------+
| ID| Span Name                        | Elapsed Time|      NODE        |
+---+----------------------------------+-------------+------------------+
| 18| px_task                          | 2.758 ms    | OBSERVER(x.x.x.1)|
| 5 | pc_get_plan                      | 52 μs       | OBSERVER(x.x.x.1)|
| 16| do_local_das_task                | 45 μs       | OBSERVER(x.x.x.1)|
| 10| do_local_das_task                | 17 μs       | OBSERVER(x.x.x.1)|
| 17| close_das_task                   | 14 μs       | OBSERVER(x.x.x.1)|
+---+----------------------------------+-------------+------------------+
Tags & Logs:
-------------------------------------
18 - px_task  Elapsed: 2.758 ms
     NODE:OBSERVER(x.x.x.1)
     tags: [{'group_id': 0}, {'qc_id': 1}, {'sqc_id': 0}...]
5 - pc_get_plan  Elapsed: 52 μs
    NODE:OBSERVER(x.x.x.1)
16 - do_local_das_task  Elapsed: 45 μs
     NODE:OBSERVER(x.x.x.3)
10 - do_local_das_task  Elapsed: 17 μs
     NODE:OBSERVER(x.x.x.1)
17 - close_das_task  Elapsed: 14 μs
     NODE:OBSERVER(x.x.x.3)
Details:
+---+----------------------------------+-------------+------------------+
| ID| Span Name                        | Elapsed Time|  NODE            |
+---+----------------------------------+-------------+------------------+
| 1 | TRACE                            | -           | -                |
| 2 | └─com_query_process              | 5.351 ms    | OBPROXY(x.x.x.1) |
| 3 |   └─mpquery_single_stmt          | 5.333 ms    | OBSERVER(x.x.x.1)|
| 4 |     ├─sql_compile                | 107 μs      | OBSERVER(x.x.x.1)|
| 5 |     │ └─pc_get_plan              | 52 μs       | OBSERVER(x.x.x.1)|
| 6 |     └─sql_execute                | 5.147 ms    | OBSERVER(x.x.x.1)|
| 7 |       ├─open                     | 87 μs       | OBSERVER(x.x.x.1)|
| 8 |       ├─response_result          | 4.945 ms    | OBSERVER(x.x.x.1)|
| 9 |       │ ├─px_schedule            | 2.465 ms    | OBSERVER(x.x.x.1)|
| 10|       │ │ ├─do_local_das_task    | 17 μs       | OBSERVER(x.x.x.1)|
| 11|       │ │ ├─px_task              | 2.339 ms    | OBSERVER(x.x.x.2)|
| 12|       │ │ │ ├─do_local_das_task  | 54 μs       | OBSERVER(x.x.x.2)|
| 13|       │ │ │ └─close_das_task     | 22 μs       | OBSERVER(x.x.x.2)|
| 14|       │ │ ├─do_local_das_task    | 11 μs       | OBSERVER(x.x.x.1)|
| 15|       │ │ ├─px_task              | 2.834 ms    | OBSERVER(x.x.x.3)|
| 16|       │ │ │ ├─do_local_das_task  | 45 μs       | OBSERVER(x.x.x.3)|
| 17|       │ │ │ └─close_das_task     | 14 μs       | OBSERVER(x.x.x.3)|
| 18|       │ │ └─px_task              | 2.758 ms    | OBSERVER(x.x.x.1)|
| 19|       │ ├─px_schedule            | 1 μs        | OBSERVER(x.x.x.1)|
| 20|       │ └─px_schedule            | 1 μs        | OBSERVER(x.x.x.1)|
| ..|       ......                     | ...         |  ......          |
+---+----------------------------------+-------------+------------------+

For more details, please run cmd
' cat analyze_flt_result/000605b1-28bb-c15f-8ba0-1206bcc08aa3.txt '
一键索引空间分析
分析示例
obdiag analyze index_space --tenant_name=test --table_name=student --index_name=name_index
输出如下:
analyze_index_space start ...
start query estimated_table_data_size, please wait some minutes... ok
+--------------------------------------------------------------------+
|                    estimated-index-space-report                    |
+--------------+------+-----------------------+----------------------+
|      ip      | port | estimated_index_space | available_disk_space |
+--------------+------+-----------------------+----------------------+
| 10.10.10.1   | 2882 |        2.57 KB        |       55.07 GB       |
| 10.10.10.3   | 2882 |        2.57 KB        |       55.07 GB       |
| 10.10.10.2   | 2882 |        3.50 KB        |       54.98 GB       |
+--------------+------+-----------------------+----------------------+
Trace ID: 9cbf48b0-6a9f-11ef-82ec-000c2934fb31
If you want to view detailed obdiag logs, please run: main.py display-trace 9cbf48b0-6a9f-11ef-82ec-000c2934fb31
obdiag analyze index_space--tenant_name=CHAT_BI --table_name=student --column_names=name
输出如下:
analyze_index_space start ...
start query estimated_table_data_size, please wait some minutes... ok
+--------------------------------------------------------------------+
|                    estimated-index-space-report                    |
+--------------+------+-----------------------+----------------------+
|      ip      | port | estimated_index_space | available_disk_space |
+--------------+------+-----------------------+----------------------+
| 10.10.10.1   | 2882 |        2.57 KB        |       55.07 GB       |
| 10.10.10.2   | 2882 |        3.50 KB        |       54.98 GB       |
| 10.10.10.3   | 2882 |        2.57 KB        |       55.07 GB       |
+--------------+------+-----------------------+----------------------+
Trace ID: e71c5cc2-6a9f-11ef-9373-000c2934fb31
If you want to view detailed obdiag logs, please run: main.py display-trace e71c5cc2-6a9f-11ef-9373-000c2934fb31
一键信息采集功能
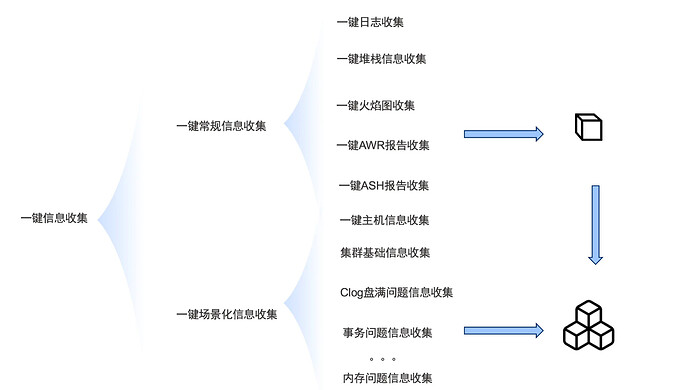
obdiag 的信息采集功能包括一键基础信息的采集和一键场景化信息采集。
一键常规信息的采集
使用说明
obdiag gather <gather type> [options]
gather type 包含如下:
- log:一键收集所属 OceanBase 集群的日志。
- sysstat:一键收集所属 OceanBase 集群主机信息。
- clog:一键收集所属 OceanBase 集群的 clog 日志。
- slog:一键收集所属 OceanBase 集群的 slog 日志。
- plan_monitor:一键收集所属 OceanBase 集群指定 trace_id 的并行 SQL 的执行详情信息。
- stack:一键收集所属 OceanBase 集群的堆栈信息。
- perf:一键收集所属 OceanBase 集群的 perf 信息。
- obproxy_log:一键收集所属 OceanBase 集群所依赖的 ODP 的日志。
- all:一键统一收集所属 OceanBase 集群的诊断信息,包括收集 OceanBase 集群日志、主机信息、OceanBase 集群堆栈信息、OceanBase 集群 perf 信息。
并行 SQL 信息采集和 CPU 高场景定位问题解析
并行 SQL 信息采集
plan_monitor 信息采集
obdiag gather plan_monitor --trace_id YBxxxxxx --env "{db_connect='-hxx -Pxx -uxx -pxx -Dxx'}"
结果解读
obdiag 收集的 SQL Monitor Report 如何解读
CPU 高场景定位问题
火焰图信息采集
obdiag gather perf
结果解读
obdiag 收集的 OceanBase 火焰图/扁鹊图解读
一键场景化信息采集
使用obdiag gather scenes 命令可以一键执行将某些问题场景所需要的排查信息统一捞回,解决分布式节点信息捞取难的痛点。
支持场景
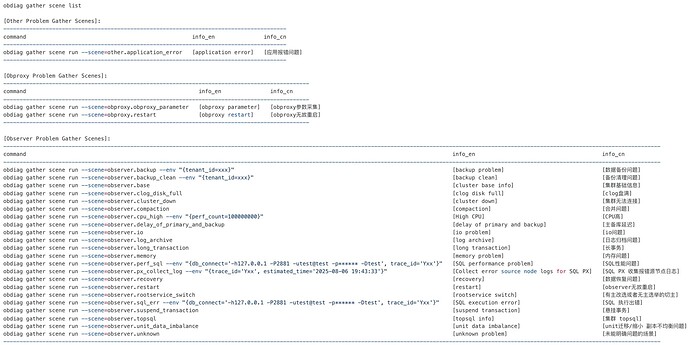
使用obdiag gather scene list 命令,可查看当前支持的场景。
一键场景信息采集
使用方法
obdiag gather scene run --scene={SceneName}
示例:
# 应用报错问题
obdiag gather scene run --scene=other.application_error

# obproxy 无故重启
obdiag gather scene run --scene=obproxy.restart

# 数据备份问题
obdiag gather scene run --scene=observer.backup

# 备份清理问题
obdiag gather scene run --scene=observer.backup_clean

# clog 盘满
obdiag gather scene run --scene=observer.clog_disk_full

# 合并问题
obdiag gather scene run --scene=observer.compaction

# CPU 高
obdiag gather scene run --scene=observer.cpu_high

# 主备库延迟
obdiag gather scene run --scene=observer.delay_of_primary_and_backup

# 日志归档问题
obdiag gather scene run --scene=observer.log_archive

# 长事务
obdiag gather scene run --scene=observer.long_transaction

# 内存问题
obdiag gather scene run --scene=observer.memory

# SQL 性能问题, 此处 env 中的 trace_id 对应 gv$ob_sql_audit 的 trace_id
obdiag gather scene run --scene=observer.perf_sql \
--env "{db_connect='-hxx -Pxx -uxx -pxx -Dxx', trace_id='xx'}"

# 数据恢复问题
obdiag gather scene run --scene=observer.recovery

# observer无故重启
obdiag gather scene run --scene=observer.restart

# 有主改选或者无主选举的切主
obdiag gather scene run --scene=observer.rootservice_switch

# SQL 执行出错,此处 env 中的 trace_id 对应 gv$ob_sql_audit 的 trace_id
obdiag gather scene run --scene=observer.sql_err \
--env "{db_connect='-hxx -Pxx -uxx -pxx -Dxx', trace_id='xx'}"

# 悬挂事务
obdiag gather scene run --scene=observer.suspend_transaction

# unit迁移/缩小 副本不均衡问题
obdiag gather scene run --scene=observer.unit_data_imbalance

# 未能明确问题的场景
obdiag gather scene run --scene=observer.unknown

# SQL PX 收集报错源节点日志,两个参数:
# trace_id:必填,会根据该trace_id去搜集 px 的日志
# estimated_time:选填,默认为当前时间,会搜这个时间点以前一周的日志
obdiag gather scene run --scene=observer.px_collect_log \
--env "{trace_id='Yxx', estimated_time='2024-04-19 14:46:17'}"
一键集群洞察
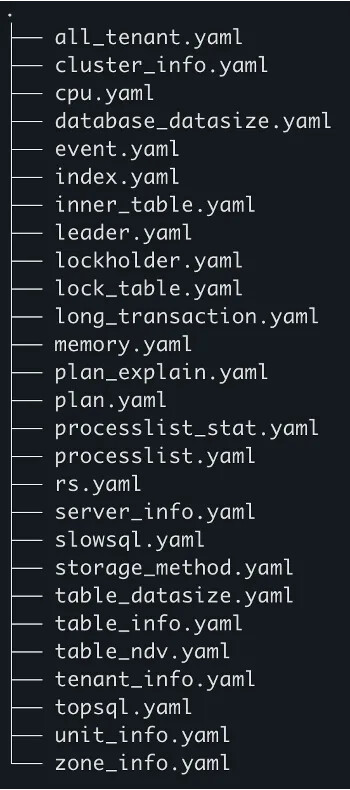
支持场景
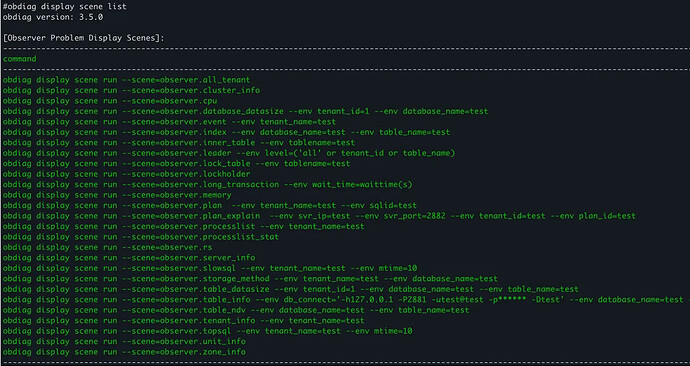
查看当前支持的场景
obdiag display scene list
场景化信息采集执行
obdiag display scene run --scene={SceneName}
示例
#集群概览信息洞察
obdiag display scene run --scene=observer.cluster_info

#集群节点信息洞察
obdiag display scene run --scene=observer.server_info
#集群 unit 信息洞察
obdiag display scene run --scene=observer.unit_info

#集群 Zone 信息洞察
obdiag display scene run --scene=observer.zone_info

#集群 RS 信息洞察
obdiag display scene run --scene=observer.rs

#集群租户信息洞察
obdiag display scene run --scene=observer.tenant_info

#集群事件信息洞察
obdiag display scene run --scene=observer.event

#集群锁信息洞察
obdiag display scene run --scene=observer.lockholder

#集群 topsql 信息洞察
obdiag display scene run --scene=observer.topsql

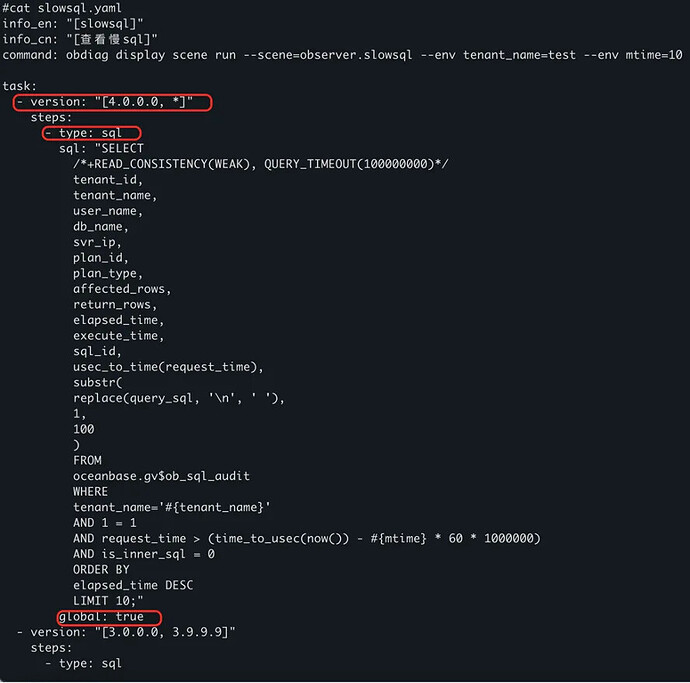
#集群 slowsql 信息洞察
obdiag display scene run --scene=observer.slowsql

#集群表信息洞察
obdiag display scene run --scene=observer.table_info

#集群 processlist 信息洞察
obdiag display scene run --scene=observer.processlist

#SQL 执行计划信息洞察
obdiag display scene run --scene=observer.plan

#数据库的磁盘占用大小信息洞察
obdiag display scene run --scene=observer.database_datasize

#数据库指定表的磁盘占用大小信息洞察
obdiag display scene run --scene=observer.table_datasize

#集群全量租户信息洞察
obdiag display scene run --scene=observer.all_tenant

#集群节点 CPU 使用信息洞察
obdiag display scene run --scene=observer.cpu

#内部表名模糊匹配信息洞察
obdiag display scene run --scene=observer.inner_table

#集群的 leader 信息洞察
obdiag display scene run --scene=observer.leader

#某张表上持有锁的信息洞察
obdiag display scene run --scene=observer.lock_table

#集群的长事务信息信息洞察
obdiag display scene run --scene=observer.long_transaction

#实际执行计划算子信息洞察
obdiag display scene run --scene=observer.plan_explain

#所有租户的内存信息洞察
obdiag display scene run --scene=observer.memory

#processlist 实时会话汇总信息洞察
obdiag display scene run --scene=observer.processlist_stat

#表/索引存储方式信息洞察
obdiag display scene run --scene=observer.storage_method

#表 NDV 信息洞察
obdiag display scene run --scene=observer.table_ndv

#表索引信息洞察
obdiag display scene run --scene=observer.index
一键根因分析功能
使用 obdiag rca 命令可帮助 OceanBase 数据库相关的诊断信息分析,目前支持对 OceanBase 的异常场景进行分析,找出可能导致问题的原因。
支持场景清单
obdiag rca list
obdiag rca run --scene=<scene_name>
scene_name 包含如下:
- disconnection:一键断连诊断,基于 OBProxy 的诊断日志。
- major_hold:一键卡合并诊断。
- lock_conflict:一键锁冲突诊断。
- ddl_disk_full:DDL 过程中报磁盘空间不足的问题诊断。
- clog_disk_full:clog 日志磁盘空间满的问题。
- clog_disk_full:clog 盘满场景根因分析
- log_error:日志流无主的场景根因分析
- ddl_failure:诊断 DDL 失败。
- index_ddl_error:建索引报错根因分析
- transaction_disconnection:针对事务断连场景的根因分析。
- transaction_execute_timeout:事务执行超时报错。
- transaction_not_ending:事务不结束场景,目前使用较为复杂。
- transaction_other_error:事务其他错误,除了目前已经列出的错误,比如错误码为:-4030,-4121,-4122,-4124,-4019。
- transaction_rollback:事务回滚报错。
- transaction_wait_timeout:事务等待超时报错。
- oms_full_trans:OMS 全量迁移异常场景根因分析。
- oms_obcdc:OMS obcdc 组件分析场景根因分析。
- suspend_transaction:悬挂事务根因分析。
- unit_gc:unit GC 问题排查。
- replay_hold:OceanBase 集群回放卡场景根因分析。
- memory_full:OceanBase 集群内存爆场景根因分析。
- delete_server_error:删除 OBServer 节点异常场景根因分析。
一键根因分析场景示例
执行 DDL 报错磁盘满 ddl_disk_full
使用示例
obdiag rca run --scene=ddl_disk_full --env tenant_name=test1 \
--env table_name=t555 --env action_type=add_index \
--env index_name=k1 --env database_name=xxxx
分析结果示例
从输出中可发现节点存在空间不足的问题,分别为 -4.32 TB 和 -4.31 TB ,由此为依据进行对应节点的扩容即可。
+----------------------------------------------------------------------------------------------------------+
|                                                  record                                                  |
+------+---------------------------------------------------------------------------------------------------+
| step | info                                                                                              |
+------+---------------------------------------------------------------------------------------------------+
|  1   | table_id is 510175                                                                                |
|  2   | tenant_id is 1002                                                                                 |
|  3   | on xxx.xxx.xxx.xxx:xxxx tablet_size: 4545356170733 as 4.13 TB                                     |
|  4   | on xxx.xxx.xxx.xxx:xxxx tablet_size: 4541074892527 as 4.13 TB                                     |
|  5   | estimated_size is [{'svr_ip': 'xxx.xxx.xxx.xxx', 'svr_port': xxxx, 'estimated_data_size':         |
|      | Decimal('4545356170733')}, {'svr_ip': 'xxx.xxx.xxx.xxx', 'svr_port': xxxx, 'estimated_data_size': |
|      | Decimal('4541074892527')}]                                                                        |
|  6   | index_name is idx_user_tx                                                                         |
|  7   | action_type is add_index                                                                          |
|  8   | index_table_id is 512088                                                                          |
|  9   | main_table_sum_of_data_length is 336                                                              |
|  10  | index_table_sum_of_data_length is 80                                                              |
|  11  | estimated_index_size without magnification 1082227659698B as 1007.90 GB from:                     |
|      | index_table_sum_of_data_length(80)/main_table_sum_of_data_length(336) *                           |
|      | estimated_data_size(4545356170733)                                                                |
|  12  | magnification is 5.5                                                                              |
|  13  | estimated_index_size with magnification is 5952252128339B as 5.41 TB                              |
|  14  | On target_server_ip is xxx.xxx.xxx.xxx, target_server_port is xxxx, estimiated_index_size is      |
|      | 5952252128339B as 5.41 TB                                                                         |
|  15  | estimated_index_size without magnification 1081208307744B as 1006.95 GB from:                     |
|      | index_table_sum_of_data_length(80)/main_table_sum_of_data_length(336) *                           |
|      | estimated_data_size(4541074892527)                                                                |
|  16  | magnification is 5.5                                                                              |
|  17  | estimated_index_size with magnification is 5946645692592B as 5.41 TB                              |
|  18  | On target_server_ip is xxx.xxx.xxx.xxx, target_server_port is xxxx, estimiated_index_size is      |
|      | 5946645692592B as 5.41 TB                                                                         |
|  19  | On target_serveris xxx.xxx.xxx.xxx:xxxx                                                           |
|  20  | target_server_estimated_size is 5952252128339B as 5.41 TB                                         |
|  21  | target_server_total_size is 3221225472000B as 2.93 TB                                             |
|  22  | target_server_used_size is 1696442875904B as 1.54 TB                                              |
|  23  | data_disk_usage_limit_percentage is 90                                                            |
|  24  | available_disk_space is 1202660048896B as 1.09 TB                                                 |
|  25  | available_disk_space - target_server_estimated_size is -4749592079443B as -4.32 TB                |
|  26  | On target_serveris xxx.xxx.xxx.xxx:xxxx                                                           |
|  27  | target_server_estimated_size is 5946645692592B as 5.41 TB                                         |
|  28  | target_server_total_size is 3221225472000B as 2.93 TB                                             |
|  29  | target_server_used_size is 1695073435648B as 1.54 TB                                              |
|  30  | data_disk_usage_limit_percentage is 90                                                            |
|  31  | available_disk_space is 1204029489152B as 1.10 TB                                                 |
|  32  | available_disk_space - target_server_estimated_size is -4742616203440B as -4.31 TB                |
+------+---------------------------------------------------------------------------------------------------+
断链接 disconnection
使用示例
obdiagrca run --scene=disconnection
分析结果示例
如下是执行命令后的断链排查结果,输出的事件类型为 CLIENT_VC_TRACE ,可判断出是客户端主动断开的连接,需要客户端配合去进行诊断。
+-----------------------------------------------------------------------------------------------------------+
|                                                   record                                                  |
+------+----------------------------------------------------------------------------------------------------+
| step | info                                                                                               |
+------+----------------------------------------------------------------------------------------------------+
|  1   | node:xxx.xxx.xxx obproxy_diagnosis_log:[2024-01-18 17:48:37.667014] [23173][Y0-00007FAA5183E710] |
|      | [CONNECTION](trace_type="CLIENT_VC_TRACE", connection_diagnosis={cs_id:1065, ss_id:4559,           |
|      | proxy_session_id:837192278409543969, server_session_id:3221810838,                                 |
|      | client_addr:"xxx.xxx.xxx.xxx:xxxx", server_addr:"xxx.xxx.xxx.xxx:2883", cluster_name:"obcluster",     |
|      | tenant_name:"sys", user_name:"root", error_code:-10010, error_msg:"An unexpected connection event  |
|      | received from client while obproxy reading request", request_cmd:"COM_SLEEP", sql_cmd:"COM_END",   |
|      | req_total_time(us):5315316}{vc_event:"VC_EVENT_EOS", user_sql:""})                                 |
|  2   | cs_id:1065, server_session_id:3221810838                                                           |
|  3   | trace_type:CLIENT_VC_TRACE                                                                         |
|  4   | error_code:-10010                                                                                  |
+------+----------------------------------------------------------------------------------------------------+
The suggest: Need client cooperation for diagnosis
OMS 全量迁移异常 oms_full_trans
使用示例:
配置分析场景,并配置组件 ID 的执行示例如下:
obdiag rca run --scene=oms_full_trans --env component_id=xxxxxx
obdiag 集群配置信息:
使用 OMS 相关诊断时(--scene 名以 oms 开头)需要配置 OMS 集群信息,配置文件地址默认为 ~/.obdiag/config.yml ,也可以通过 --config 选项传递配置。修改配置文件的示例如下:
oms:
  oms_name: oms_cluster
  servers:
    nodes:
      - ip: 127.0.0.1
    global:
your username
password if need
your ssh port, default 22
your ssh-key file path if need
ssh_type choice [remote, docker, kube] default remote
container_name for ssh_type is docker
The directory for oms log
      log_path: /home/admin/logs
The directory for oms task's run path
      run_path: /home/ds/run
The directory for oms task's store path
      store_path: /home/ds/store


