报错信息如下:
[admin@localhost example]$ obd cluster component add obtest -c all-components.yaml
Get local repositories and plugins ok
Open ssh connection ok
[ERROR] OBD-1019: component oceanbase-ce is already in cluster
[ERROR] Failed to add components for obtest
See https://www.oceanbase.com/product/ob-deployer/error-codes .
Trace ID: 2abcd2c2-2008-11f0-a3b5-000c2918c312
If you want to view detailed obd logs, please run: obd display-trace 2abcd2c2-2008-11f0-a3b5-000c2918c312
安装过程步骤:
[admin@localhost example]$ pwd
/home/admin/oceanbase-all-in-one/obd/usr/obd/example
[admin@localhost example]$ obd cluster deploy obtest -c mini-single-example.yaml #部署
±-------------------------------------------------------------------------------------------+
| Packages |
±-------------±--------±-----------------------±-----------------------------------------+
| Repository | Version | Release | Md5 |
±-------------±--------±-----------------------±-----------------------------------------+
| oceanbase-ce | 4.3.5.1 | 101000042025031818.el7 | 8826bc816ae660198f9ca5fd7e96d93c1ce4fc84 |
±-------------±--------±-----------------------±-----------------------------------------+
Repository integrity check ok
Load param plugin ok
Open ssh connection ok
Initializes observer work home ok
Parameter check ok
Remote oceanbase-ce-4.3.5.1-101000042025031818.el7-8826bc816ae660198f9ca5fd7e96d93c1ce4fc84 repository install ok
Remote oceanbase-ce-4.3.5.1-101000042025031818.el7-8826bc816ae660198f9ca5fd7e96d93c1ce4fc84 repository lib check ok
obtest deployed
Please execute obd cluster start obtest to start
Trace ID: 7119ce12-2028-11f0-914a-000c2918c312
If you want to view detailed obd logs, please run: obd display-trace 7119ce12-2028-11f0-914a-000c2918c312
[admin@localhost example]$ obd cluster start obtest #启动
Get local repositories ok
Load cluster param plugin ok
Open ssh connection ok
[WARN] OBD-1011: (10.1.1.190) The recommended value of fs.aio-max-nr is 1048576 (Current value: 65536)
[WARN] OBD-1007: (10.1.1.190) The recommended number of max user processes is 655350 (Current value: 120000)
[WARN] OBD-1017: (10.1.1.190) The value of the “vm.max_map_count” must be within [327600, 1310720] (Current value: 65530, Recommended value: 655360)
[WARN] OBD-1017: (10.1.1.190) The value of the “fs.file-max” must be greater than 6573688 (Current value: 761326, Recommended value: 6573688)
[WARN] OBD-1012: (10.1.1.190) clog and data use the same disk (/)
cluster scenario: htap
Start observer ok
observer program health check ok
Connect to observer 10.1.1.190:2881 ok
Cluster bootstrap ok
obshell start ok
obshell program health check ok
obshell bootstrap ok
Connect to observer 10.1.1.190:2881 ok
Wait for observer init ok
±---------------------------------------------+
| oceanbase-ce |
±-----------±--------±-----±------±-------+
| ip | version | port | zone | status |
±-----------±--------±-----±------±-------+
| 10.1.1.190 | 4.3.5.1 | 2881 | zone1 | ACTIVE |
±-----------±--------±-----±------±-------+
obclient -h10.1.1.190 -P2881 -uroot -p’oldboy123.com’ -Doceanbase -A
obtest running
Trace ID: 9dc45d4c-2028-11f0-81f9-000c2918c312
If you want to view detailed obd logs, please run: obd display-trace 9dc45d4c-2028-11f0-81f9-000c2918c312
[admin@localhost example]$ obd cluster display obtest #查看 obtest 集群状态
Get local repositories and plugins ok
Open ssh connection ok
Connect to observer 10.1.1.190:2881 ok
Wait for observer init ok
±---------------------------------------------+
| oceanbase-ce |
±-----------±--------±-----±------±-------+
| ip | version | port | zone | status |
±-----------±--------±-----±------±-------+
| 10.1.1.190 | 4.3.5.1 | 2881 | zone1 | ACTIVE |
±-----------±--------±-----±------±-------+
obclient -h10.1.1.190 -P2881 -uroot -p’oldboy123.com’ -Doceanbase -A
Trace ID: 3f237920-2029-11f0-8f55-000c2918c312
If you want to view detailed obd logs, please run: obd display-trace 3f237920-2029-11f0-8f55-000c2918c312
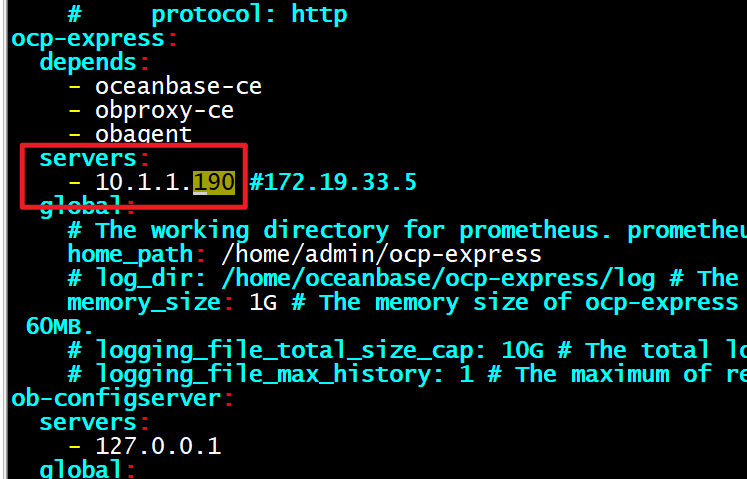
[admin@localhost example]$ obd cluster component add obtest -c all-components.yaml #执行组件加载
Get local repositories and plugins ok
Open ssh connection ok
[ERROR] OBD-1019: component oceanbase-ce is already in cluster
[ERROR] Failed to add components for obtest
See https://www.oceanbase.com/product/ob-deployer/error-codes .
Trace ID: 7773c0be-2029-11f0-8cdf-000c2918c312
If you want to view detailed obd logs, please run: obd display-trace 7773c0be-2029-11f0-8cdf-000c2918c312
[admin@localhost example]$