

最近有使用OB新做一个大数据实时数仓OLAP分析的需求,以往都是用手动方式离线部署的集群。本次使用OBD进行部署,花个周末总结一下OBD及OCP的搭建过程,对于第一次部署弯路还是挺多的,感谢苏琅老师和李作群老师,没有您们孜孜不倦的指导,就没有这篇文章。
OBD 全称为 OceanBase Deployer,是 OceanBase 开源软件的安装部署工具。OBD 同时也是包管理器,可以用来管理 OceanBase 所有的开源软件。
文档地址
OceanBase 云平台(OceanBase Cloud Platform,简称 OCP)是一款为 OceanBase 数据库集群量身打造的企业级管理平台,兼容 OceanBase 所有主流版本。OCP 提供对 OceanBase 集群的图形化管理能力,包括数据库组件及相关资源(主机、网络和软件包等)的全生命周期管理、故障恢复、性能诊断、监控告警等。 旨在协助客户更加高效地管理 OceanBase 集群,降低企业的 IT 运维成本和用户的学习成本。
文档地址
1.主机准备
主机配置
| ip | 主机名 | CPU | 内存 | 硬盘 | 计划部署应用 |
|---|---|---|---|---|---|
| 192.168.18.18 | node18 | 24核心 | 64G | 500G | OBD、OBServer、OBProxy、OCP |
| 192.168.28.44 | cmagent44 | 24核心 | 64G | 500G | OBServer |
| 192.168.28.53 | node53 | 24核心 | 64G | 500G | OBServer |
硬盘配置
文件系统        容量  已用  可用 已用% 挂载点
devtmpfs         32G     0   32G    0% /dev
tmpfs            32G   44K   32G    1% /dev/shm
tmpfs            32G  1.2M   32G    1% /run
tmpfs            32G     0   32G    0% /sys/fs/cgroup
/dev/sda2        40G   17G   21G   46% /
/dev/sda1       477M  145M  304M   33% /boot
/dev/sda4       502G  7.3G  470G    2% /data
cm_processes     32G  576K   32G    1% /run/cloudera-scm-agent/process
2.用户准备
创建admin用户:
# 创建用户(/data目录可用空间大)
[root@node18 ~]$ useradd -d /data/home/admin admin -m
# 制作软连接,否则OCP部署目录上有问题
[root@node18 ~]$ ln -s /data/home/admin /home/admin
# 给 admin 用户添加 sudo 权限,用于OBD部署集群,且OCP会检查该项
[root@node18 ~]$ chmod u+w /etc/sudoers
[root@node18 ~]$ echo 'admin ALL=(ALL) NOPASSWD: ALL' >> /etc/sudoers
[root@node18 ~]$ chmod u-w /etc/sudoers
# 自免密码登录制作,用于OBD部署集群
[root@node18 ~]$ su - admin
[admin@node18 ~]$ ssh-keygen -t rsa
[admin@node18 ~]$ cp   ~/.ssh/id_rsa.pub   ~/.ssh/authorized_keys
SSH密匙制作及配置
可使用xshell制作密匙对,应对密码无法登录的生产环境,用于OCP管理集群
# 私钥 用于填写在OCP中
-----BEGIN RSA PRIVATE KEY-----
MIIEoQIBAA....省略2048....BNk7sQ==
-----END RSA PRIVATE KEY-----
# 公钥 放在主机上
ssh-rsa AAAAB3NzaC1....省略....P4fCfow== rsa 2048-021123
制作完毕后,所有机器/data/home/admin/.ssh/authorized_keys文件内容如下

3.部署OBD
在192.168.18.18主机上部署obd
[admin@node18 ~]$ sudo yum install -y yum-utils
[admin@node18 ~]$ sudo yum-config-manager --add-repo https://mirrors.aliyun.com/oceanbase/OceanBase.repo
[admin@node18 ~]$ sudo yum install -y ob-deploy
# 使用模板部署
[admin@node18 ~]$ cp /usr/obd/example/mini-distributed-with-obproxy-example.yaml .
# 编辑配置文件
[admin@node18 ~]$ vim ~/mini-distributed-with-obproxy-example.yaml
部署配置文件内容如下:
其中密码是必填的,是OCP部署的检查项,注意proxyro_password和observer_sys_password值是相同的
## Only need to configure when remote login is required
user:
   username: admin
#   password: your password if need
   key_file: /data/home/admin/.ssh/id_rsa
   port: 22822
#   timeout: ssh connection timeout (second), default 30
oceanbase-ce:
  servers:
    - name: server1
      # Please don't use hostname, only IP can be supported
      ip: 192.168.18.18
    - name: server2
      ip: 192.168.28.44
    - name: server3
      ip: 192.168.28.53
  global:
    # Please set devname as the network adaptor's name whose ip is  in the setting of severs.
    # if set severs as "127.0.0.1", please set devname as "lo"
    # if current ip is 192.168.1.10, and the ip's network adaptor's name is "eth0", please use "eth0"
    devname: em2
    cluster_id: 1
    # please set memory limit to a suitable value which is matching resource.
    memory_limit: 42G # The maximum running memory for an observer
    system_memory: 2G # The reserved system memory. system_memory is reserved for general tenants. The default value is 30G.
    datafile_size: 150G # Size of the data file.
    log_disk_size: 120G # The size of disk space used by the clog files.
    cpu_count: 20
    production_mode: false
    syslog_level: WARN # System log level. The default value is INFO.
    enable_syslog_wf: false # Print system logs whose levels are higher than WARNING to a separate log file. The default value is true.
    enable_syslog_recycle: true # Enable auto system log recycling or not. The default value is false.
    max_syslog_file_count: 4 # The maximum number of reserved log files before enabling auto recycling. The default value is 0.
    # observer cluster name, consistent with obproxy's cluster_name
    appname: obcluster
    root_password: Root_***@sys_pw_real # root user password, can be empty
    proxyro_password: Root_***@sys_pw_proxy # proxyro user pasword, consistent with obproxy's observer_sys_password, can be empty
  server1:
    mysql_port: 2881 # External port for OceanBase Database. The default value is 2881. DO NOT change this value after the cluster is start
ed.
    rpc_port: 2882 # Internal port for OceanBase Database. The default value is 2882. DO NOT change this value after the cluster is started
.
    #  The working directory for OceanBase Database. OceanBase Database is started under this directory. This is a required field.
    home_path: /data/home/admin/observer
    # The directory for data storage. The default value is $home_path/store.
    data_dir: /data/home/admin/data
    # The directory for clog, ilog, and slog. The default value is the same as the data_dir value.
    redo_dir: /data/home/admin/redo
    zone: zone1
  server2:
    mysql_port: 2881 # External port for OceanBase Database. The default value is 2881. DO NOT change this value after the cluster is start
ed.
    rpc_port: 2882 # Internal port for OceanBase Database. The default value is 2882. DO NOT change this value after the cluster is started
.
    #  The working directory for OceanBase Database. OceanBase Database is started under this directory. This is a required field.
    home_path: /data/home/admin/observer
    # The directory for data storage. The default value is $home_path/store.
    data_dir: /data/home/admin/data
    # The directory for clog, ilog, and slog. The default value is the same as the data_dir value.
    redo_dir: /data/home/admin/redo
    zone: zone2
  server3:
    mysql_port: 2881 # External port for OceanBase Database. The default value is 2881. DO NOT change this value after the cluster is start
ed.
    rpc_port: 2882 # Internal port for OceanBase Database. The default value is 2882. DO NOT change this value after the cluster is started
.
    #  The working directory for OceanBase Database. OceanBase Database is started under this directory. This is a required field.
    home_path: /data/home/admin/observer
    # The directory for data storage. The default value is $home_path/store.
    data_dir: /data/home/admin/data
    # The directory for clog, ilog, and slog. The default value is the same as the data_dir value.
    redo_dir: /data/home/admin/redo
    zone: zone3
obproxy-ce:
  # Set dependent components for the component.
  # When the associated configurations are not done, OBD will automatically get the these configurations from the dependent components.
  #depends:
  #  - oceanbase-ce
  servers:
    - 192.168.18.18
  global:
    listen_port: 2883 # External port. The default value is 2883.
    prometheus_listen_port: 2884 # The Prometheus port. The default value is 2884.
    home_path: /data/home/admin/obproxy
    # oceanbase root server list
    # format: ip:mysql_port;ip:mysql_port. When a depends exists, OBD gets this value from the oceanbase-ce of the depends.
    rs_list: 192.168.18.18:2881;192.168.28.44:2881;192.168.28.53:2881
    enable_cluster_checkout: false
    # observer cluster name, consistent with oceanbase-ce's appname. When a depends exists, OBD gets this value from the oceanbase-ce of th
e depends.
    cluster_name: obcluster
    skip_proxy_sys_private_check: true
    enable_strict_kernel_release: false
    obproxy_sys_password: Root_***@proxysys_pw_real # obproxy sys user password, can be empty. When a depends exists, OBD gets this value from
the oceanbase-ce of the depends.
    observer_sys_password: Root_***@sys_pw_proxy # proxyro user pasword, consistent with oceanbase-ce's proxyro_password, can be empty. When a
depends exists, OBD gets this value from the oceanbase-ce of the depends.
开始部署:
# 如有部署失败,铲除原有部署
[admin@node18 ~]$ obd cluster stop obcluster
[admin@node18 ~]$ obd cluster destroy obcluster
[admin@node18 ~]$ rm -rf /data/home/admin/.obd/
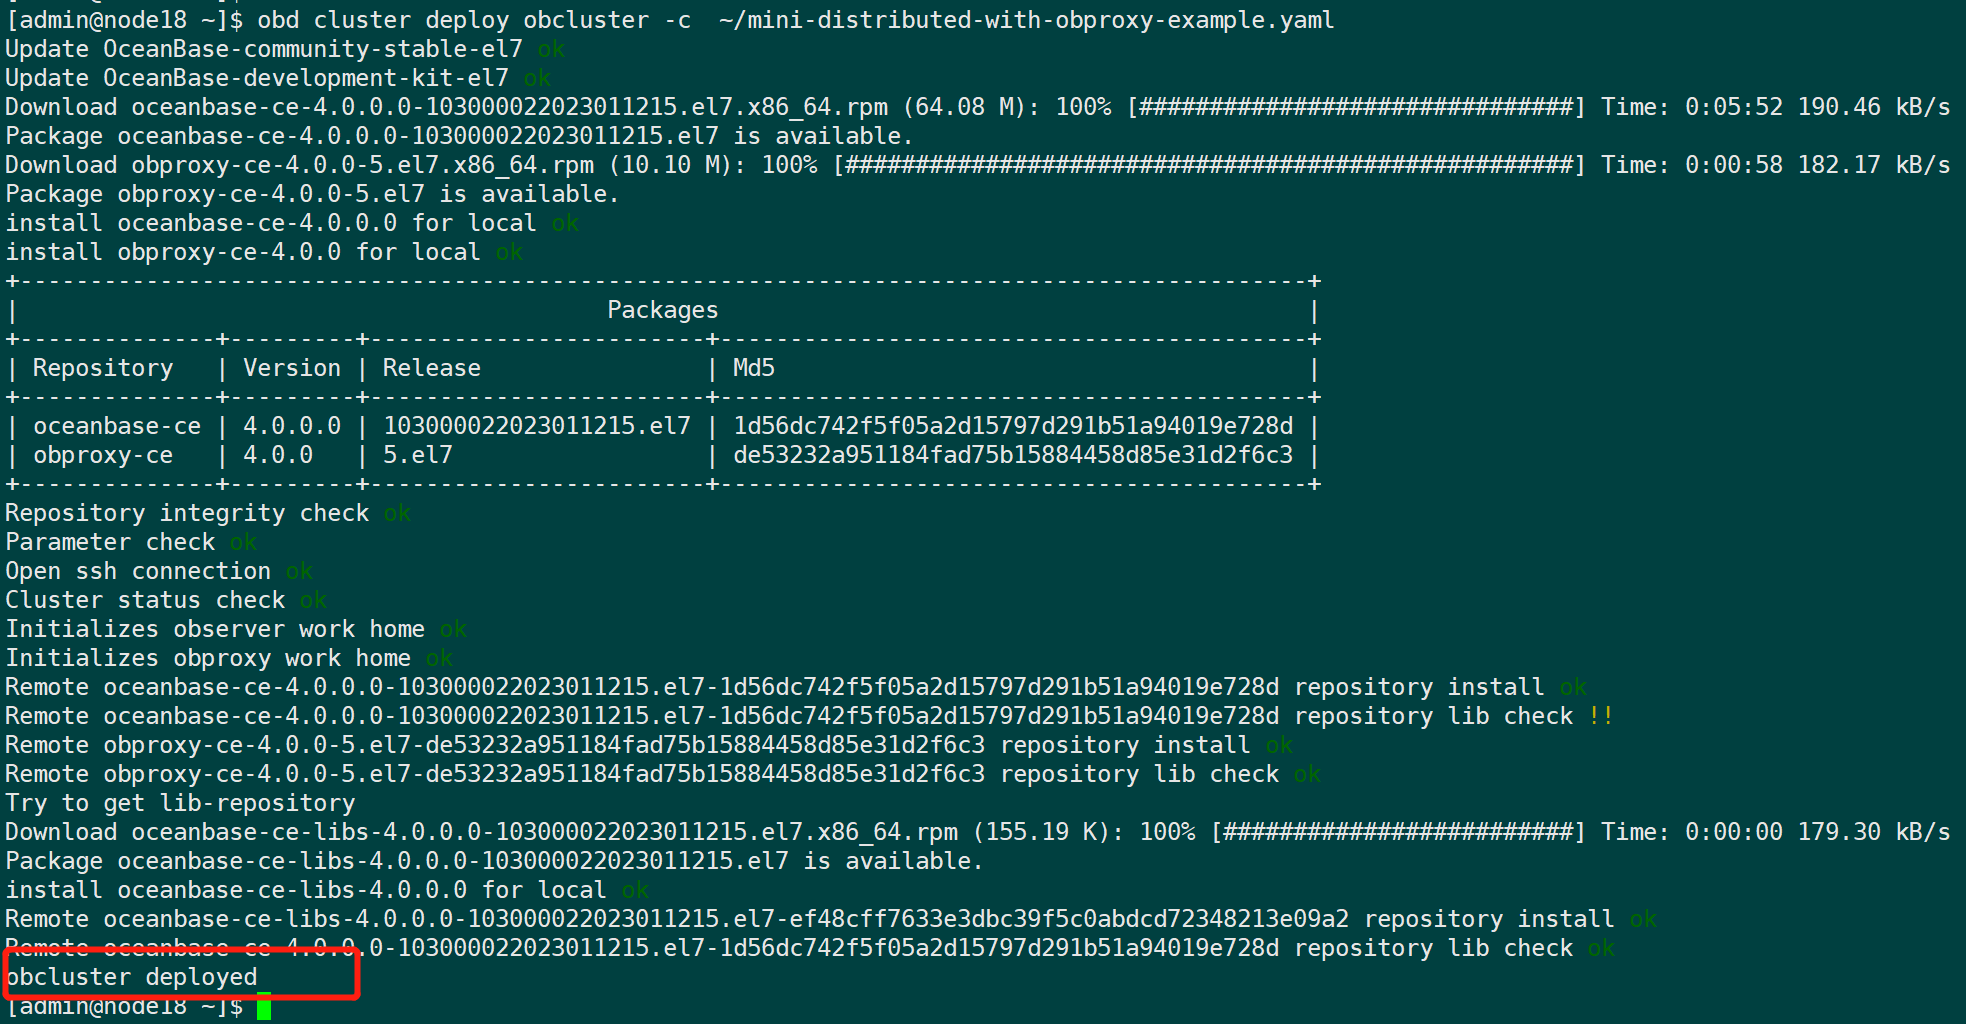
# 开始部署
[admin@node18 ~]$ obd cluster deploy obcluster -c ~/mini-distributed-with-obproxy-example.yaml
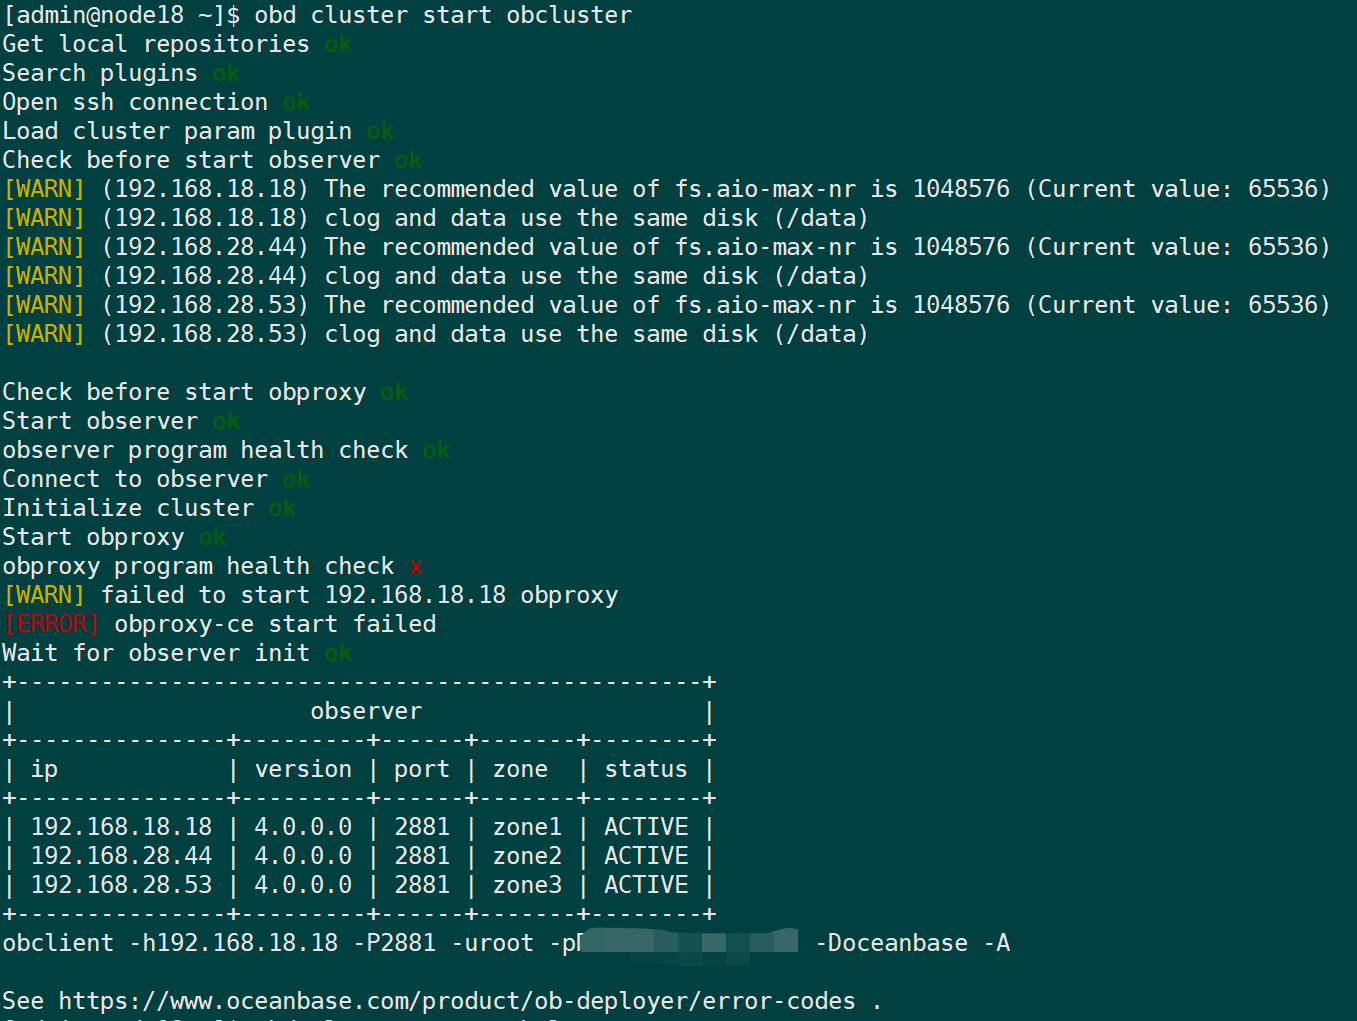
[admin@node18 ~]$ obd cluster start obcluster
# 如obproxy健康检查失败,再启动一次可解决健康检查失败,健康检查失败集群未进入running状态将影响OCP部署前健康检查。
[admin@node18 ~]$ obd cluster start obcluster
# 如需调整内存、cpu、硬盘等参数,可通过以下命令进行调整参数,根据返回的提示进行重启或重载的操作
[admin@node18 ~]$ obd cluster edit-config obcluster
部署:
启动第一次(启动失败,但看端口是都启动了的,但通过2883端口root@sys无法连接oceanbase数据库):
赶紧启动第二次(确保都启动成功才能通过OCP部署检查,重装多次,在无意中再启动一次才发现第二次可以启动成功):

连接数据库:

4.部署OCP
数据库准备
环境检查 参见完整文档
[admin@node18 ~]$ obd cluster check4ocp obcluster -c oceanbase-ce -V 4.0.0

设置IDC机房信息
[admin@node18 ~]$ mysql -h192.168.18.18 -uroot@sys#obcluster -P2883 -pRoot_***@sys_pw_real -c -A oceanbase
mysql> alter system modify zone 'zone1' idc 'cd';
mysql> alter system modify zone 'zone2' idc 'cd';
mysql> alter system modify zone 'zone3' idc 'cd';
再次检查

创建用于OCP部署的租户及用户
参考文档 其中授权弯路参考文档
[admin@node18 ~]$ mysql -h192.168.18.18 -uroot@sys#obcluster -P2883 -pRoot_***@sys_pw_real -c -A oceanbase
# observer log 自动清理设置
mysql> ALTER SYSTEM SET enable_syslog_recycle=True;
mysql> ALTER SYSTEM SET max_syslog_file_count=10;
# 创建 meta_tenant 租户
mysql> CREATE RESOURCE UNIT unit002 MAX_CPU 8,MEMORY_SIZE '10G';
mysql> CREATE RESOURCE POOL pool002 UNIT='unit002',UNIT_NUM=1,ZONE_LIST=('zone1','zone2','zone3');
mysql> CREATE TENANT IF NOT EXISTS meta_tenant
    ->      CHARSET='utf8mb4',
    ->      PRIMARY_ZONE='zone1,zone2,zone3',
    ->      RESOURCE_POOL_LIST=('pool002')
    ->      SET ob_tcp_invited_nodes='%';
# 设置 meta_tenant 租户白名单(其他租户不需要这步骤)
mysql> ALTER TENANT meta_tenant SET VARIABLES ob_tcp_invited_nodes='%';

# 创建meta_tenant租户下meta_user及monitor_user用户
[admin@node18 ~]$ mysql -h192.168.18.18 -uroot@meta_tenant#obcluster -P2883 -c -A oceanbase;
mysql> CREATE USER 'meta_user' IDENTIFIED BY 'meta_password_***';
mysql> CREATE USER 'monitor_user' IDENTIFIED BY 'monitor_password_***';
# 设置用户白名单(其他用户不需要这步骤)
mysql> set global ob_tcp_invited_nodes = '%';
mysql> grant all on *.* to meta_user;
mysql> grant all on *.* to monitor_user;
# 创建数据库
mysql> create database meta_database;
mysql> create database monitor_database;
# 授权数据库给用户
mysql> GRANT ALL PRIVILEGES ON meta_database.* TO meta_user WITH GRANT OPTION;
mysql> GRANT ALL PRIVILEGES ON monitor_database.* TO monitor_user WITH GRANT OPTION;
安装docker
[root@node18 ~]$ yum install -y docker
[root@node18 ~]$ groupadd docker
# admin用户需加入到docker用户组才能操作docker
[root@node18 ~]$ gpasswd -a admin docker
[root@node18 ~]$ systemctl restart docker
安装OCP
下载ocp-4.0.0-ce-bp1-x86_64.tar.gz安装包并解压,解压后如下

配置config.yaml文件:
# OCP deploy config
# Note:
# Do not use 127.0.0.1 or hostname as server address
# When a server has both public ip and private ip, if private ip is connectable, use private ip for faster connection
# If a vip is configured, it should be already created and bonded to the right server and port, the installation script won't do any work w
ith vip maintainance, just use it to connect to the service

# Ignore precheck errors
# It's recommanded to not ignore precheck errors
precheck_ignore: true

# Create an obcluster as OCP's metadb
create_metadb_cluster: false

# Clean OCP's metadb cluster when uninstall
clean_metadb_cluster: true

# Metadb cluster deploy config
ob_cluster: #这个配置不被执行,因为 create_metadb_cluster: false
  name: obcluster
  home_path: /home/admin/oceanbase
  root_password: 'Root_***@sys_pw_real'
  # The directory for data storage, it's recommanded to use an independent path
  data_path: /data/home/admin/observer/data/
  # The directory for clog, ilog, and slog, it's recommanded to use an independent path.
  redo_path: /data/home/admin/observer/data/log1
  sql_port: 2881
  rpc_port: 2882
  zones:
    - name: zone1
      servers:
        - 192.168.18.18
  ## custom obd config for obcluster
  custom_config:
     - key: devname
       value: em2
     - key: cpu_count
       value: 18
     - key: memory_limit
       value: 46G
     - key: system_memory
       value: 1G
     - key: __min_full_resource_pool_memory
       value: 5368709120
     - key: datafile_maxsize
       value: 150100010001000
     - key: datafile_next
       value: 150100010001000

  # Meta user info
  meta:
    tenant: meta_tenant
    user: meta_user
    password: meta_password_***
    database: meta_database
    cpu: 2
    # Memory configs in GB, 4 means 4GB
    memory: 4

  # Monitor user info
  monitor:
    tenant: monitor_tenant
    user: monitor_user
    password: monitor_password_***
    database: monitor_database
    cpu: 4
    # Memory configs in GB, 8 means 8GB
    memory: 8

# Obproxy to connect metadb cluster
obproxy:
  home_path: /home/admin/obproxy
  port: 2883
  servers:
    - 192.168.18.18

  ## custom config for obproxy
  # custom_config:
  #   - key: clustername
  #     value: obcluster


  ## Vip is optional, if vip is not configured, one of obproxy servers's address will be used
  # vip:
  #   address: 1.1.1.1
  #   port: 2883

# Ssh auth config
ssh:
  port: 22822
  user: admin
  # auth method, support password and pubkey
  auth_method: pubkey
  # key_file: /data/home/admin/.ssh/id_rsa
  timeout: 30
  password: password
#
# OCP config
ocp:
  # ocp container's name
  name: 'ocp'

  # OCP process listen port and log dir on host
  process:
    port: 8080
    log_dir: /tmp/ocp/log
  servers:
    - 192.168.18.18
  # OCP container's resource
  resource:
    cpu: 4
    # Memory configs in GB, 8 means 8GB
    memory: 8
  # Vip is optional, if vip is not configured, one of ocp servers's address will be used
  # vip:
  #   address: 1.1.1.1
  #   port: 8080
  # OCP basic auth config, used when upgrade ocp
  auth:
    user: admin
    password: aaAA11__
  options:
    # enable front-end tracking, non-business sensitive data such as system information, user behavior, and front-end anomalies will be col
lected to improve the product experience and stability
    enable_web_tracking: true
  # OCP metadb config, for ocp installation, if "create_metadb_cluster" is configured true, this part will be replaced with the configurati
on of metadb cluster and obproxy
  metadb:
    host: 192.168.18.18
    port: 2883
    meta_user: meta_user@meta_tenant#obcluster
    meta_password: meta_password_***
    meta_database: meta_database
    monitor_user: monitor_user@meta_tenant#obcluster
    monitor_password: monitor_password_***
    monitor_database: monitor_database
开始部署
[admin@node18 ocp-4.0.0-ce-bp1-x86_64]$ ./ocp_installer.sh install -c config.yaml -i ./ocp-installer.tar.gz -o ./ocp.tar.gz

这里需要等待30分钟左右…

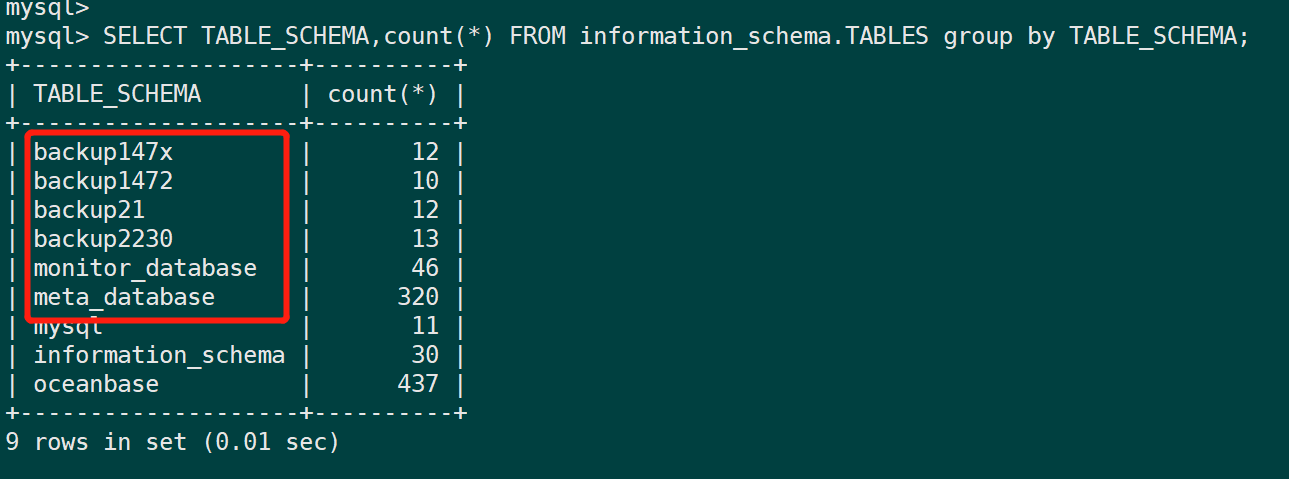
查看建表情况
mysql> SELECT TABLE_SCHEMA,count(*) FROM information_schema.TABLES group by TABLE_SCHEMA;
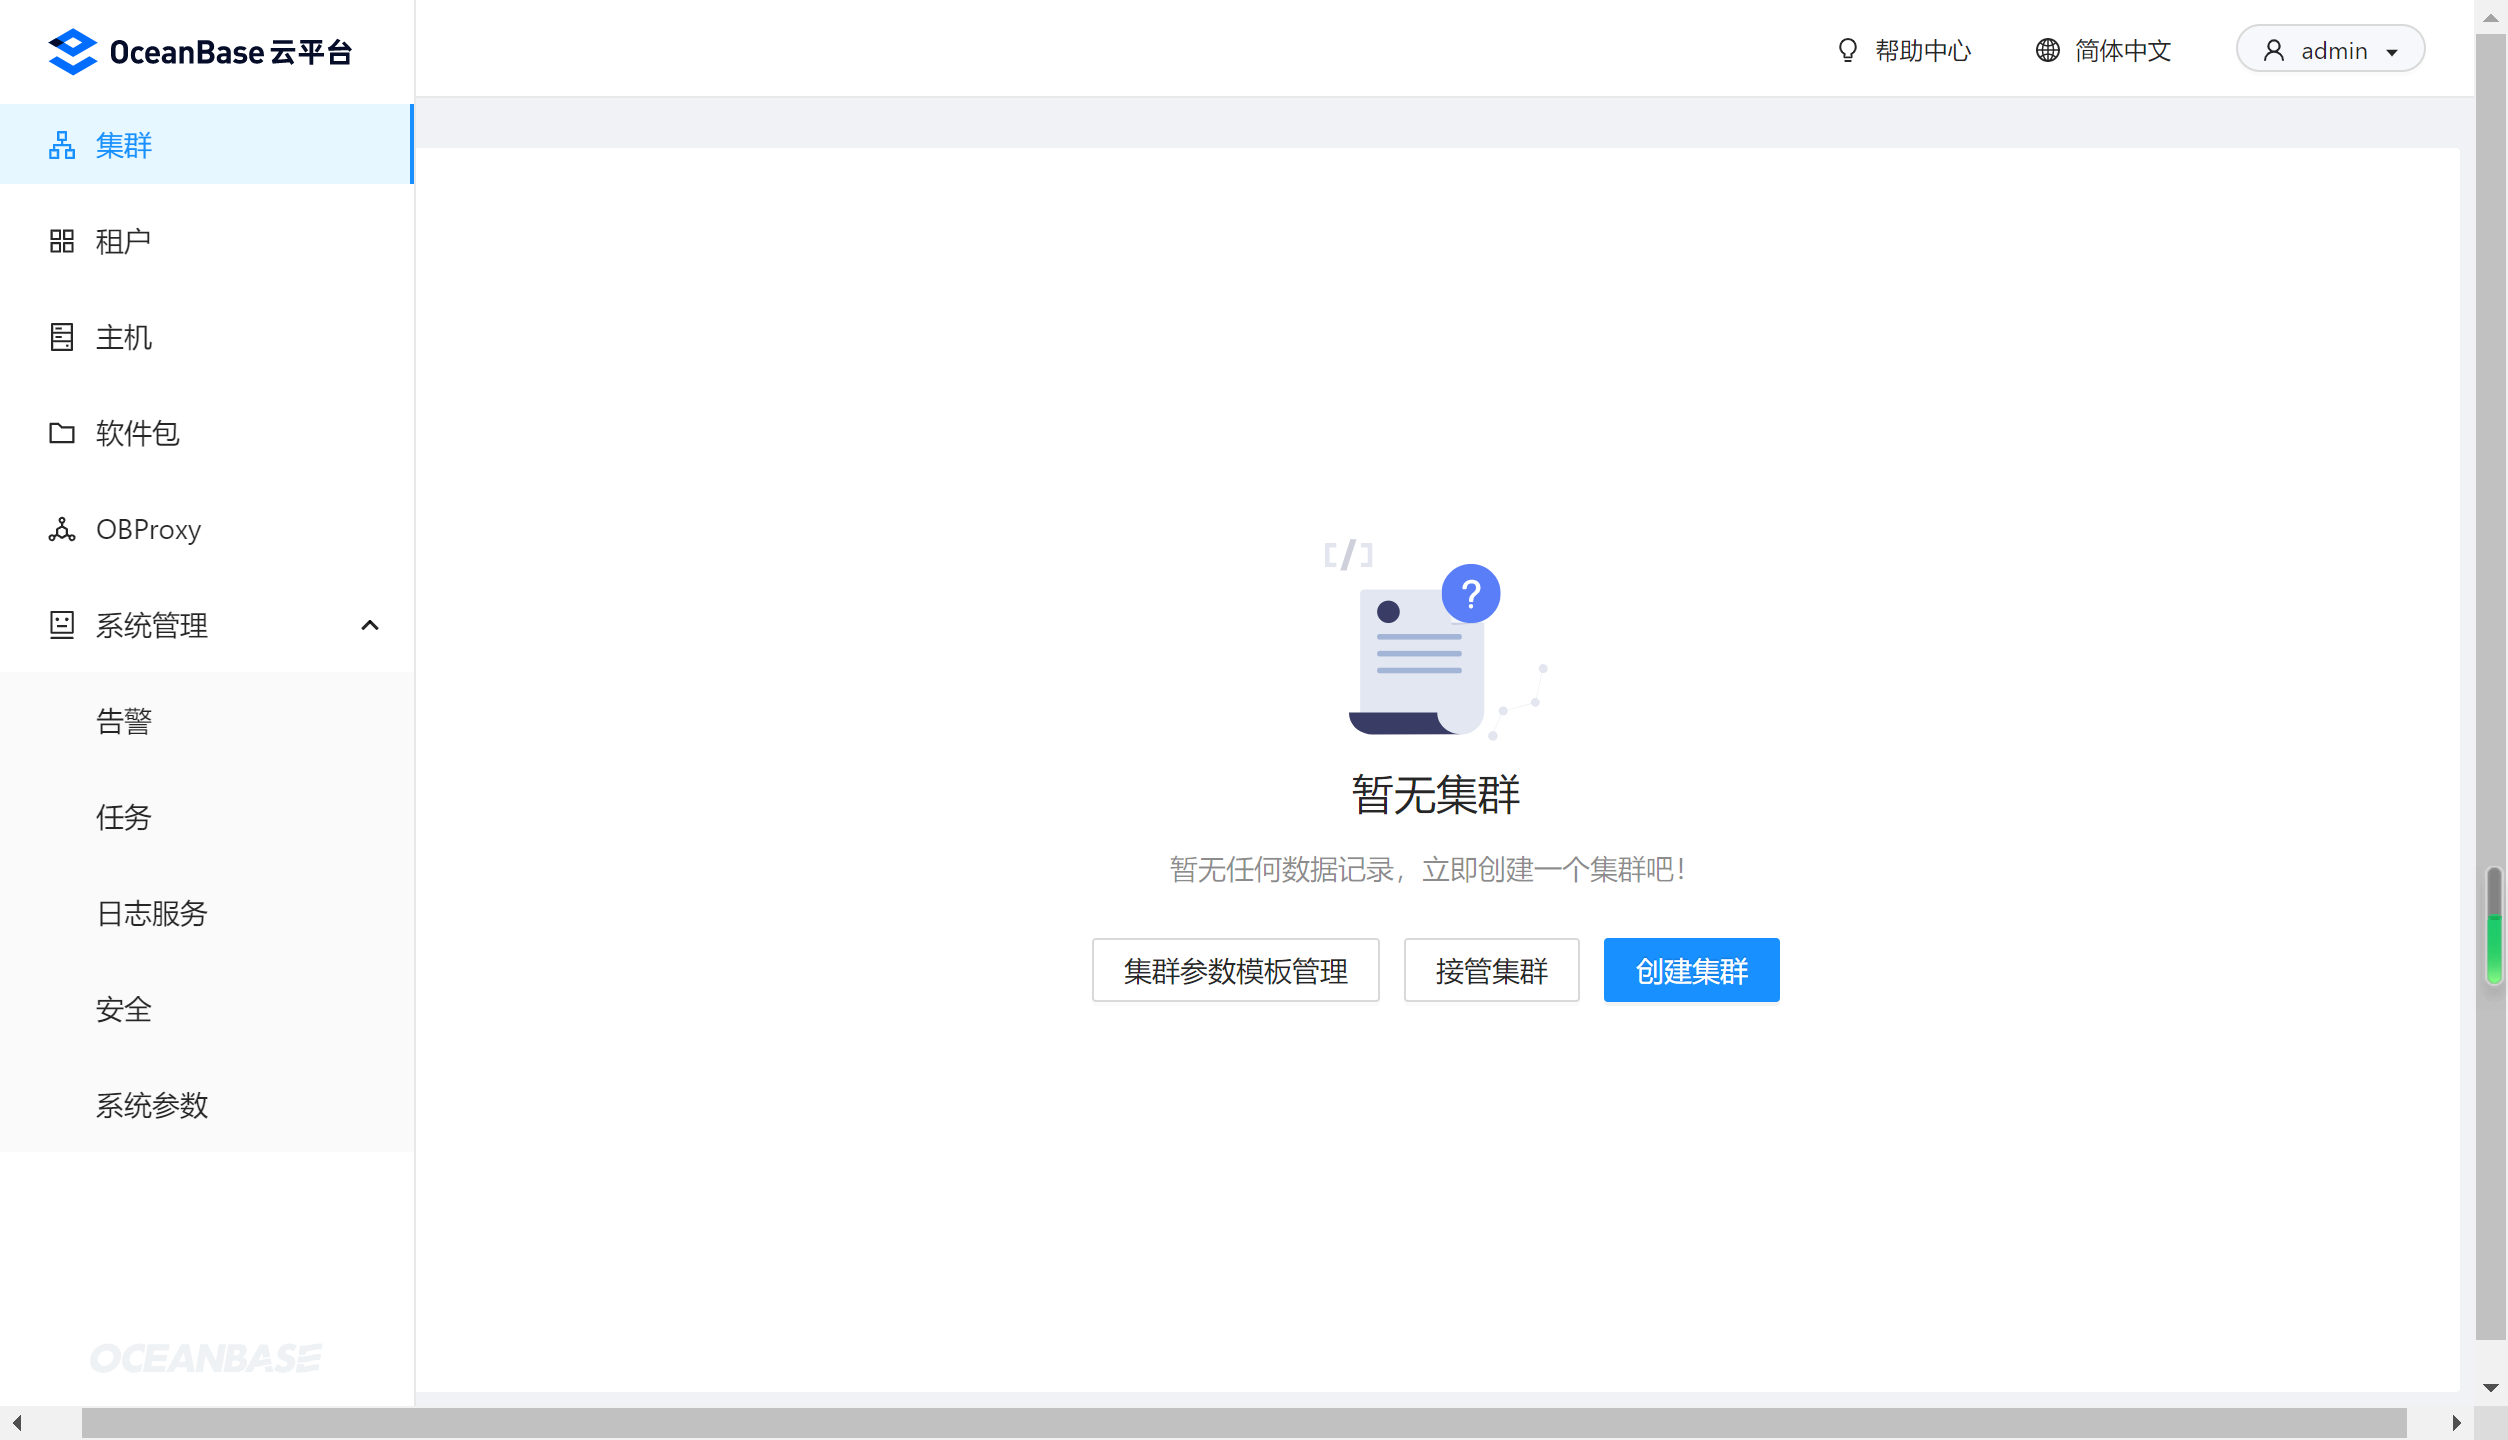
登录配置OCP
地址:http://192.668.18.18:8080/login
用户名:admin
初始密码:aaAA11__

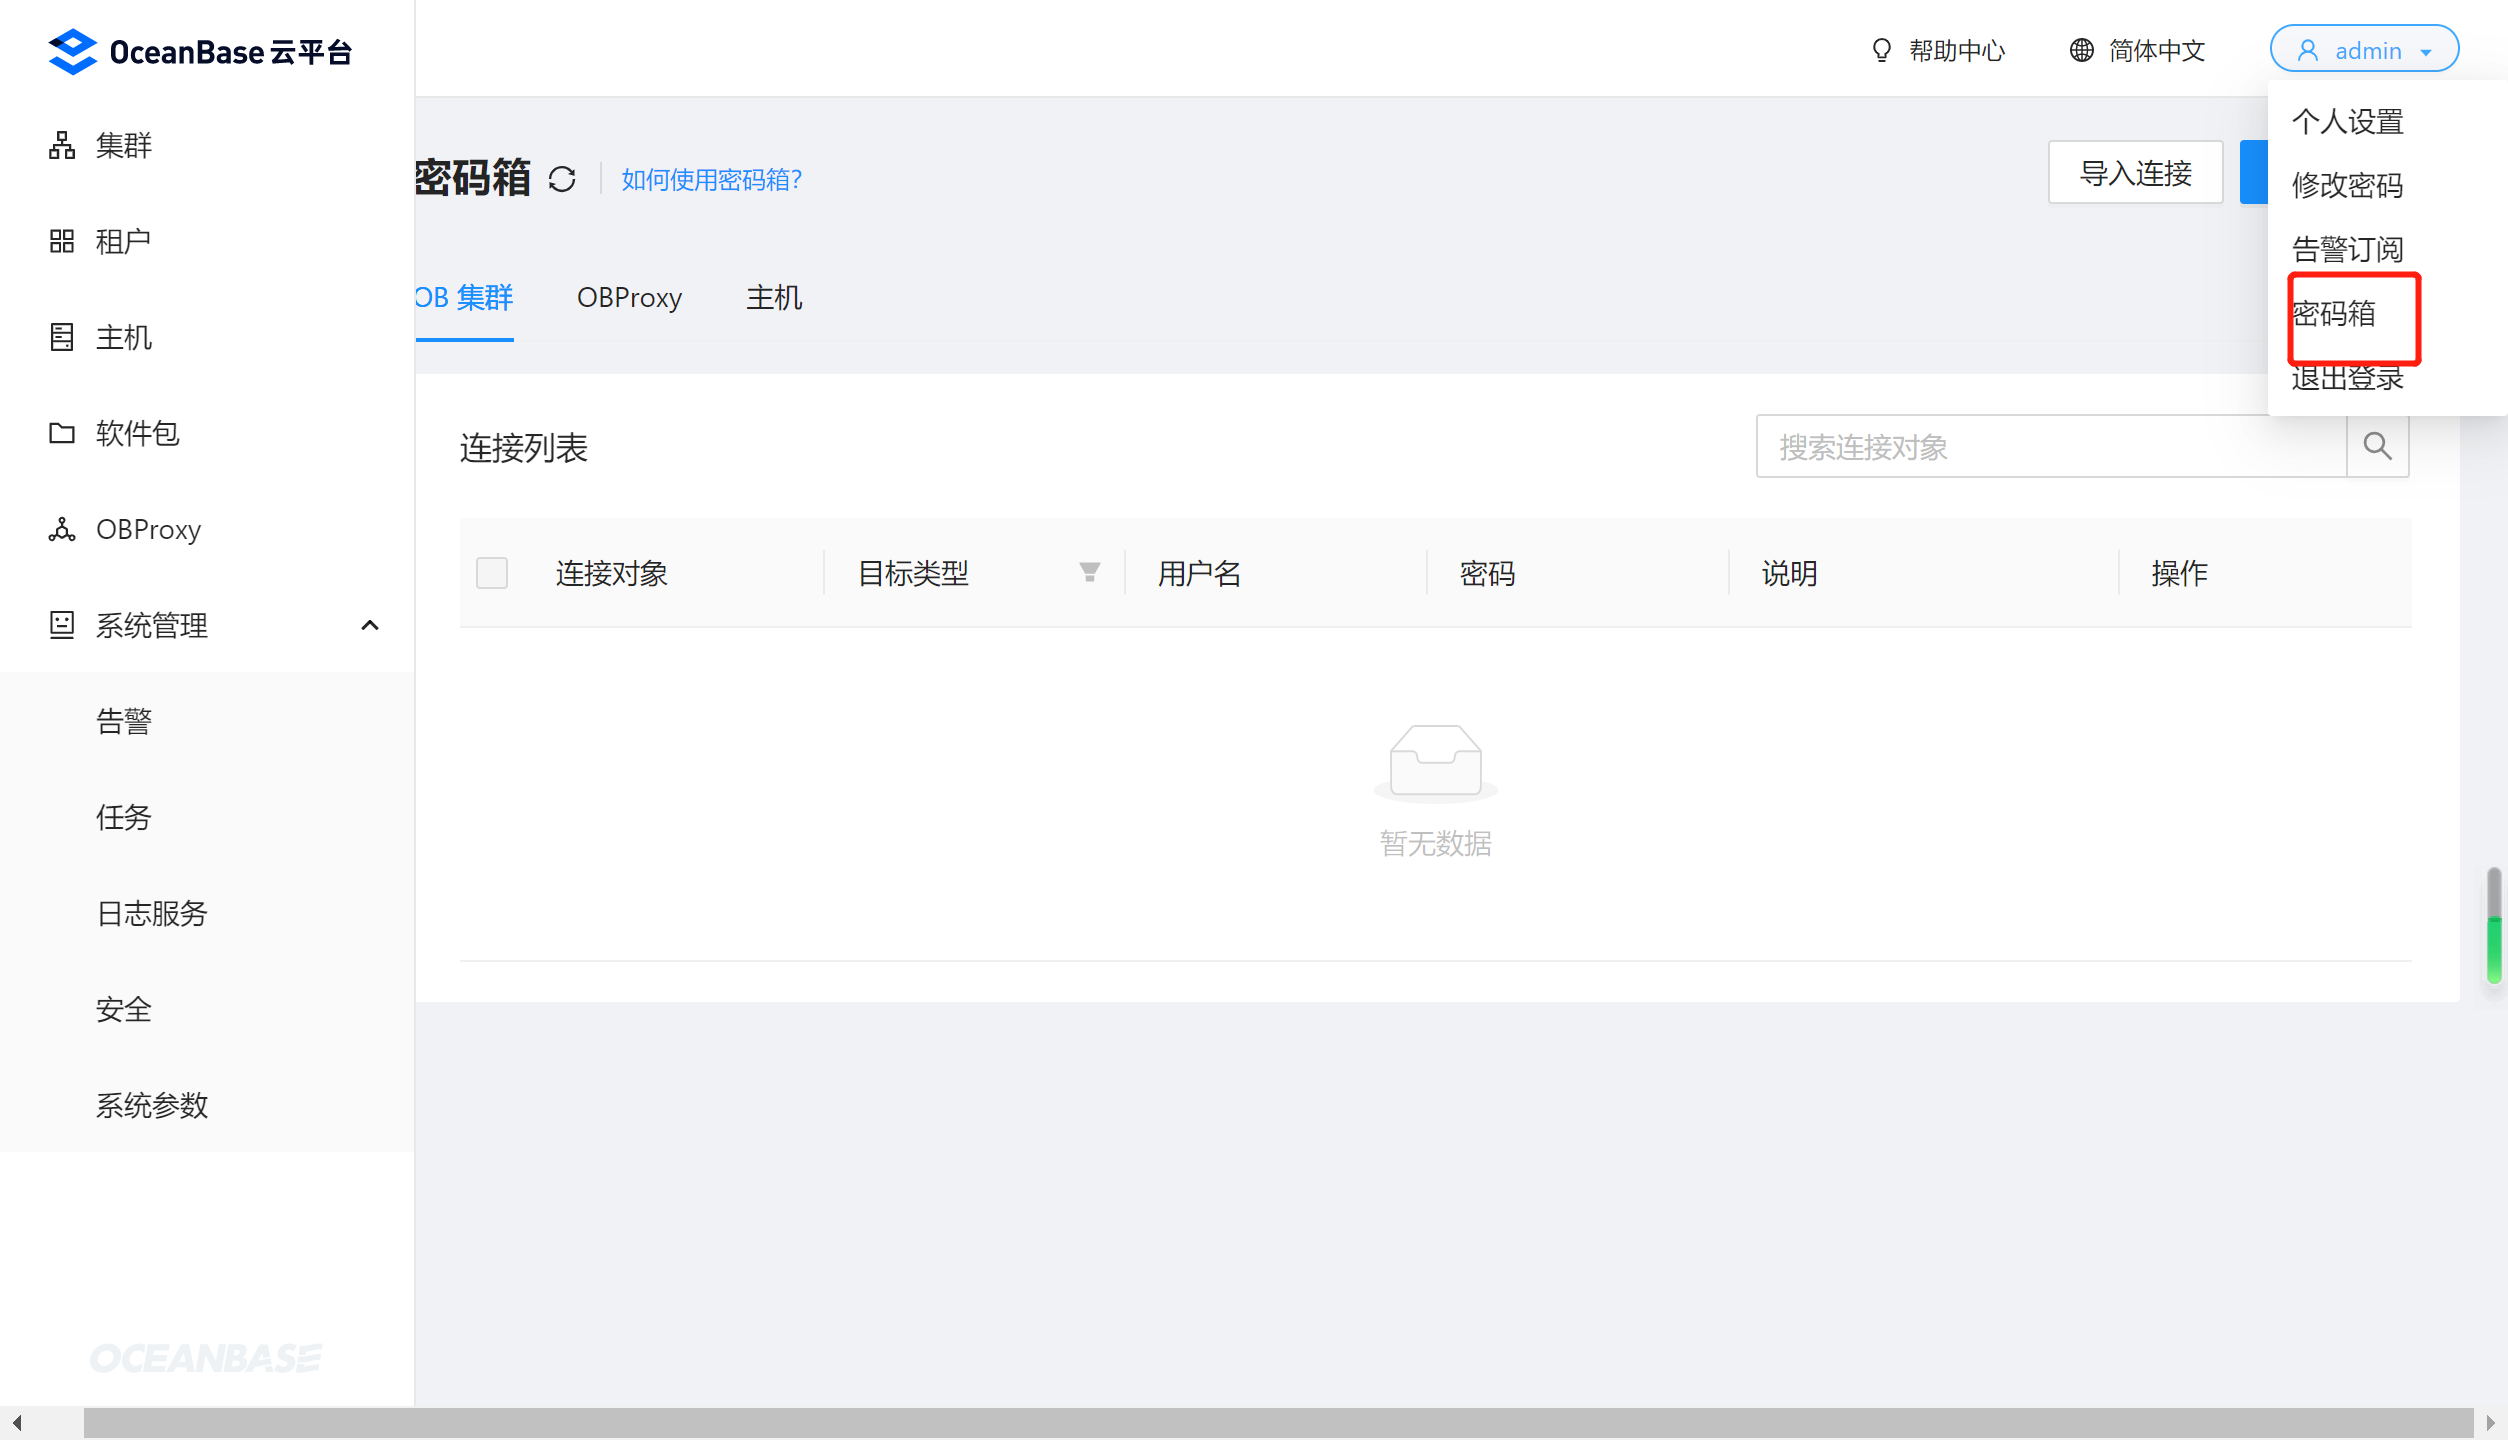
修改密码重新登陆后:
进入密码箱
新建连接凭据-主机

接管集群

选择OBProxy连接集群
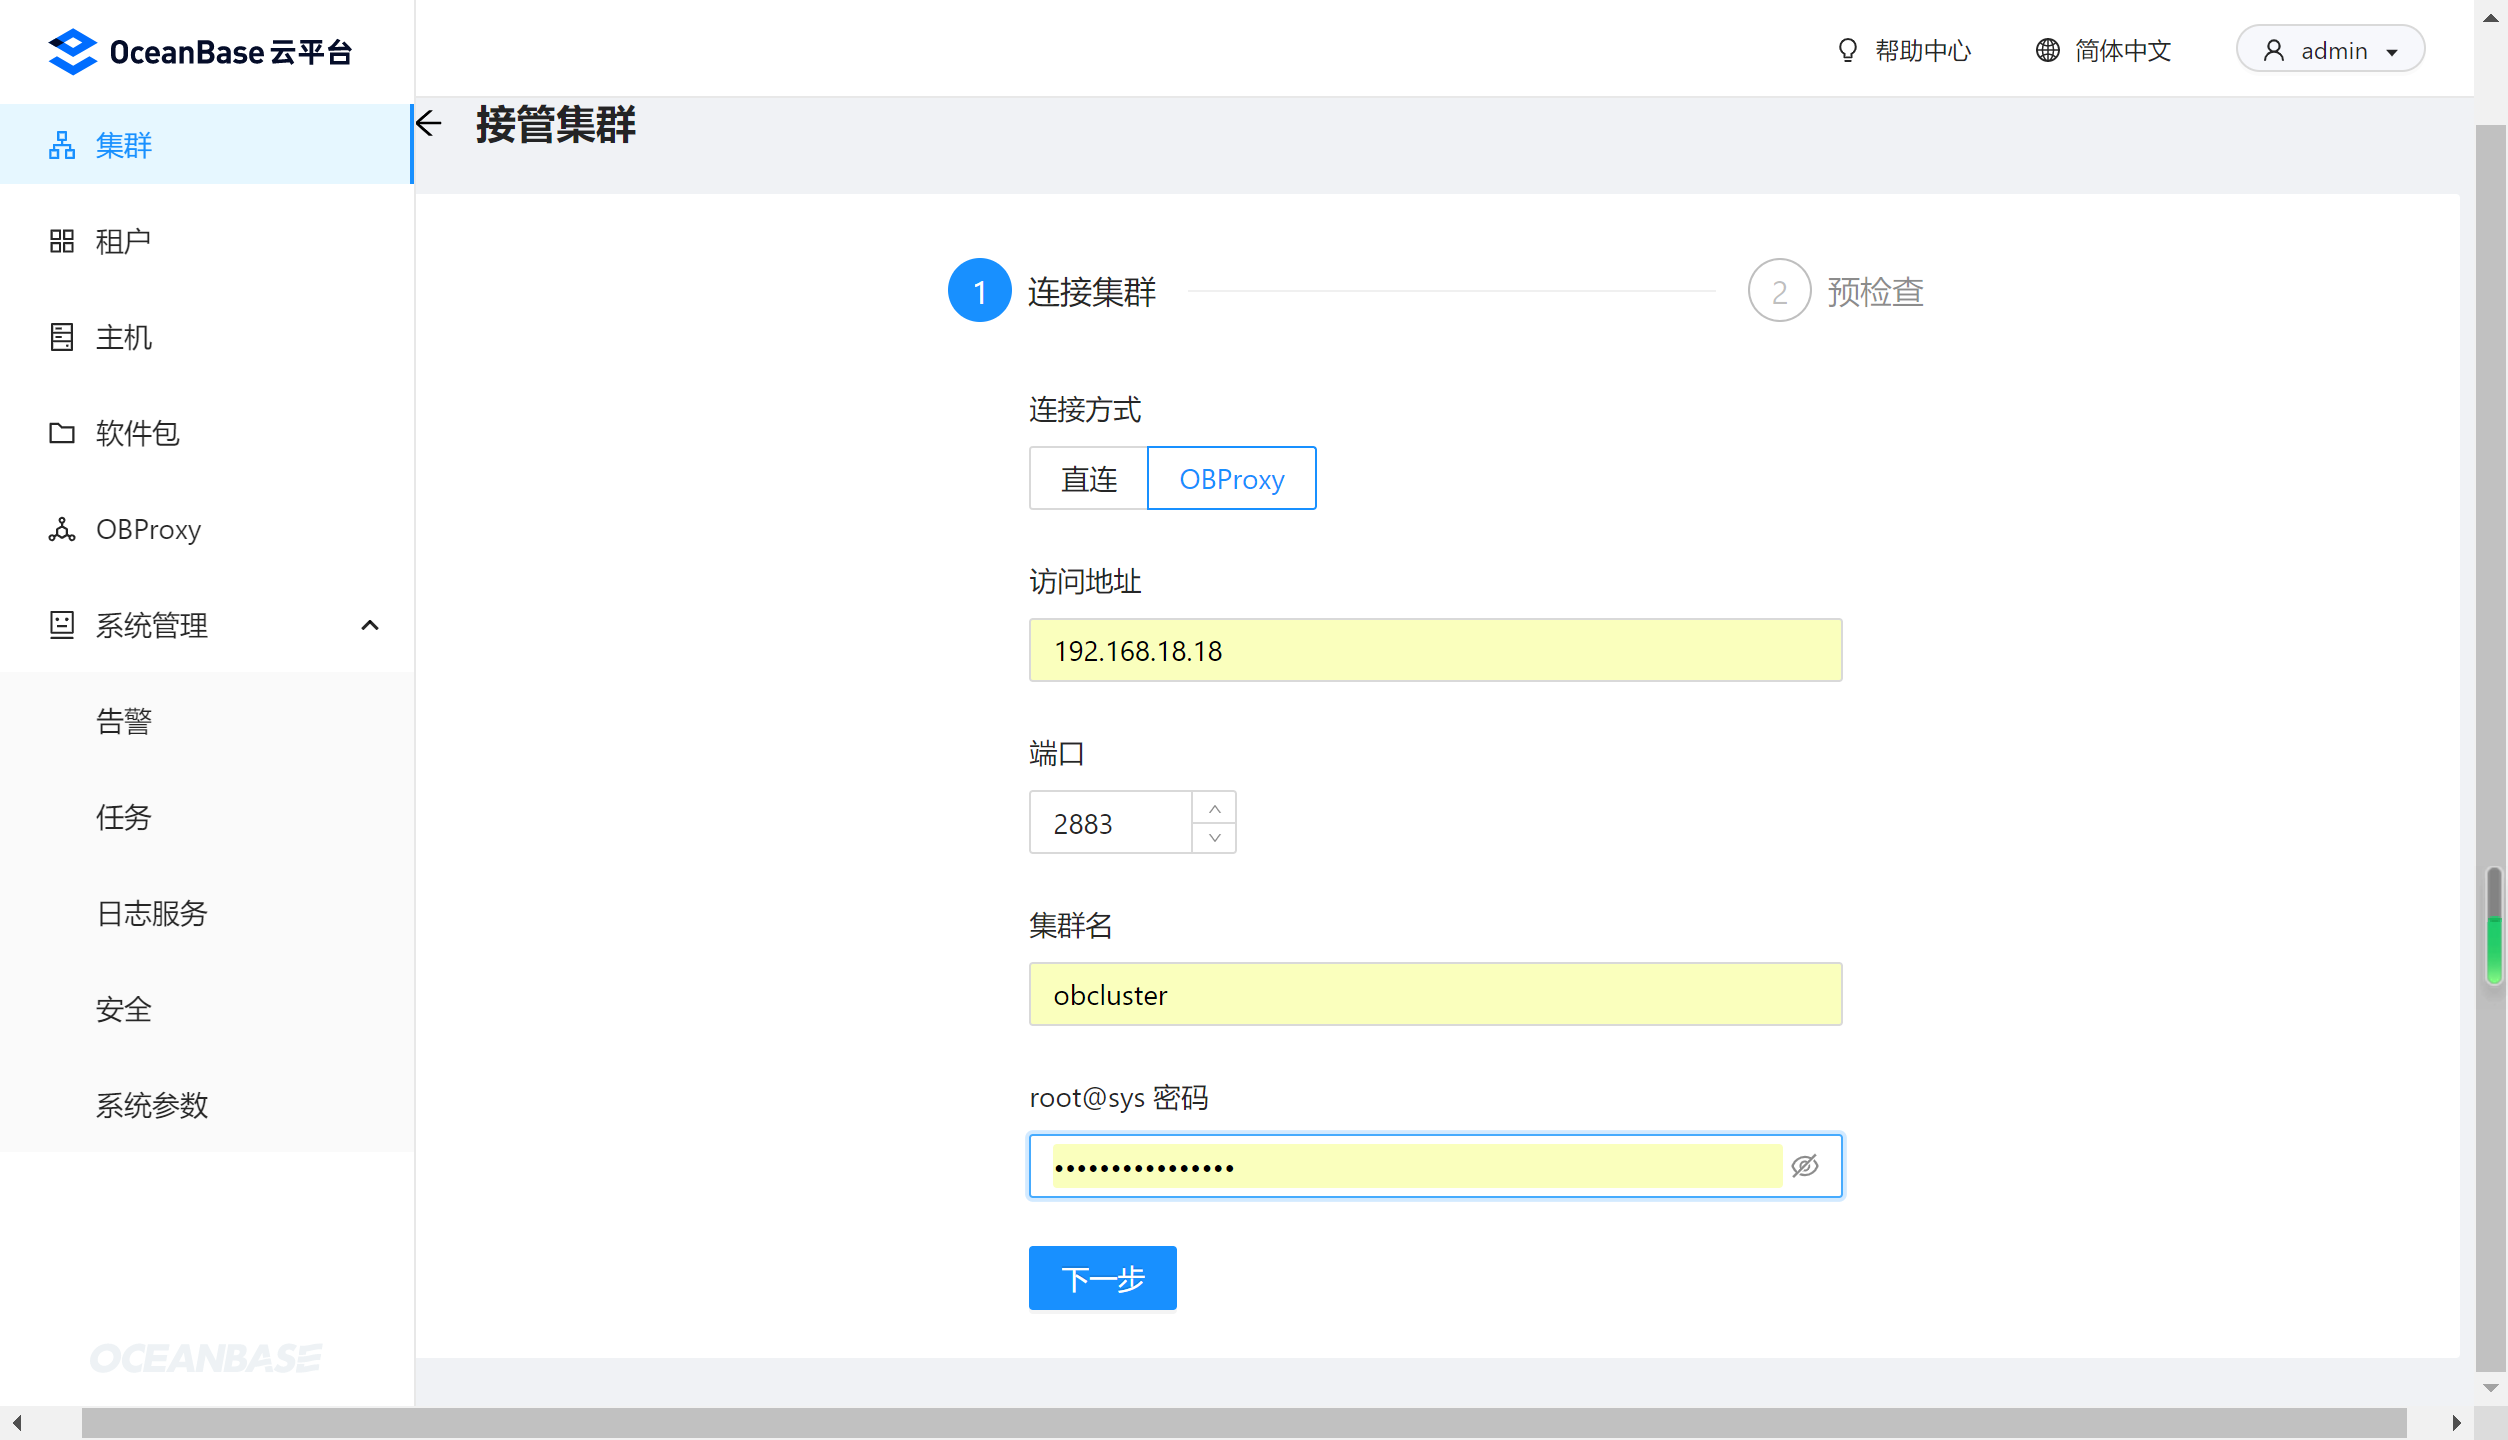
下一步
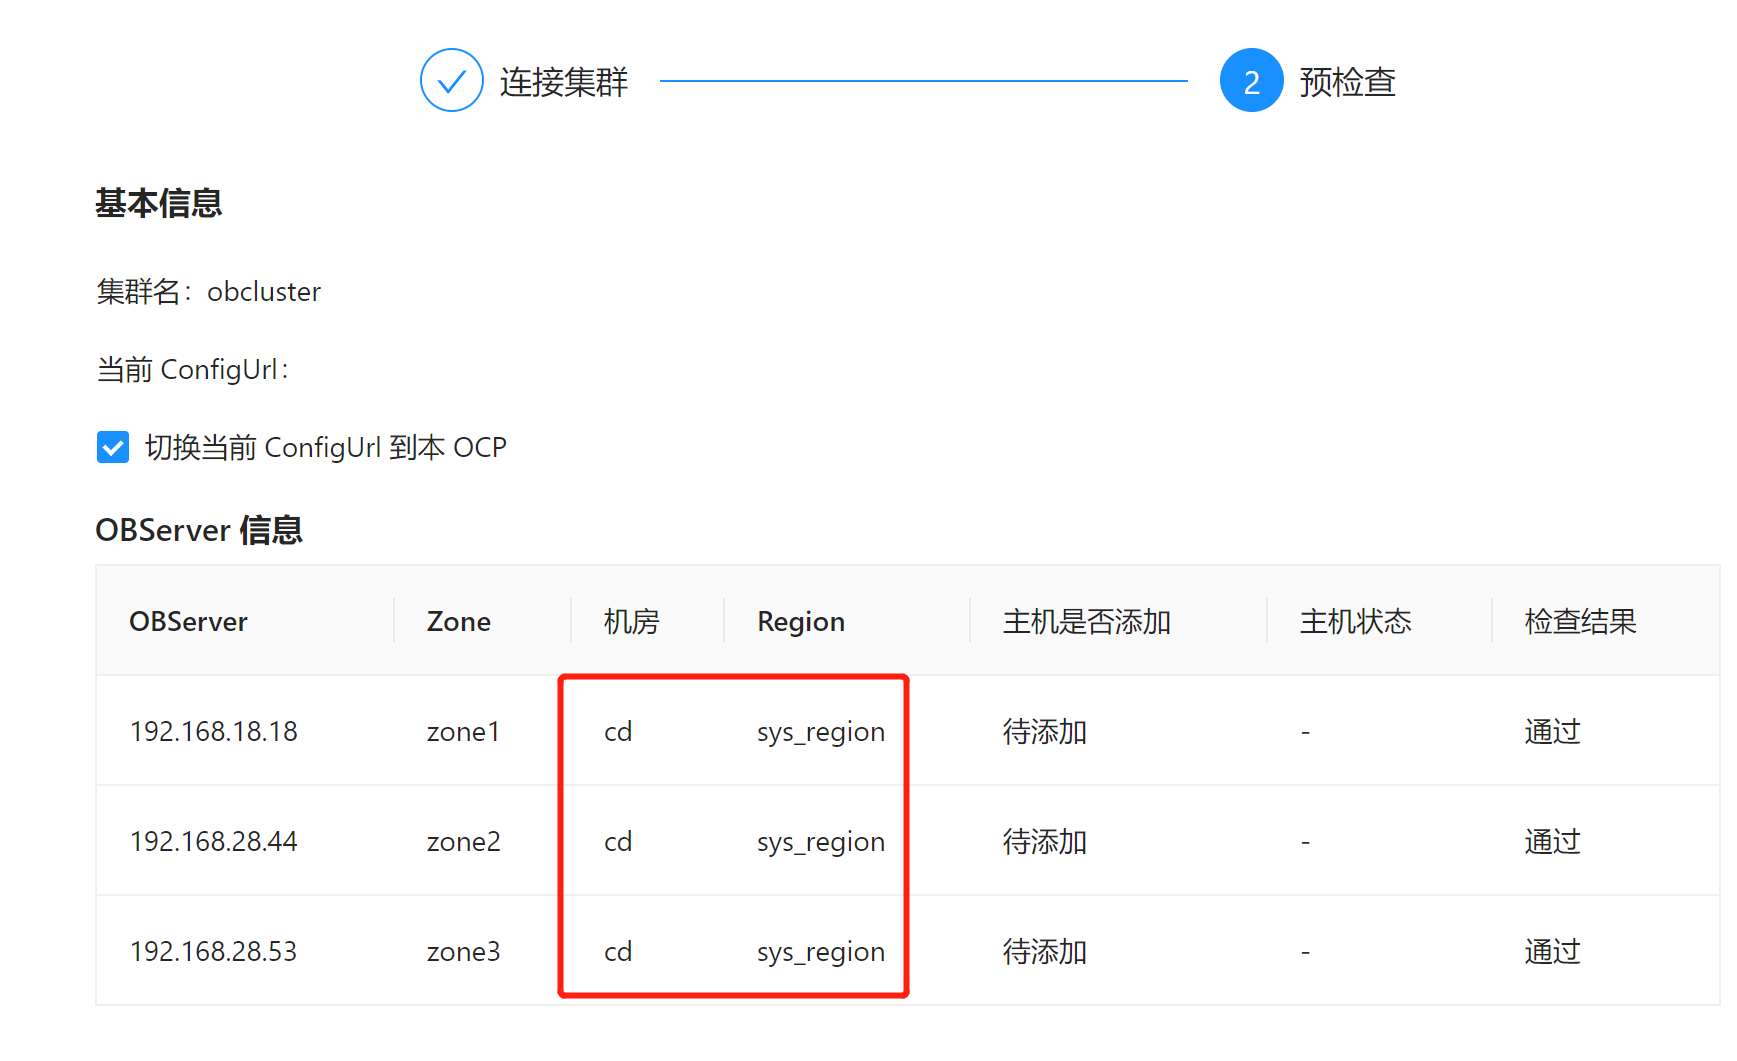
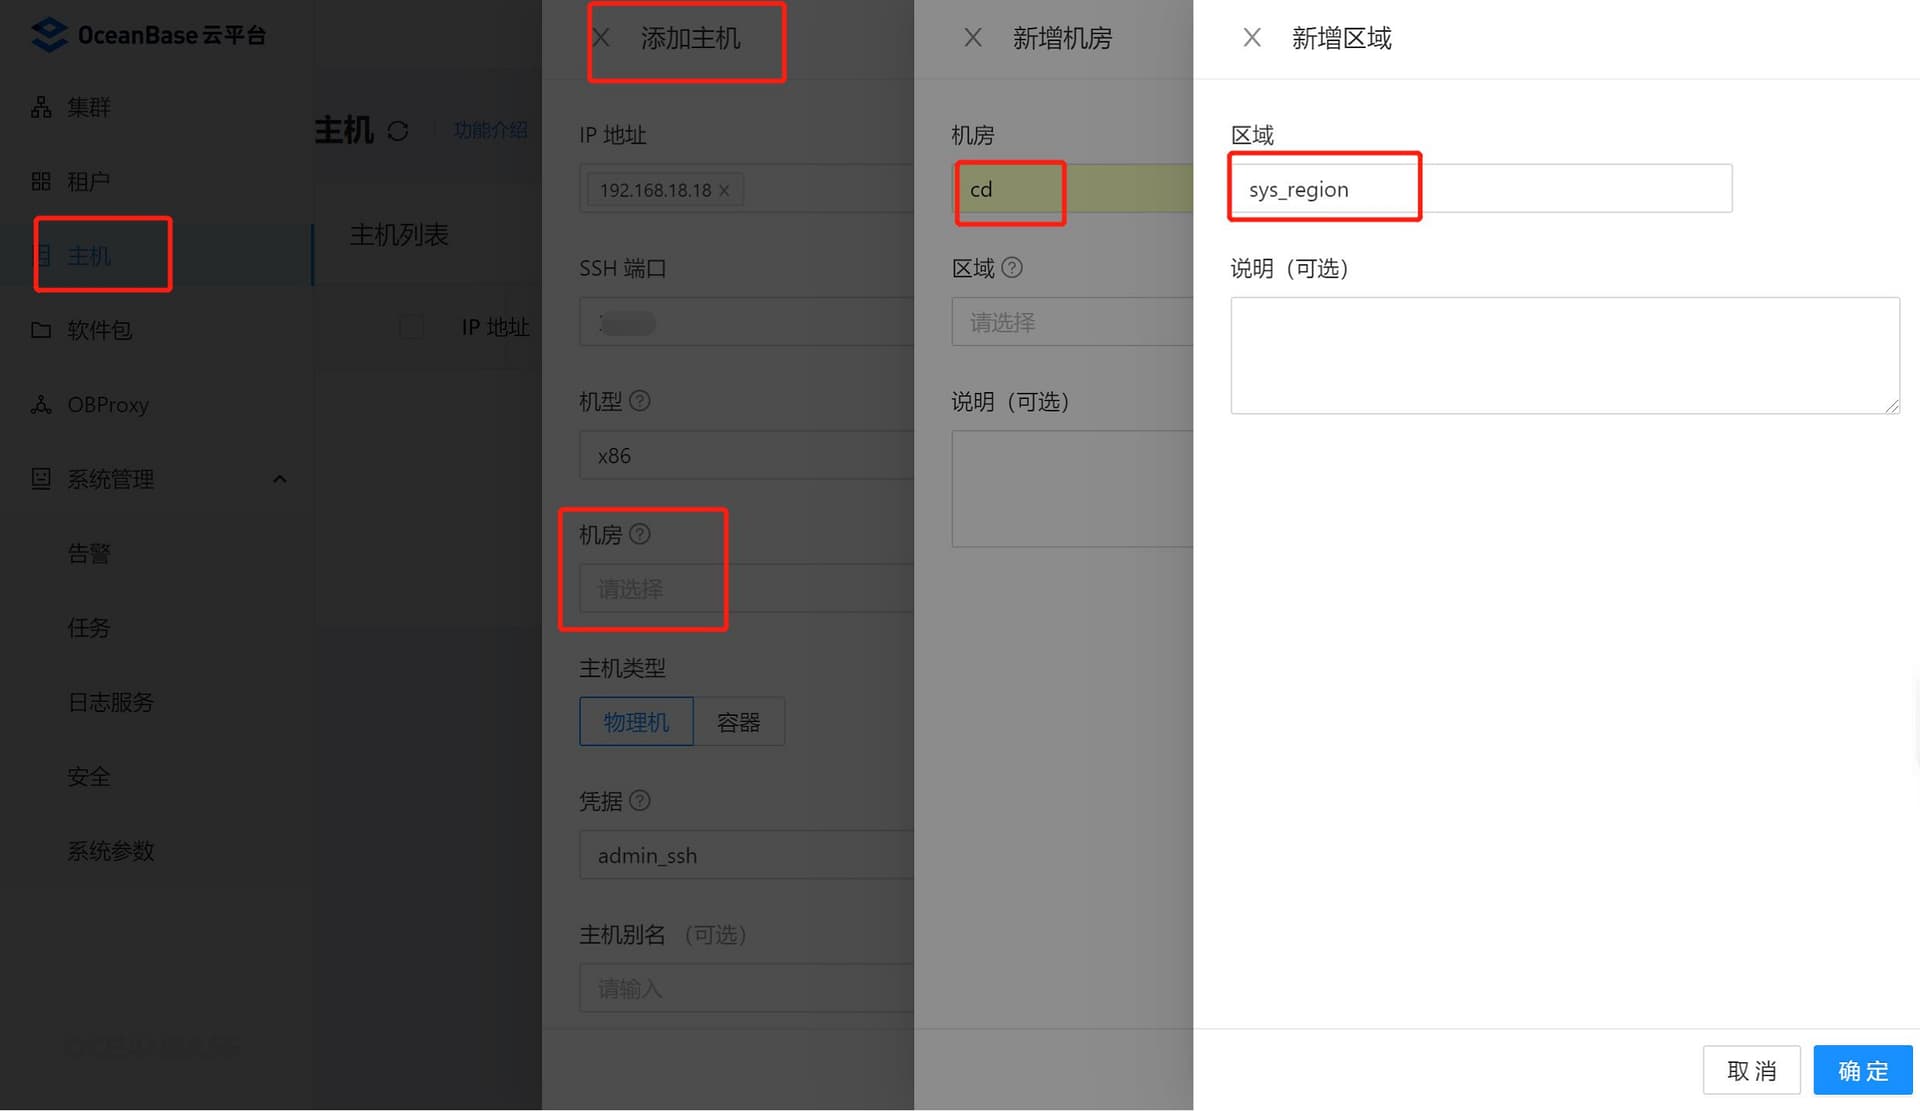
注意机房为:cd,区域为:sys_region,由于ssh端口不是22,无法在本页添加主机,选择先独立添加主机
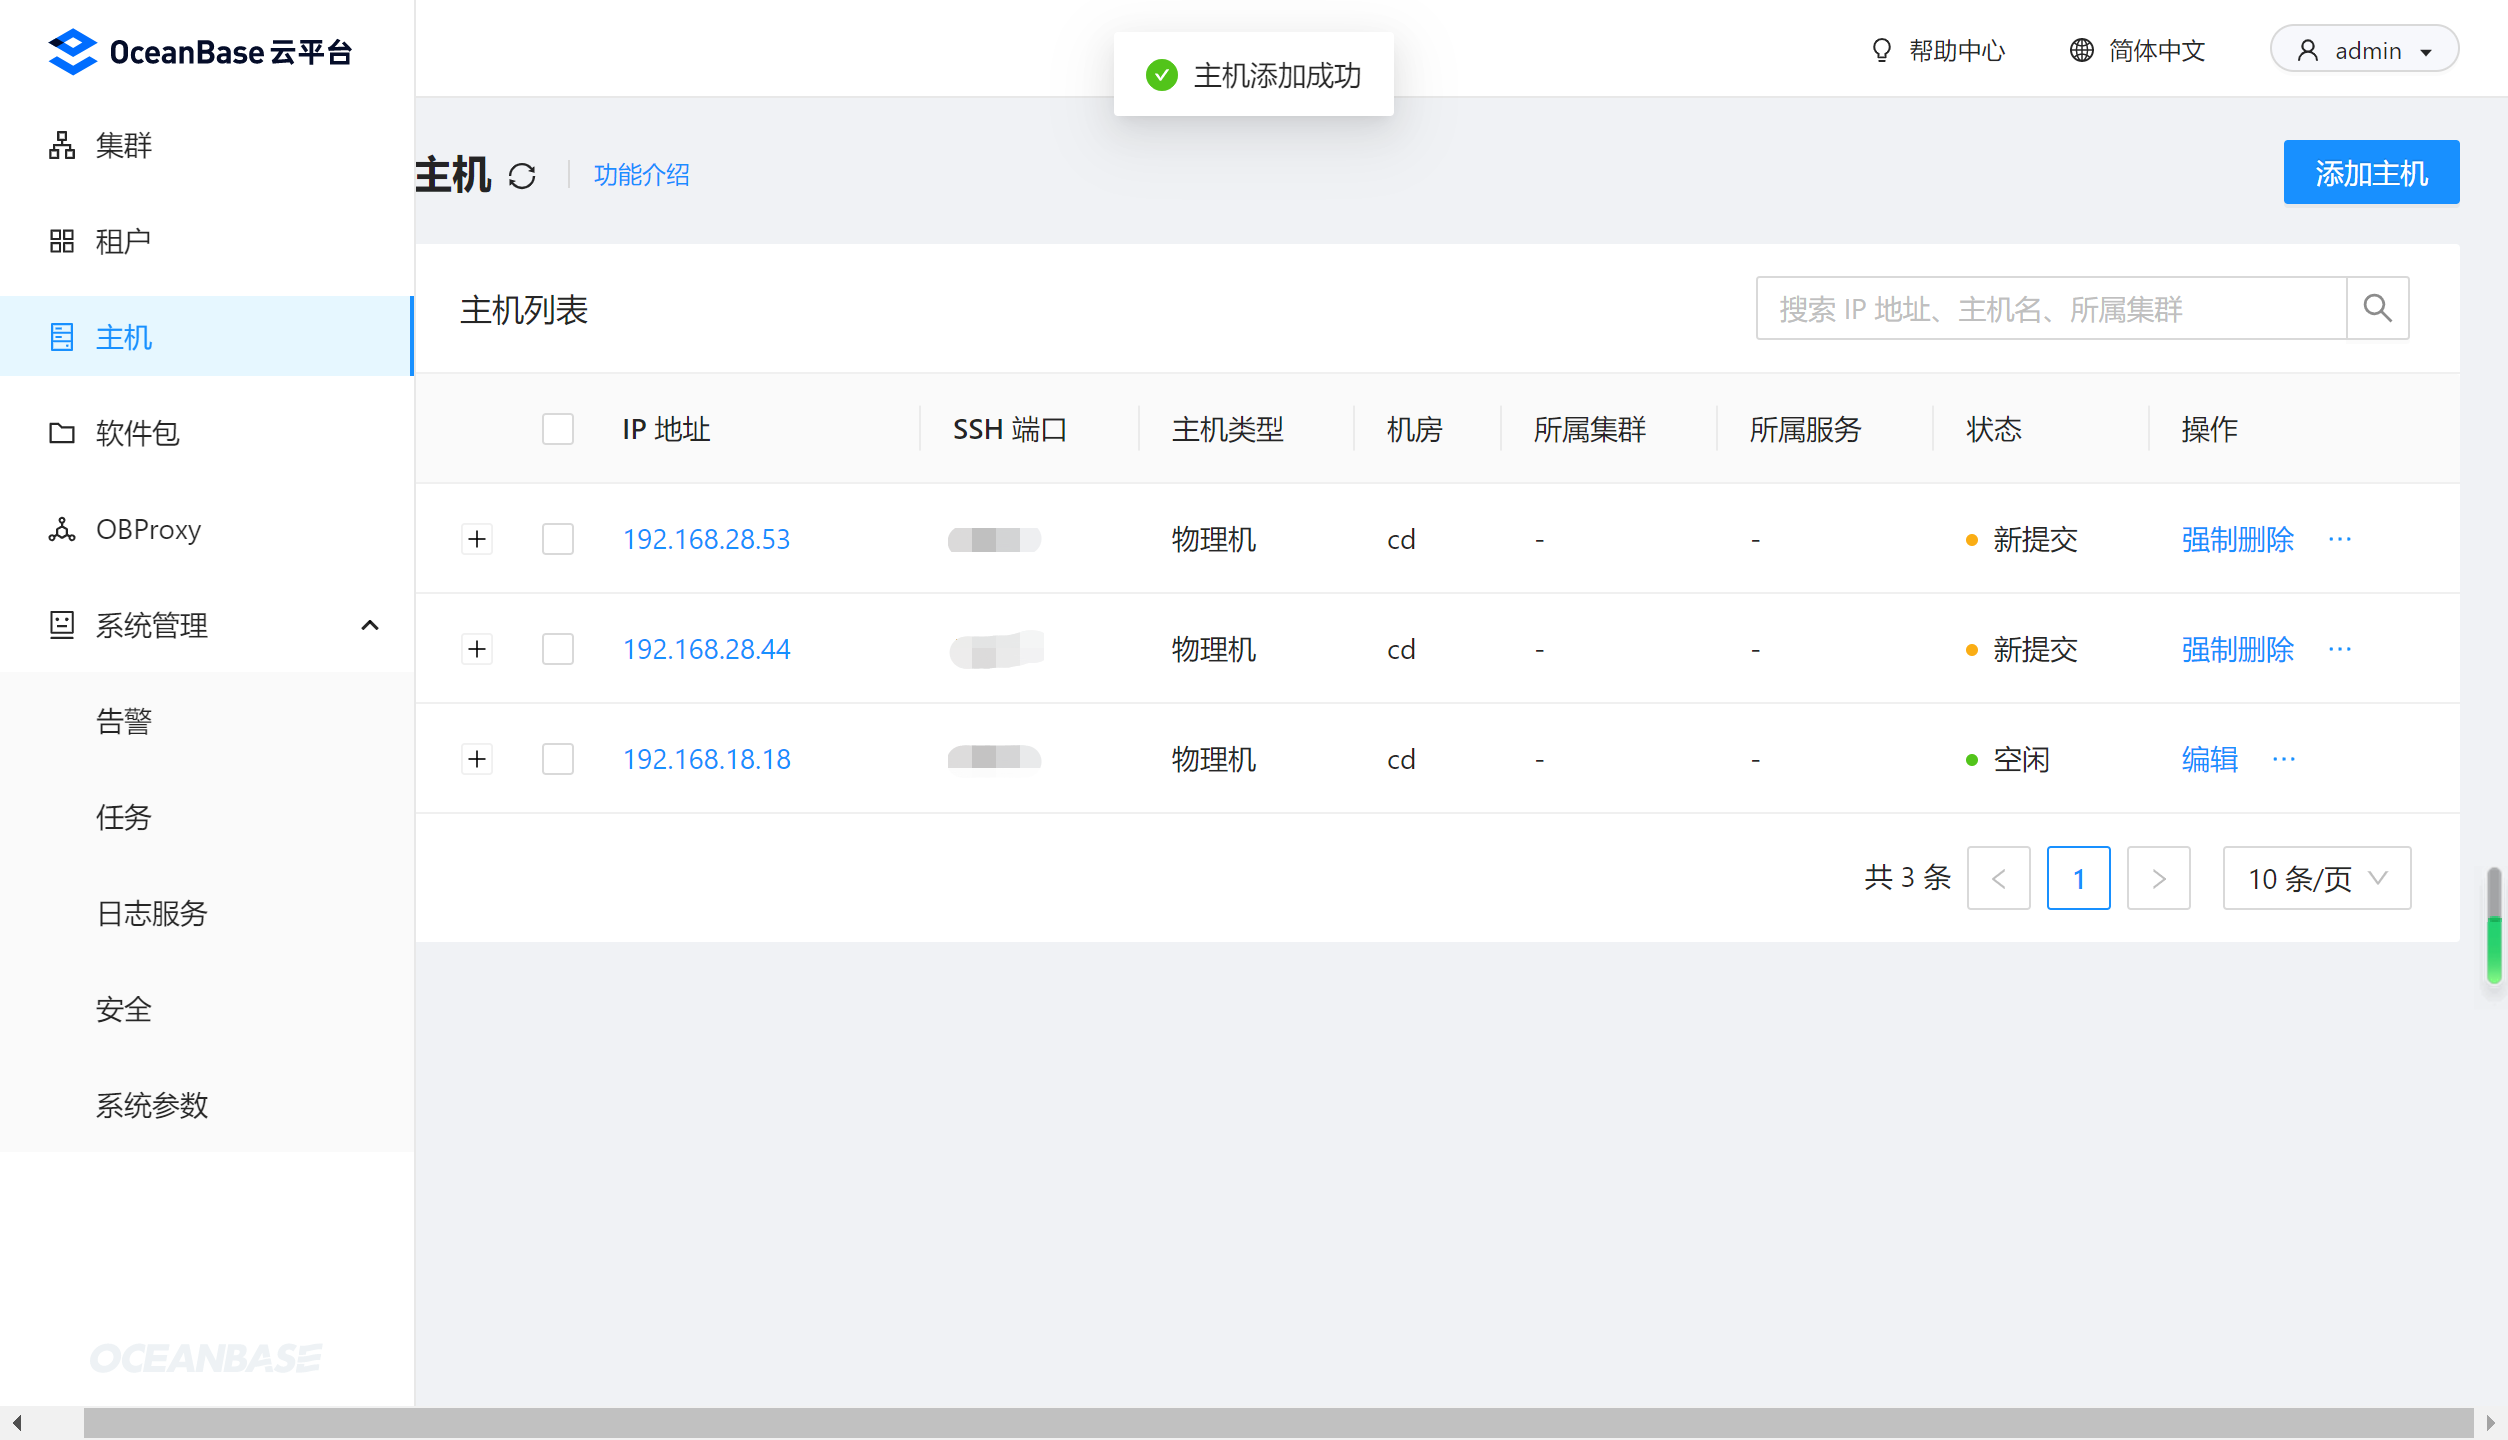
添加主机:
添加完毕后:
返回集群添加,通过OBProxy连接集群:


接管成功:

查看OCP资源占用情况
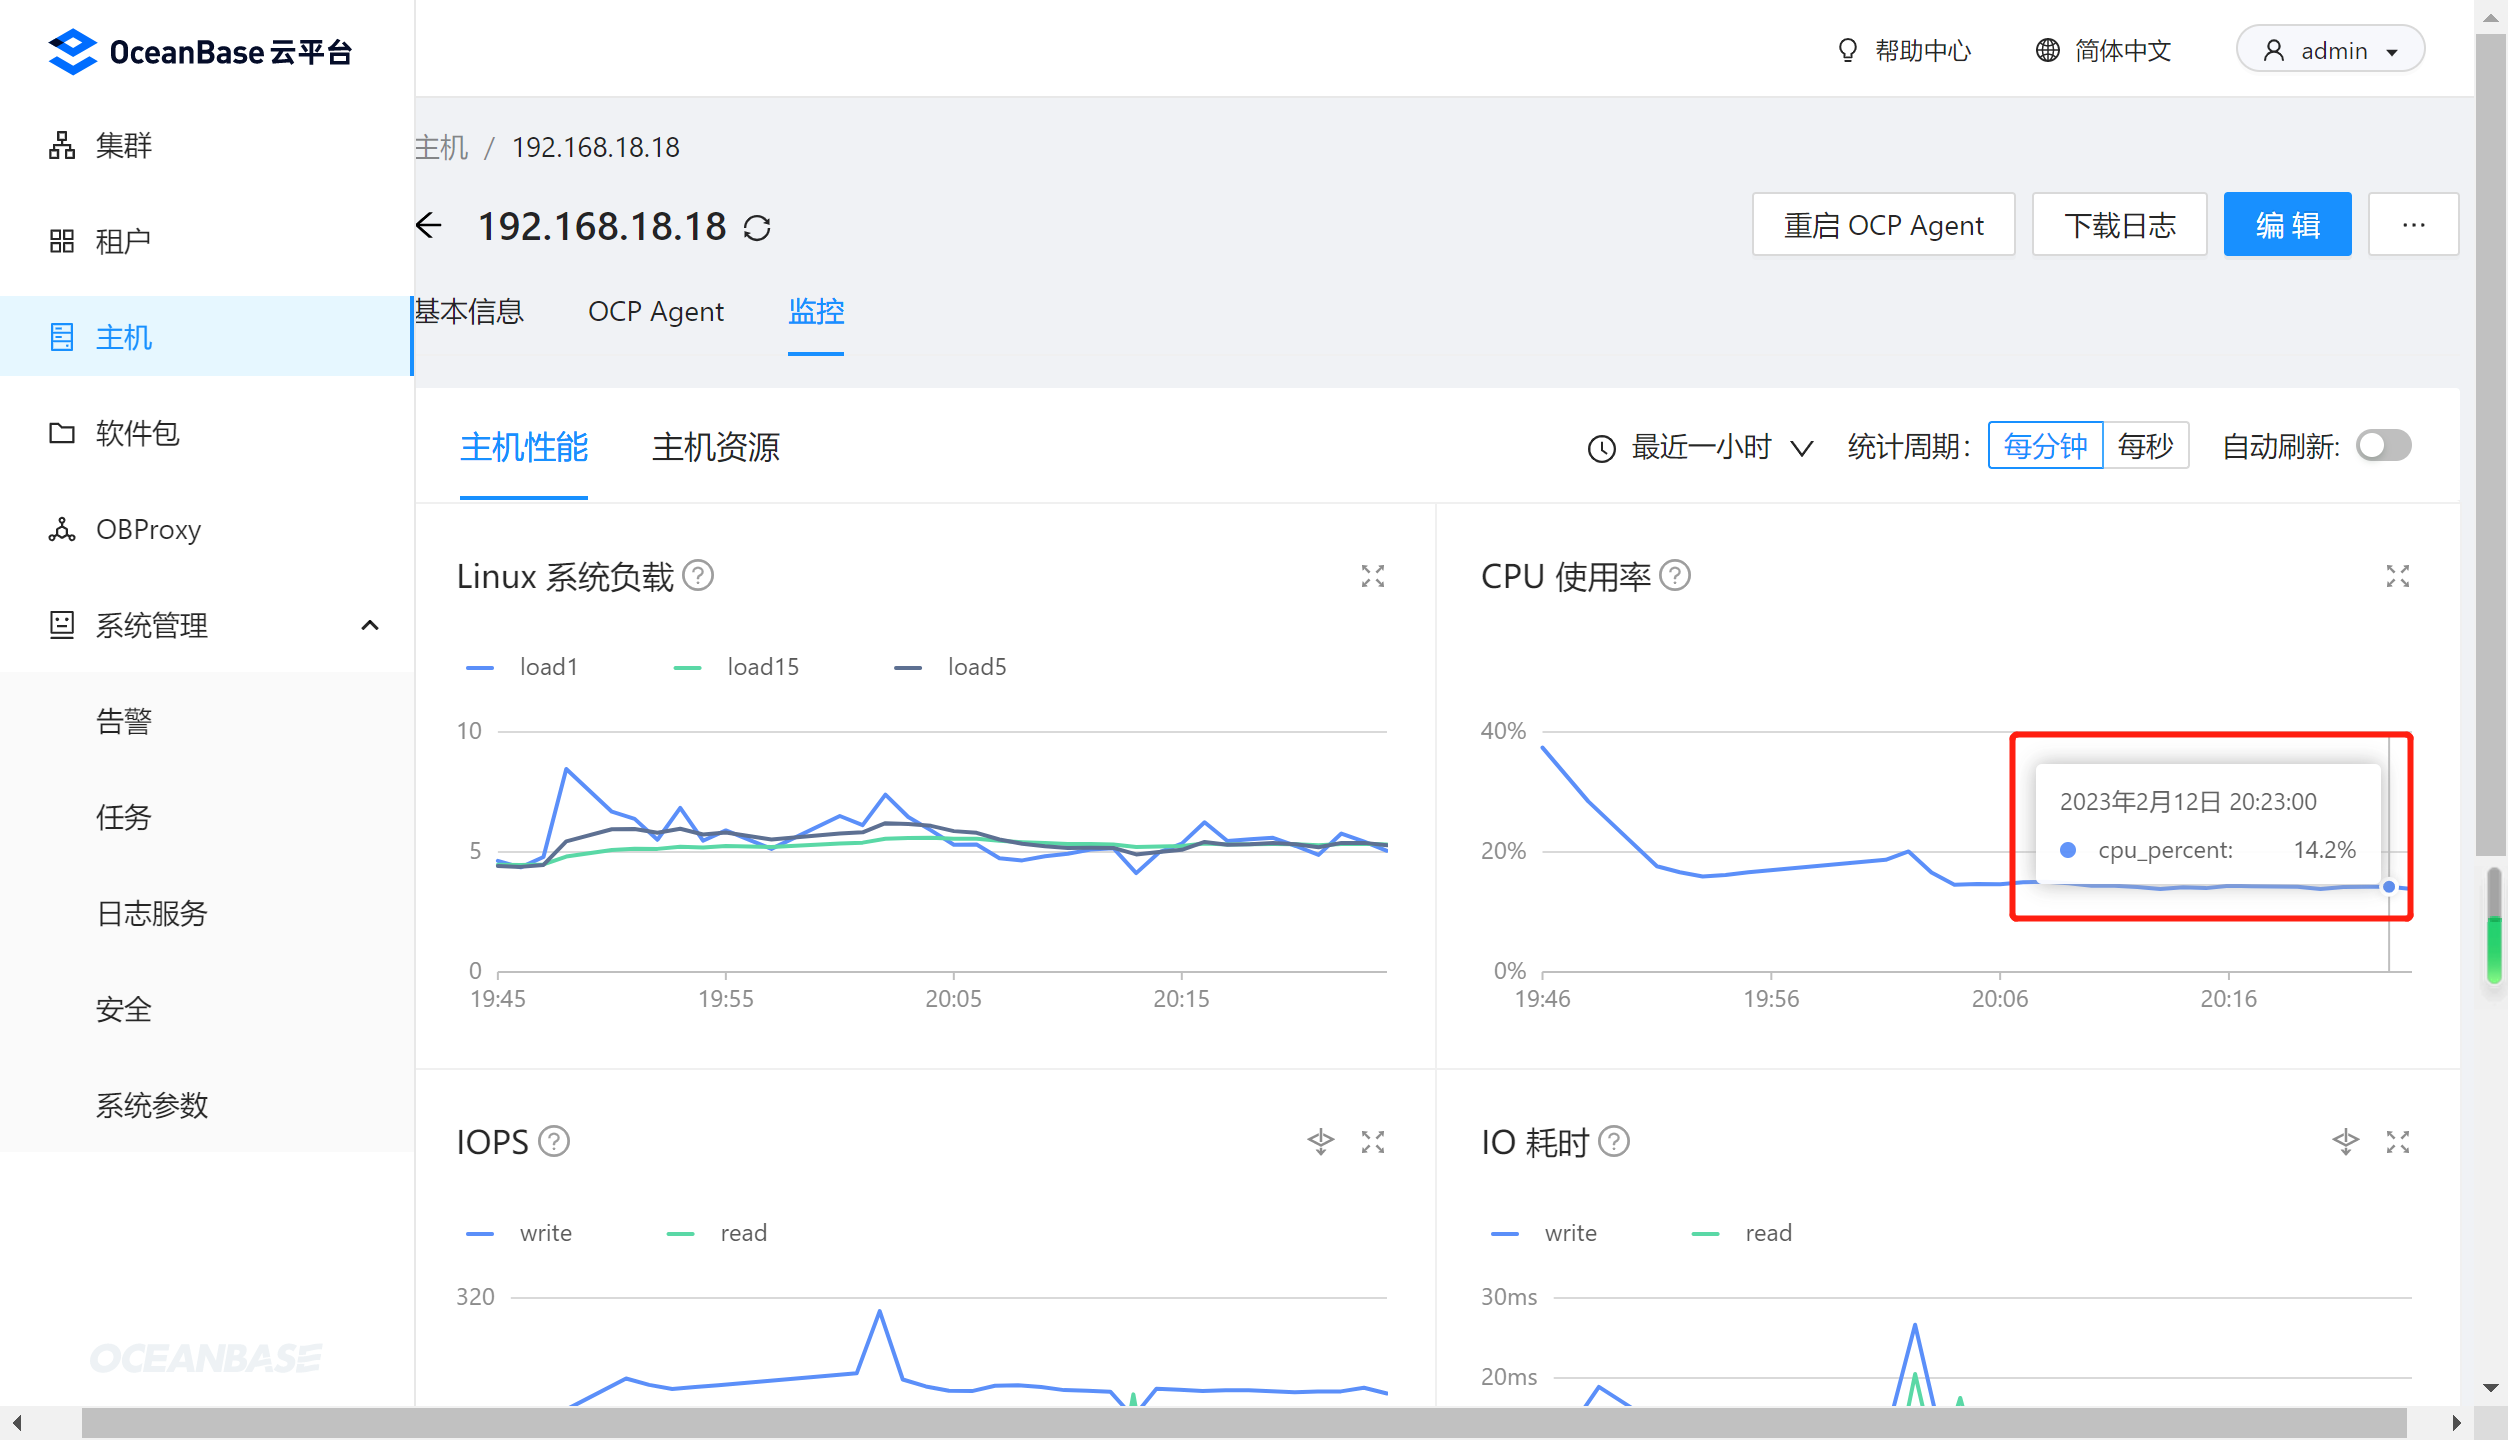
Done!
千里之行始于足下,走的人多了,脚下也就有了路。生态丰富,禾下乘凉,献给OB社区的的所有使用者。