![]() OceanBase 快速体验系列:
OceanBase 快速体验系列:
本篇文档适合有较高规格机器资源的用户,OCP 能够以可视化的方式管理 OceanBase 的全生命周期,具备完善的运维、诊断、监控和告警等企业级能力,并支持大规模管控。
资源规划和购买
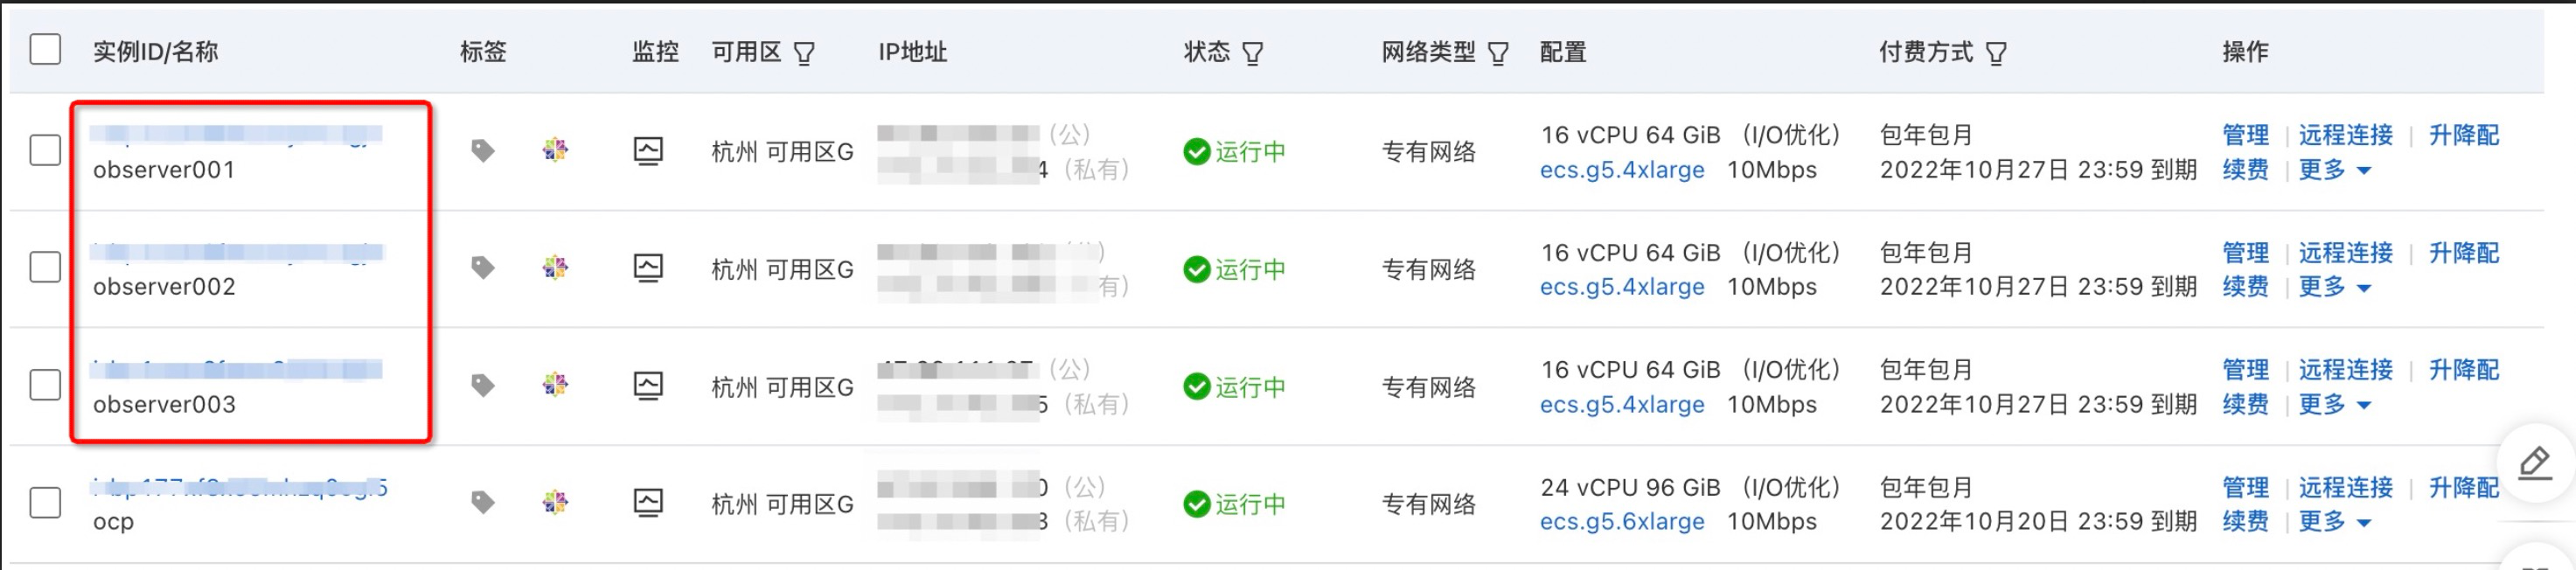
- 需要 4 台 ECS,一台搭建 OCP,其他三台搭建三节点的 OB 集群。
根据 OCP 官方文档的 配置说明,最小规格为 24C64GB,这里的 64GB 要求为可用内存、而不是总内存。因此为了保证 OCP 安装成功,建议内存 > 64GB。
| ECS 数量 | 主机用途 | ECS 配置 |
|---|---|---|
| 1 台 ECS | OCP + metadb 集群 + OBProxy | 24C96GB/500GB 高效云盘存储/10MB 固定带宽/CentOS 7.9 |
| 3 台 ECS | 3 节点 OBServer | 16C64GB/500GB 高效云盘存储/10MB 固定带宽/CentOS 7.9 |
- 阿里云上购买的 ECS 如下:

安装 OCP
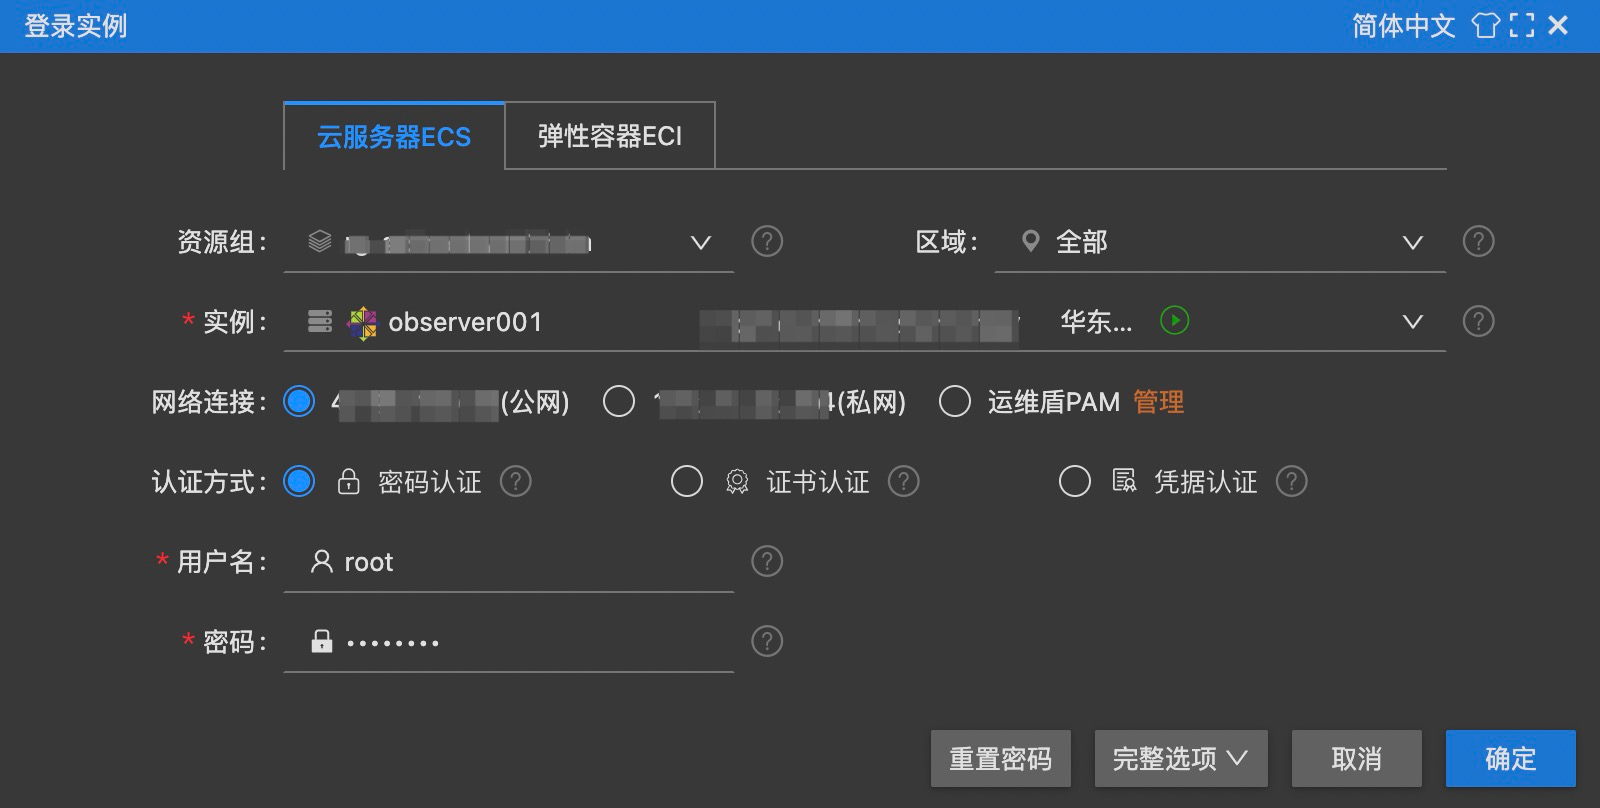
登录 ECS
-
远程连接-立即登录,进入连接页面:

- 使用
root用户进行登录:

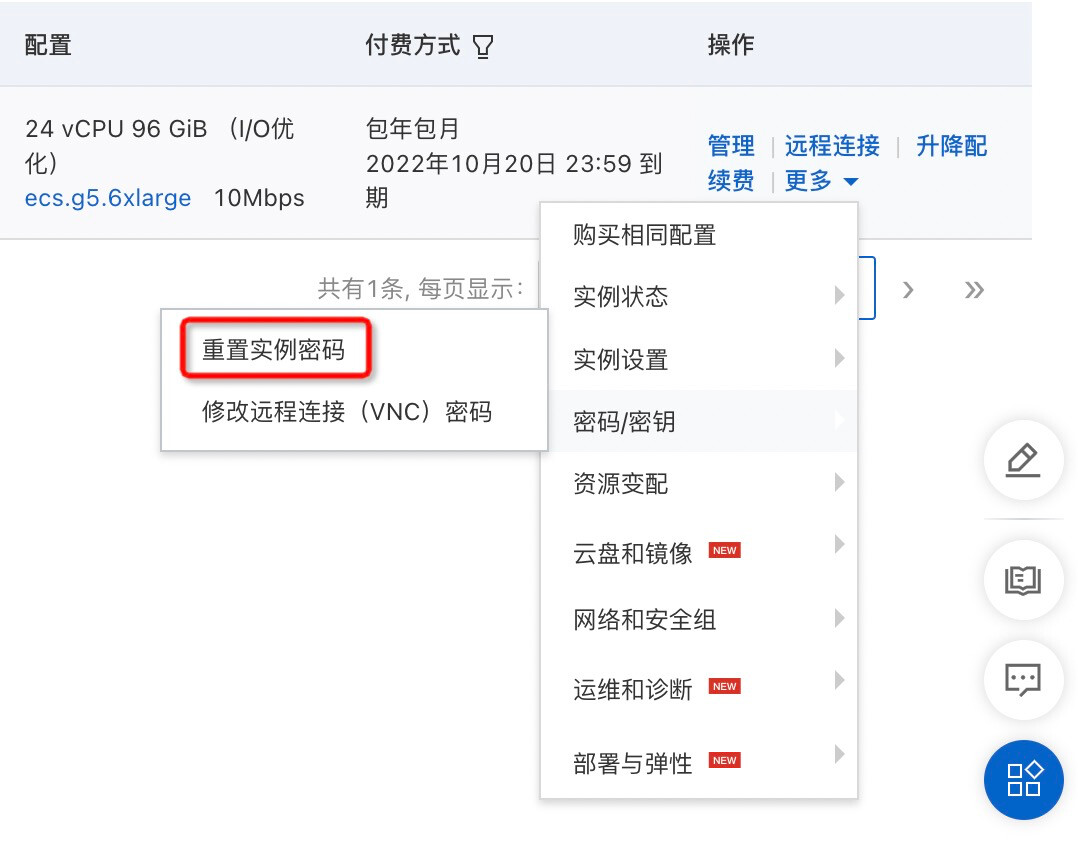
- 如果忘记密码或购买 ECS 时未设置 root 密码,可以进行重置:
- 如果使用其他用户连接,也可以执行以下命令切换到 root 用户:
$ su - root
用户和目录规划
- OCP 的 metadb 集群用的也是 OceanBase,因此安装 OCP 前需要先设置 metadb 的安装配置,包括目录和用户权限。
- 新建 admin 用户并设置密码:
# 创建 admin 用户
$ useradd -U admin -d /home/admin -s /bin/bash

# 设置 admin 用户的密码
$ passwd admin
- 打开
/etc/sudoers文件:
$ vim /etc/sudoers
- 为 admin 用户设置 sudo 权限 (注意,编辑完后需要使用
wq!才能保存退出):
## Same thing without a password
# %wheel        ALL=(ALL)       NOPASSWD: ALL
admin       ALL=(ALL)       NOPASSWD: ALL
- 新建
/home/admin/oceanbase、/data/1、/data/log1三个目录,并将目录权限赋予admin用户:
| 目录 | 说明 | 权限 |
|---|---|---|
| /home/admin/oceanbase | OceanBase 安装目录 | admin 用户可读可写 |
| /data/1 | OceanBase 数据目录 | admin 用户可读可写 |
| /data/log1 | OceanBase 日志目录 | admin 用户可读可写 |
# 新建目录
$ mkdir -p /home/admin/oceanbase
$ mkdir -p /data/1
$ mkdir -p /data/log1

# 将目录权限赋予 admin
$ chown -R admin:admin /home/admin/oceanbase
$ chown -R admin:admin /data/1
$ chown -R admin:admin /data/log1

# 查看目录权限
[/home/admin/oceanbase] $ ls -al
total 8
drwxr-xr-x 2 admin admin 4096 Sep 22 18:13 .
drwx------ 3 admin admin 4096 Sep 22 18:13 ..

[/data/1] $ ls -al
total 8
drwxr-xr-x 2 admin admin 4096 Sep 22 18:13 .
drwxr-xr-x 4 root  root  4096 Sep 22 18:13 ..

[/data/log1] $ ls -al
total 8
drwxr-xr-x 2 admin admin 4096 Sep 22 18:13 .
drwxr-xr-x 4 root  root  4096 Sep 22 18:13 ..
端口规划
- 安装时用到的端口如下,要求未被其他程序占用:
| 说明 | 端口 | 协议类型 |
|---|---|---|
| metadb 集群中 OBServer 的 SQL 端口 | 2881 | TCP |
| metadb 集群中 OBServer 的 RPC 端口 | 2882 | TCP |
OBProxy 访问端口 (OCP 通过 OBProxy 代理访问 metadb 集群) |
2883 | TCP |
| OCP Web 的访问端口 | 8080 | HTTP |
- 执行以下命令可查看端口占用情况:
# 安装 lsof 工具
$ yum install -y lsof

# 查看 2881 端口占用情况,为空表示未被占用
$ lsof -i:2881
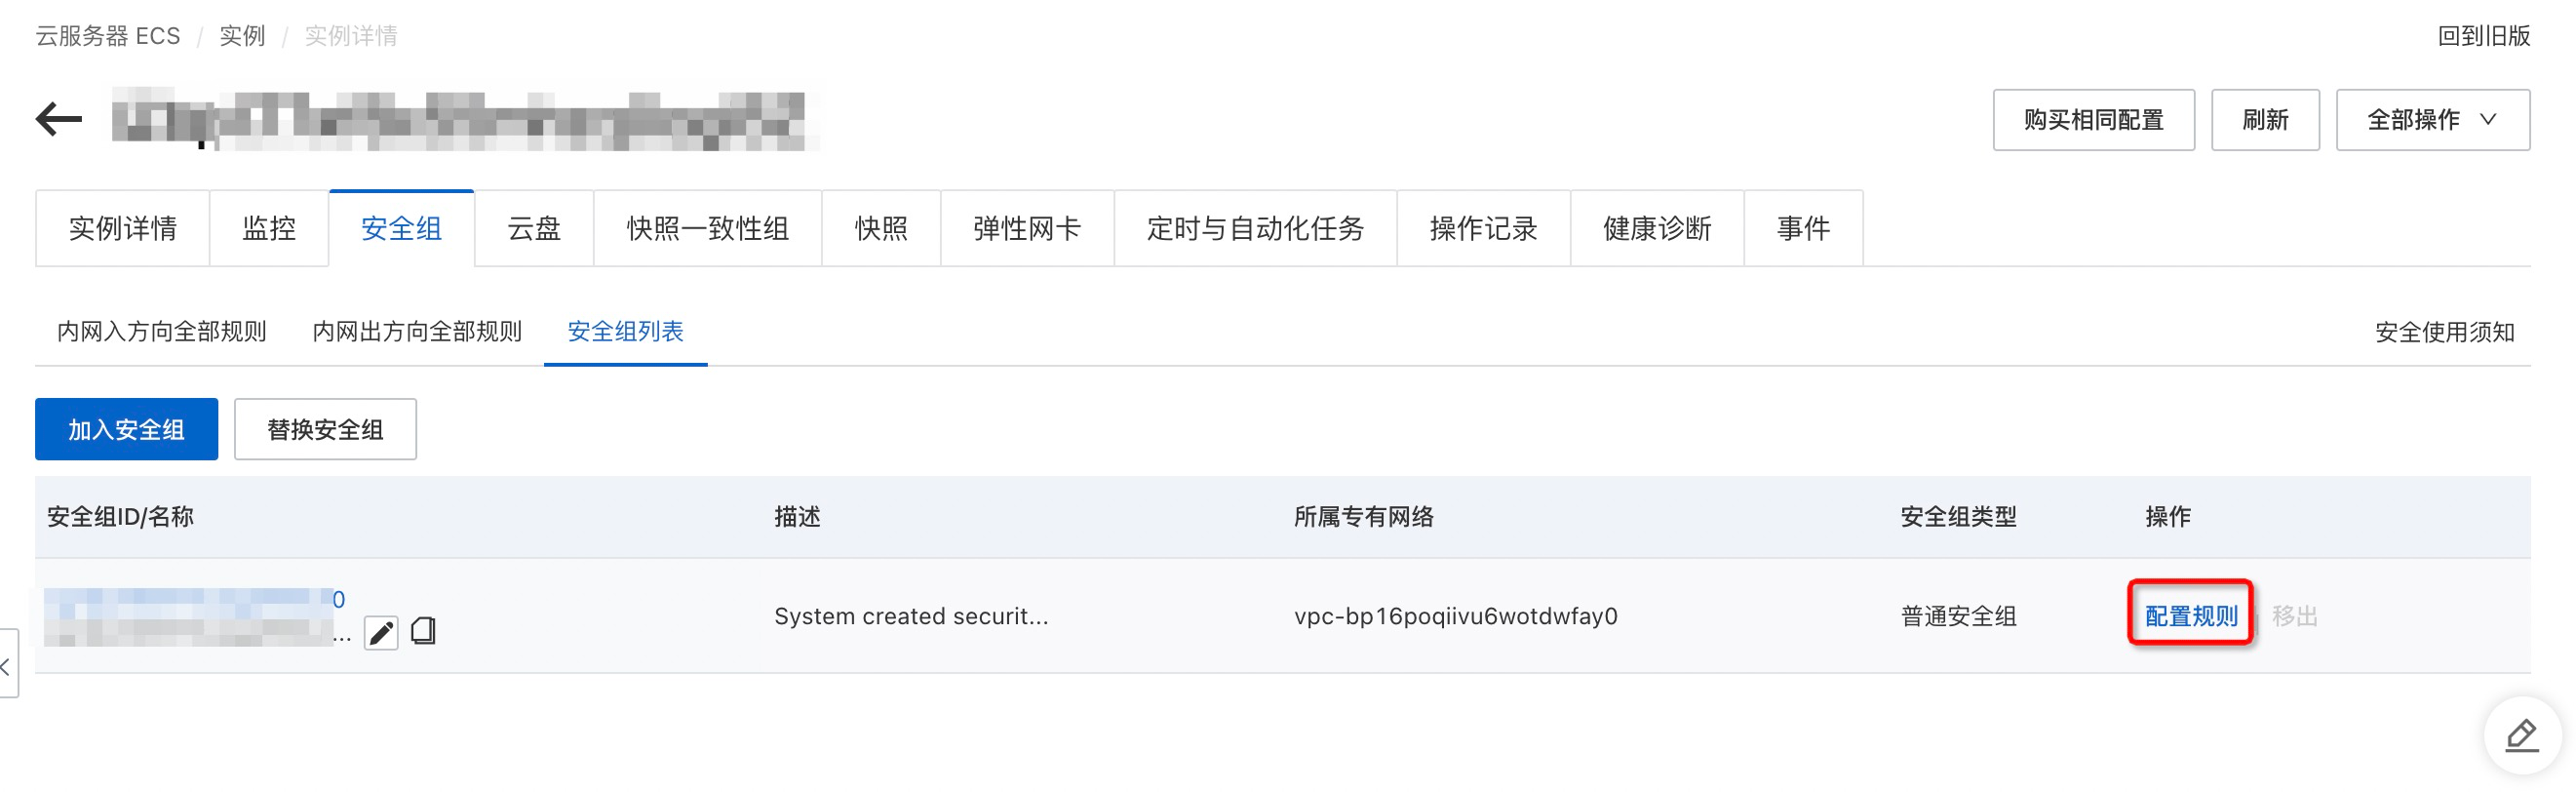
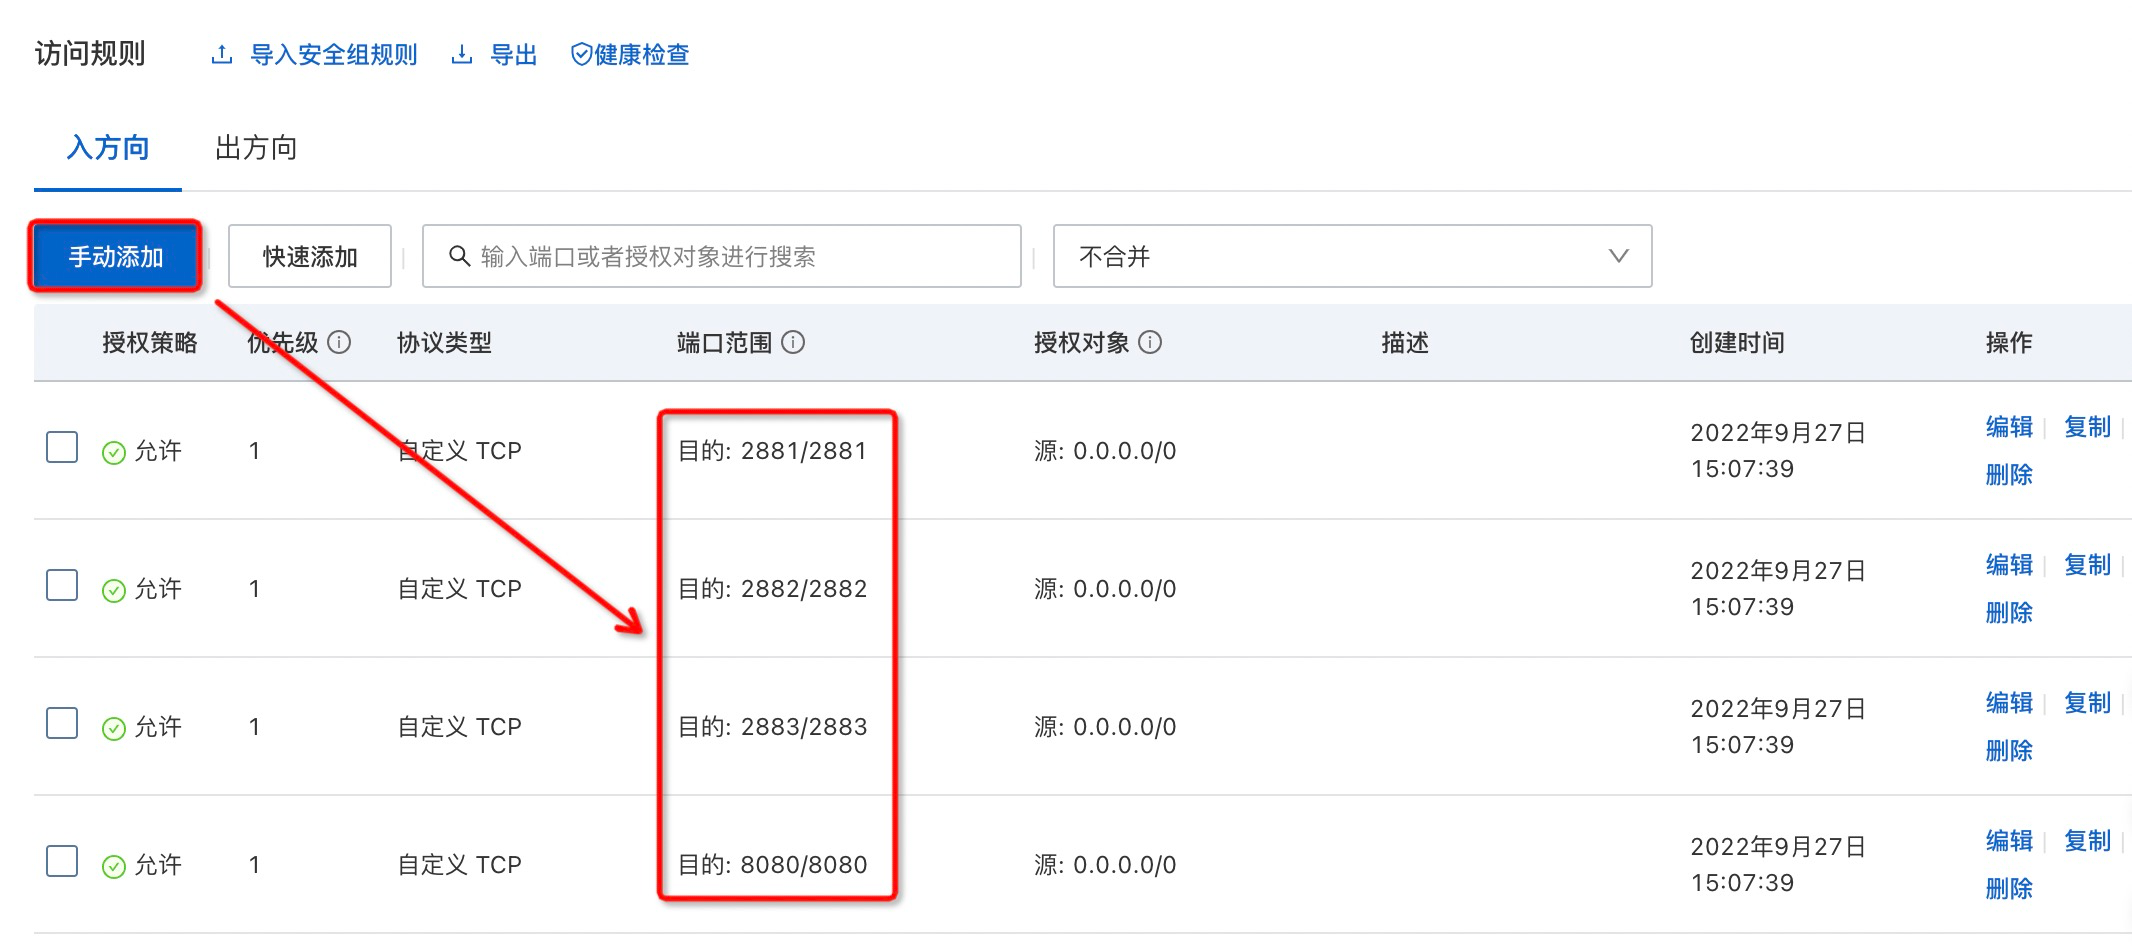
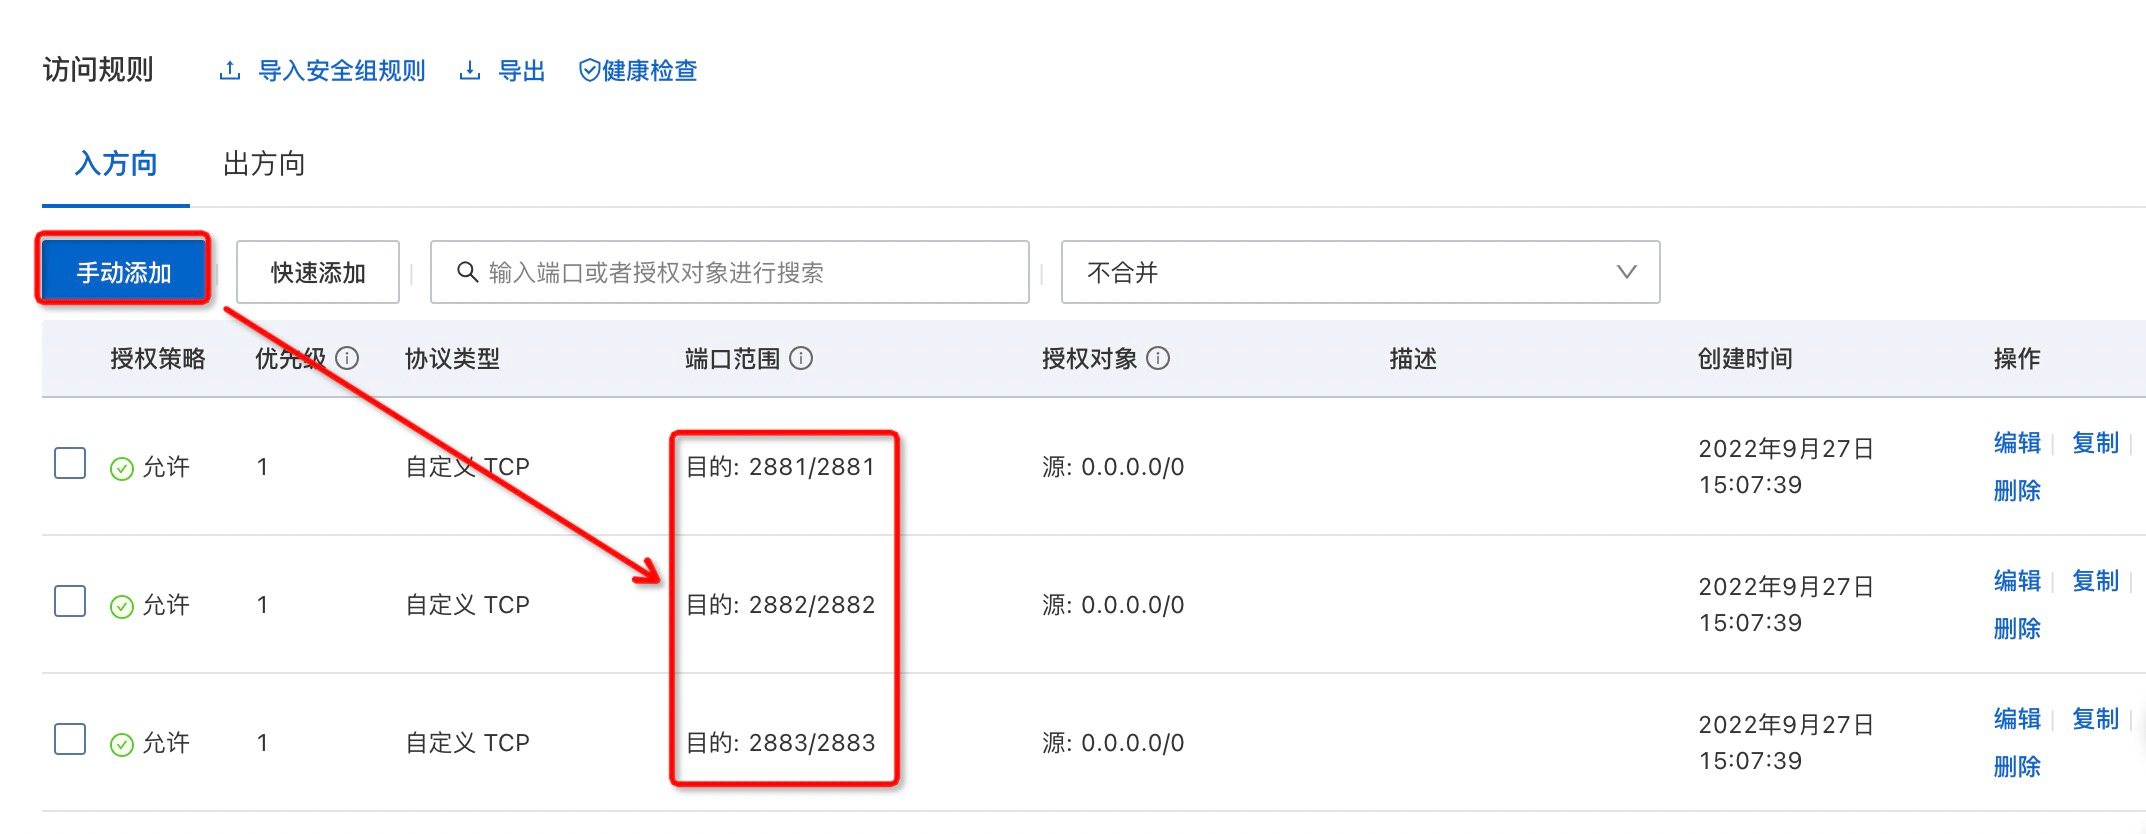
- 同时还需要在 ECS 安全组中开放 2881、2882、2883 和 8080 端口:
安装 Docker
- 安装并启动 Docker:
# 安装前置依赖
$ yum install -y yum-utils

# 增加 Docker 的 yum 源
$ yum-config-manager --add-repo https://download.docker.com/linux/centos/docker-ce.repo

# 安装 Docker
$ yum install -y docker-ce docker-ce-cli containerd.io docker-compose-plugin

# 启动 Docker
$ systemctl start docker
获取 OCP 安装包
- OCP 社区版安装包的获取地址: https://open.oceanbase.com/softwareCenter/community
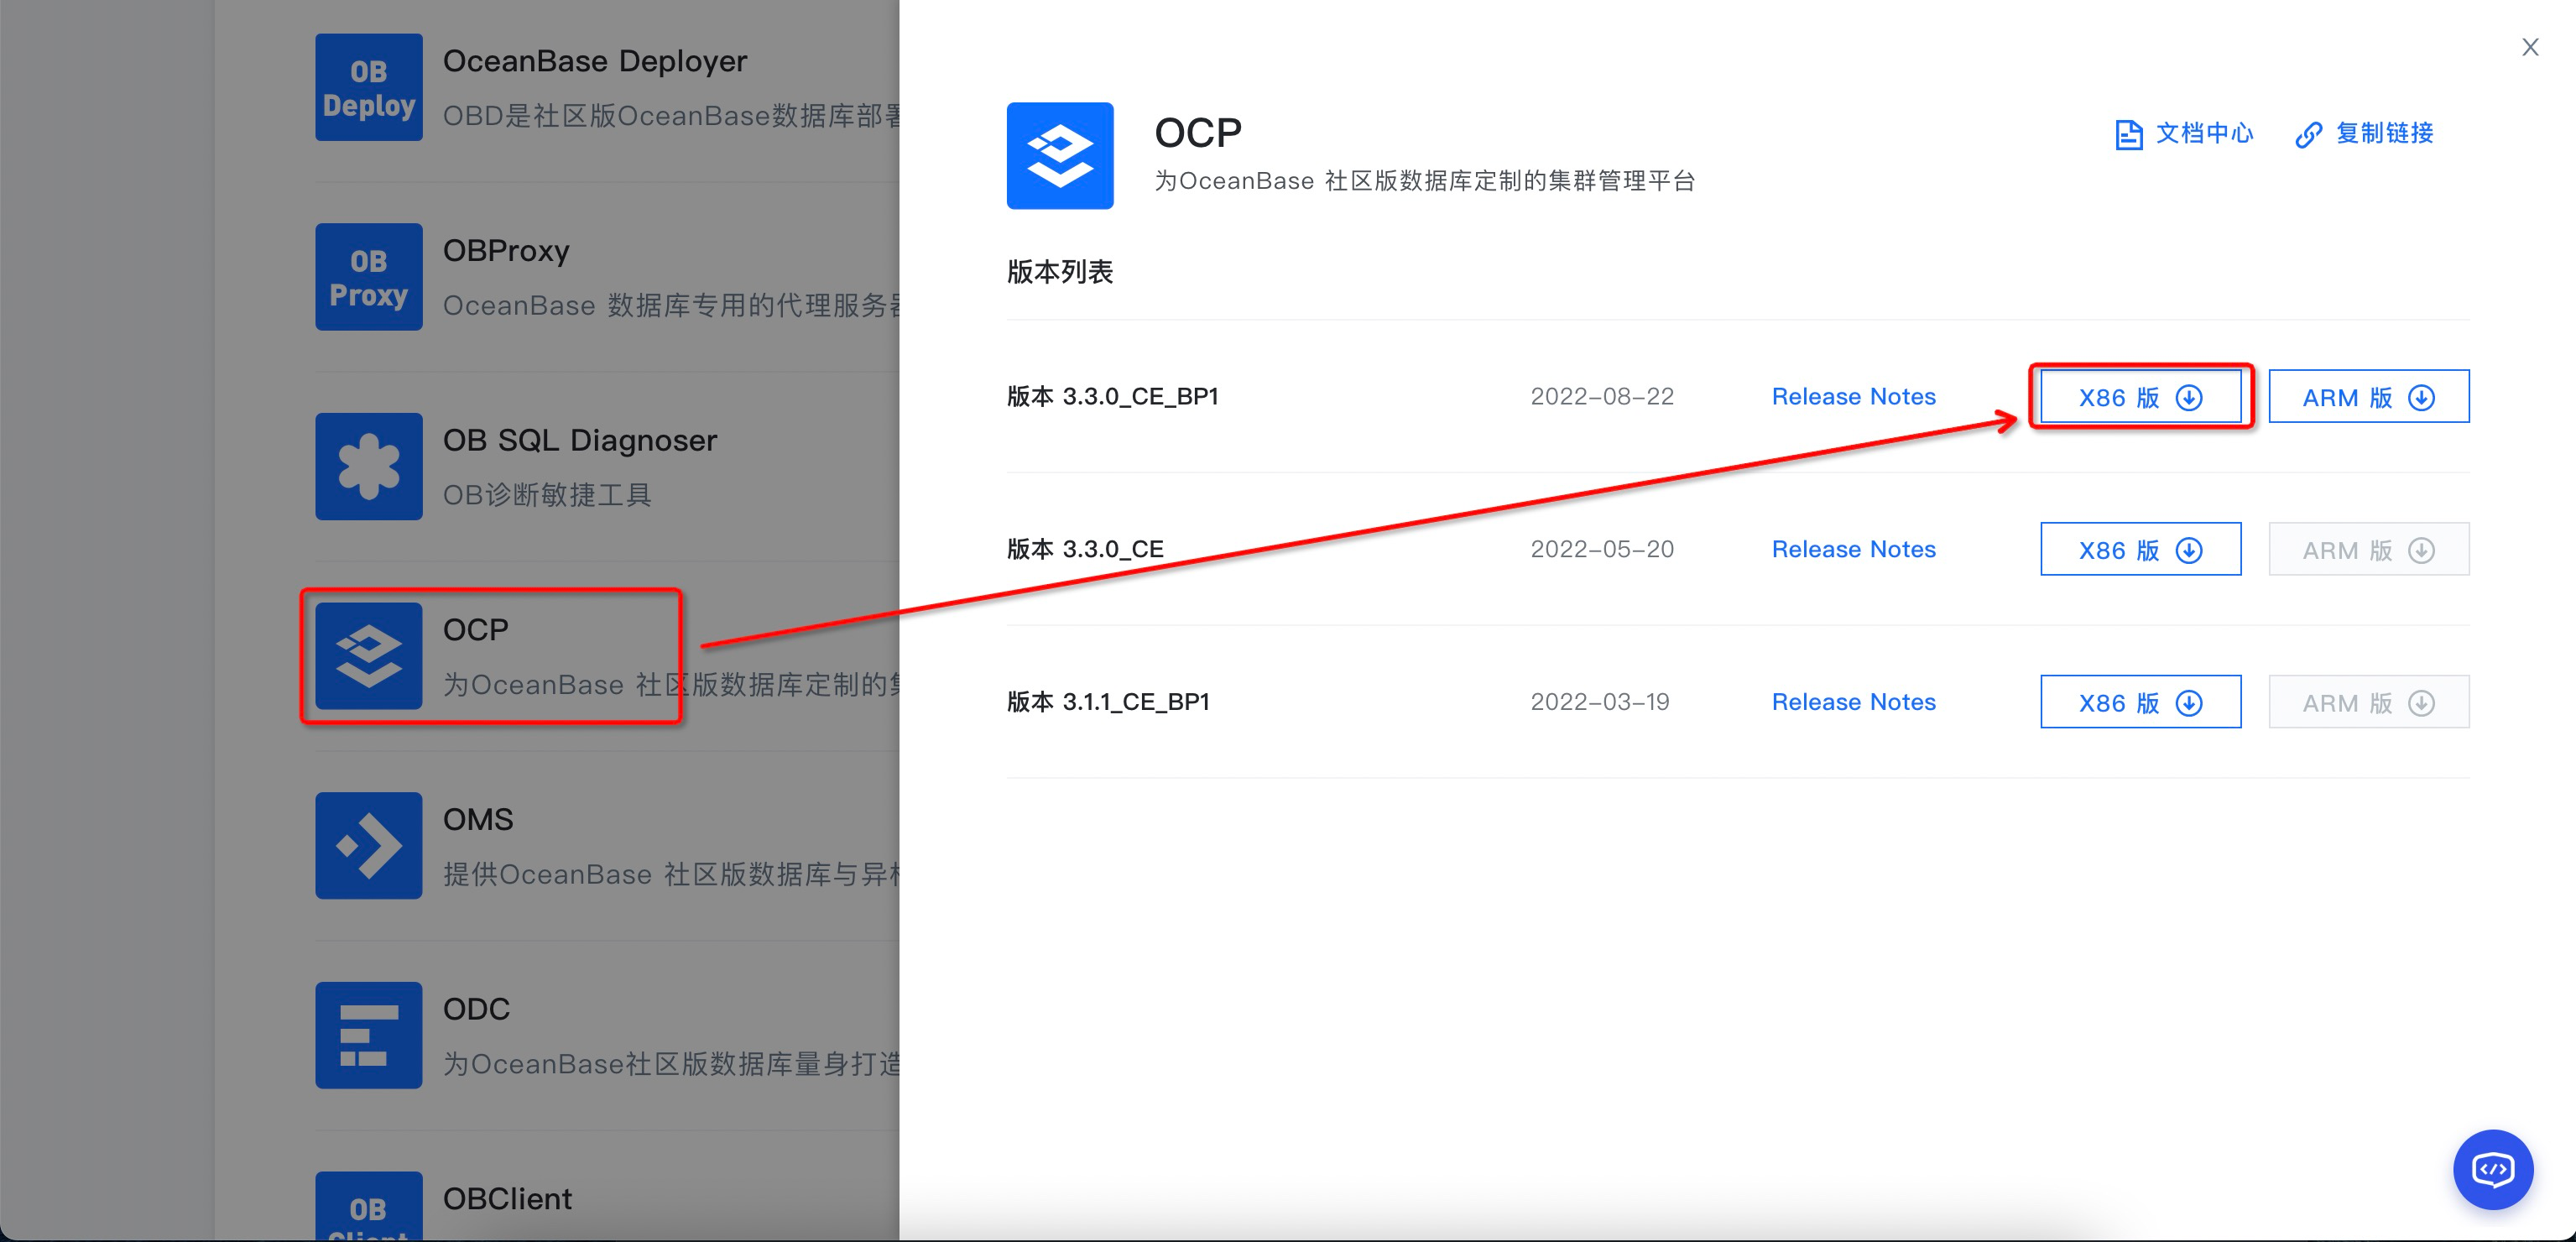
- 下载安装包 (2.1 GB):
# 使用断点续传下载 OCP 社区版安装包
$ wget -c https://obbusiness-private.oss-cn-shanghai.aliyuncs.com/download-center/opensource/ocp/3.3.0_CE_BP1/ocp-3.3.0-ce-bp1-x86_64.tar.gz

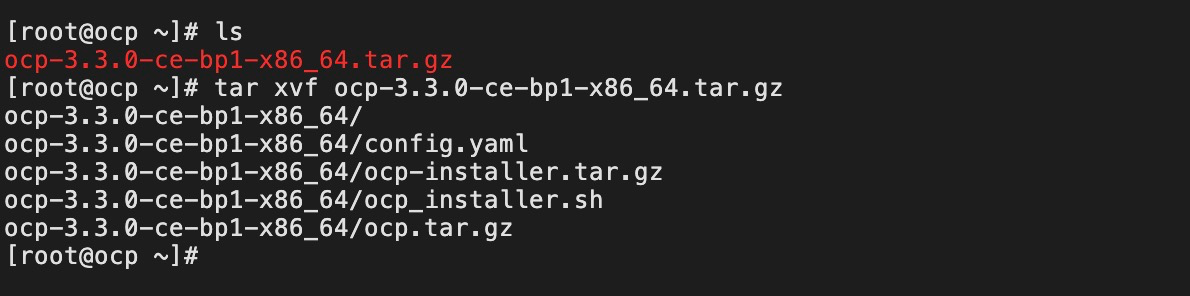
- 解压安装包:
# 解压安装包
$ tar xvf ocp-3.3.0-ce-bp1-x86_64.tar.gz
- 解压后获得以下文件:
-
config.yaml: OCP 配置文件 -
ocp-installer.tar.gz: OCP 安装程序镜像文件 -
ocp_installer.sh: OCP 安装脚本 -
ocp.tar.gz: OCP 镜像文件
-
导入镜像
-
ocp-installer.tar.gz和ocp.tar.gz镜像在安装过程中都会导入到 docker 中,会花费一定时间。尤其是ocp.tar.gz会先scp到目标主机 (虽然当前主机和目标主机是同一台,但 scp 时间测试下来仍然会比较久) 再导入到 docker,导致速度比较慢,容易出现超时等异常错误。 - 因此建议提前导入镜像,可以避免执行 scp,提升安装成功率:
# 导入 OCP 安装程序镜像
$ docker load -i ocp-installer.tar.gz

# 导入 OCP 镜像
$ docker load -i ocp.tar.gz

# 查看镜像列表
$ docker image ls
REPOSITORY                                            TAG            IMAGE ID       CREATED       SIZE
reg.docker.alibaba-inc.com/ocp2/ocp-installer         3.3.0-x86_64   4416b5374d7e   5 weeks ago   1.15GB
reg.docker.alibaba-inc.com/oceanbase/ocp-all-in-one   3.3.0-ce-bp1   5c0bd54ece38   6 weeks ago   2.61GB
修改安装配置
- 安装前需要先修改
config.yaml文件,主要分为以下几类配置:-
全局配置: 是否跳过预检查、是否创建和清空 metadb 集群。 -
metadb 集群配置: 作为 OCP 的元数据库集群,其中 home_path 安装路径、data_path 数据路径、redo_path 日志路径要和刚刚创建的目录保持一致。 -
OBProxy 配置: 作为 OCP 连接 metadb 集群的数据库代理。 -
SSH 鉴权配置: 主机鉴权,一般用 SSH 账密的方式。 -
OCP 配置: 包括安装服务器、启动端口、元数据库信息、权限用户等信息。其中元数据库通常使用上面 配置的 metadb 集群,权限用户使用刚刚创建的 admin。
-
# 进入解压后的目录
$ cd ocp-3.3.0-ce-bp1-x86_64/

# 修改配置文件
$ vim config.yaml
- 以下是我的
config.yaml配置 (数据已脱敏),将 metadb 集群、OBProxy 和 OCP 都安装到一台 ECS 上,大家可以按需配置。
# OCP deploy config
# Note:
# Do not use 127.0.0.1 or hostname as server address
# When a server has both public ip and private ip, if private ip is connectable, use private ip for faster connection
# If a vip is configured, it should be already created and bonded to the right server and port, the installation script won't do any work with vip maintainance, just use it to connect to the service

# Ignore precheck errors
# It's recommanded to not ignore precheck errors
precheck_ignore: false

# Create an obcluster as OCP's metadb
create_metadb_cluster: true

# Clean OCP's metadb cluster when uninstall
clean_metadb_cluster: false

# Metadb cluster deploy config
ob_cluster:
  name: obcluster
  home_path: /home/admin/oceanbase
  root_password: '******'
  # The directory for data storage, it's recommanded to use an independent path
  data_path: /data/1
  # The directory for clog, ilog, and slog, it's recommanded to use an independent path.
  redo_path: /data/log1
  sql_port: 2881
  rpc_port: 2882
  zones:
    - name: zone1
      servers:
        - x.x.x.x
  ## custom obd config for obcluster
  # custom_config:
  #   - key: devname
  #     value: eth0

  # Meta user info
  meta:
    tenant: meta_tenant
    user: meta_user
    password: ******
    database: meta_database
    cpu: 2
    # Memory configs in GB, 4 means 4GB
    memory: 4

  # Monitor user info
  monitor:
    tenant: monitor_tenant
    user: monitor_user
    password: ******
    database: monitor_database
    cpu: 4
    # Memory configs in GB, 8 means 8GB
    memory: 8

# Obproxy to connect metadb cluster
obproxy:
  home_path: /home/admin/obproxy
  port: 2883
  servers:
    - x.x.x.x

  ## custom config for obproxy
  # custom_config:
  #   - key: clustername
  #     value: obcluster


  ## Vip is optional, if vip is not configured, one of obproxy servers's address will be used
  # vip:
  #   address: 1.1.1.1
  #   port: 2883

# Ssh auth config
ssh:
  port: 22
  user: admin
  # auth method, support password and pubkey
  auth_method: password
  timeout: 10
  password: ******

# OCP config
ocp:
  # ocp container's name
  name: 'ocp'

  # OCP process listen port and log dir on host
  process:
    port: 8080
    log_dir: /tmp/ocp/log
  servers:
    - x.x.x.x
  # OCP container's resource
  resource:
    cpu: 4
    # Memory configs in GB, 8 means 8GB
    memory: 8
  # Vip is optional, if vip is not configured, one of ocp servers's address will be used
  # vip:
  #   address: 1.1.1.1
  #   port: 8080
  # OCP basic auth config, used when upgrade ocp
  auth:
    user: admin
    password: ******
  # OCP metadb config, for ocp installation, if "create_metadb_cluster" is configured true, this part will be replaced with the configuration of metadb cluster and obproxy
  metadb:
    host: x.x.x.x
    port: 2883
    meta_user: meta_user@meta_tenant#obcluster
    meta_password: ******
    meta_database: meta_database
    monitor_user: monitor_user@monitor_tenant#obcluster
    monitor_password: ******
    monitor_database: monitor_database
安装 OCP
- 安装时使用 SSH 密码方式进行认证:
# 使用密码的方式进行认证
$ ./ocp_installer.sh install -c config.yaml -i ./ocp-installer.tar.gz -o ./ocp.tar.gz
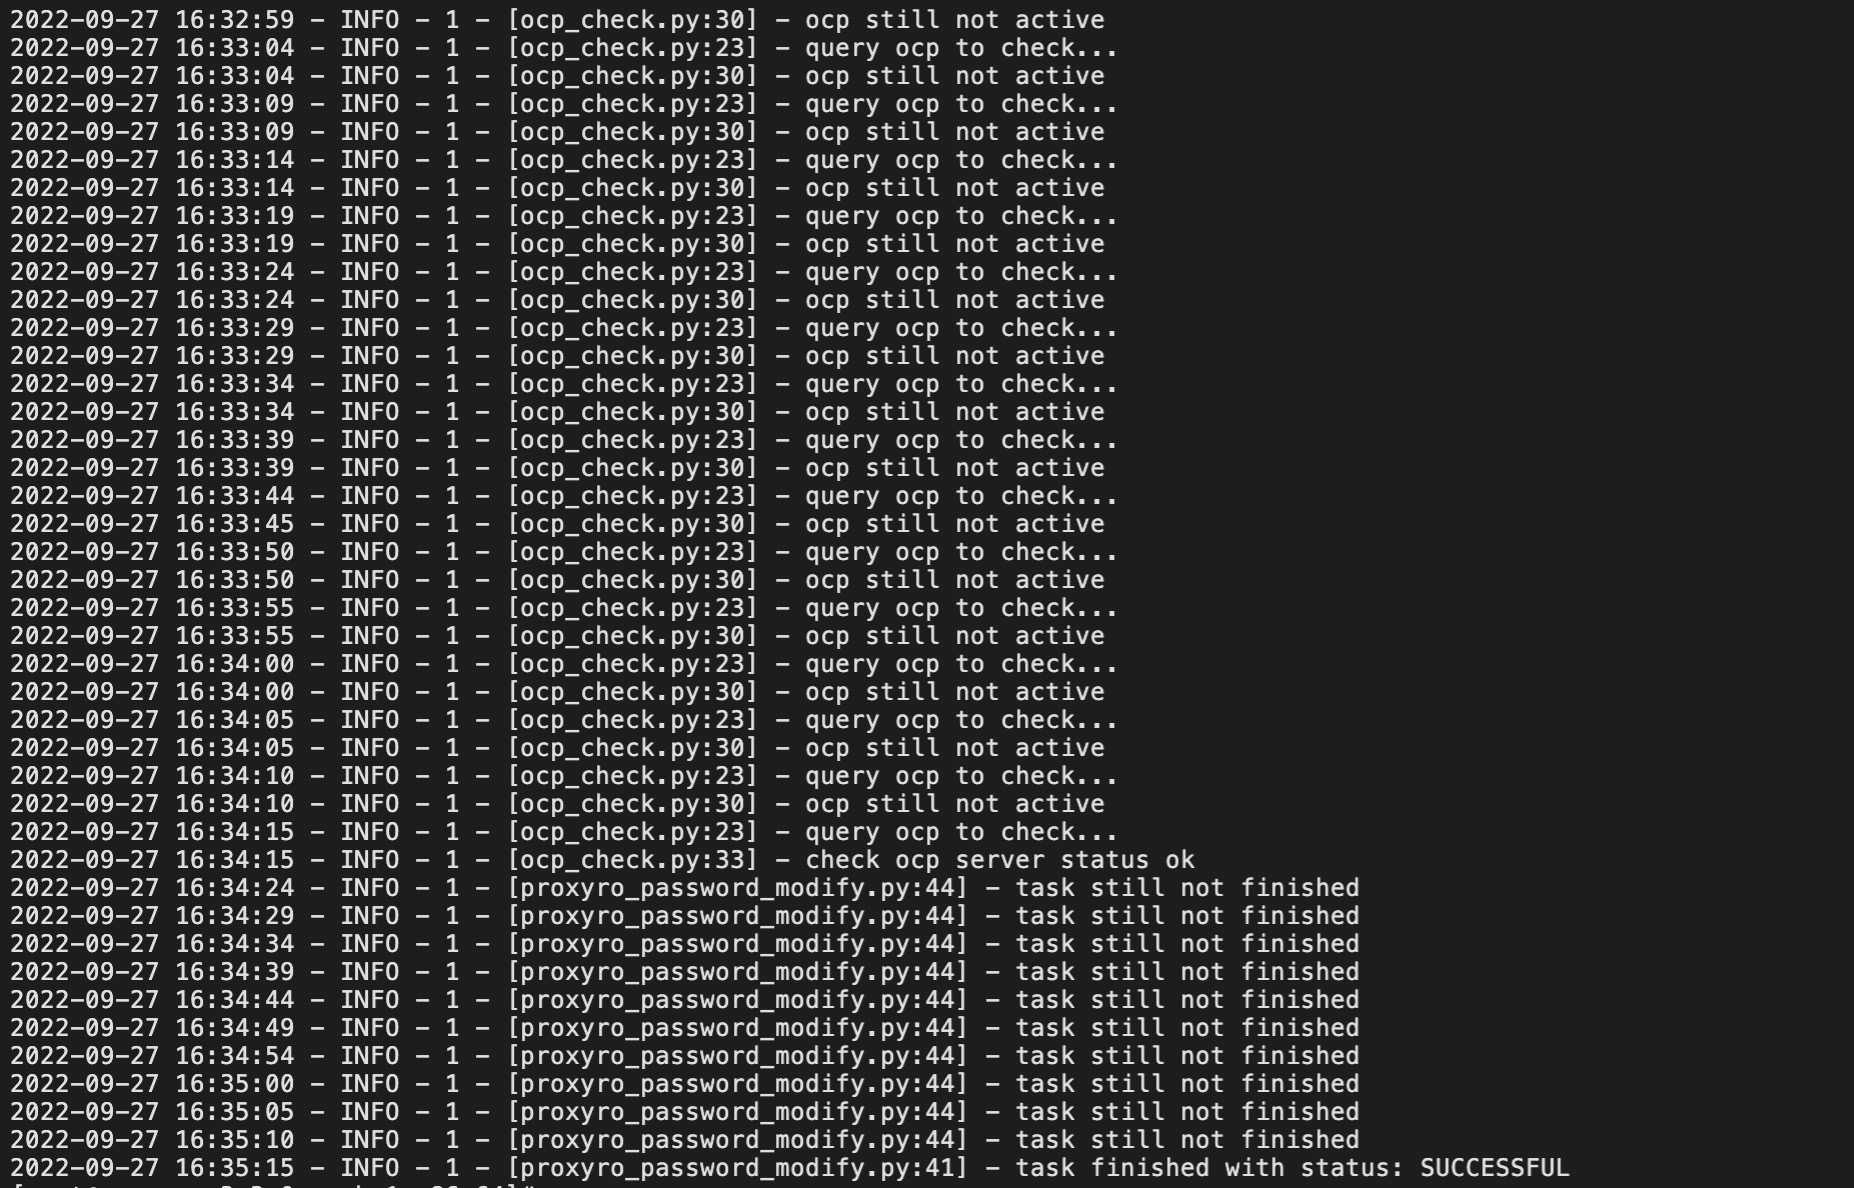
- 主要安装步骤如下:
-
install start: 开始安装 -
check docker on host: 检查 docker -
load installer docker image: 导入 OCP 安装程序镜像,之前已手动导入,因此这里会直接使用已导入的镜像。 -
make log dir: 创建安装的日志目录 -
make obd dir: 创建 OBD 目录 -
ob_precheck.py: OceanBaase 安装预检查,包括主机状态、CPU (> 8C)、可用内存 (> 64GB)、操作系统、用户权限和目录、防火墙等。
-

-
ob_install.py: 使用 OBD 部署 metadb 集群,安装 OBProxy 和 OCP,并对 metadb 集群进行元数据初始化。
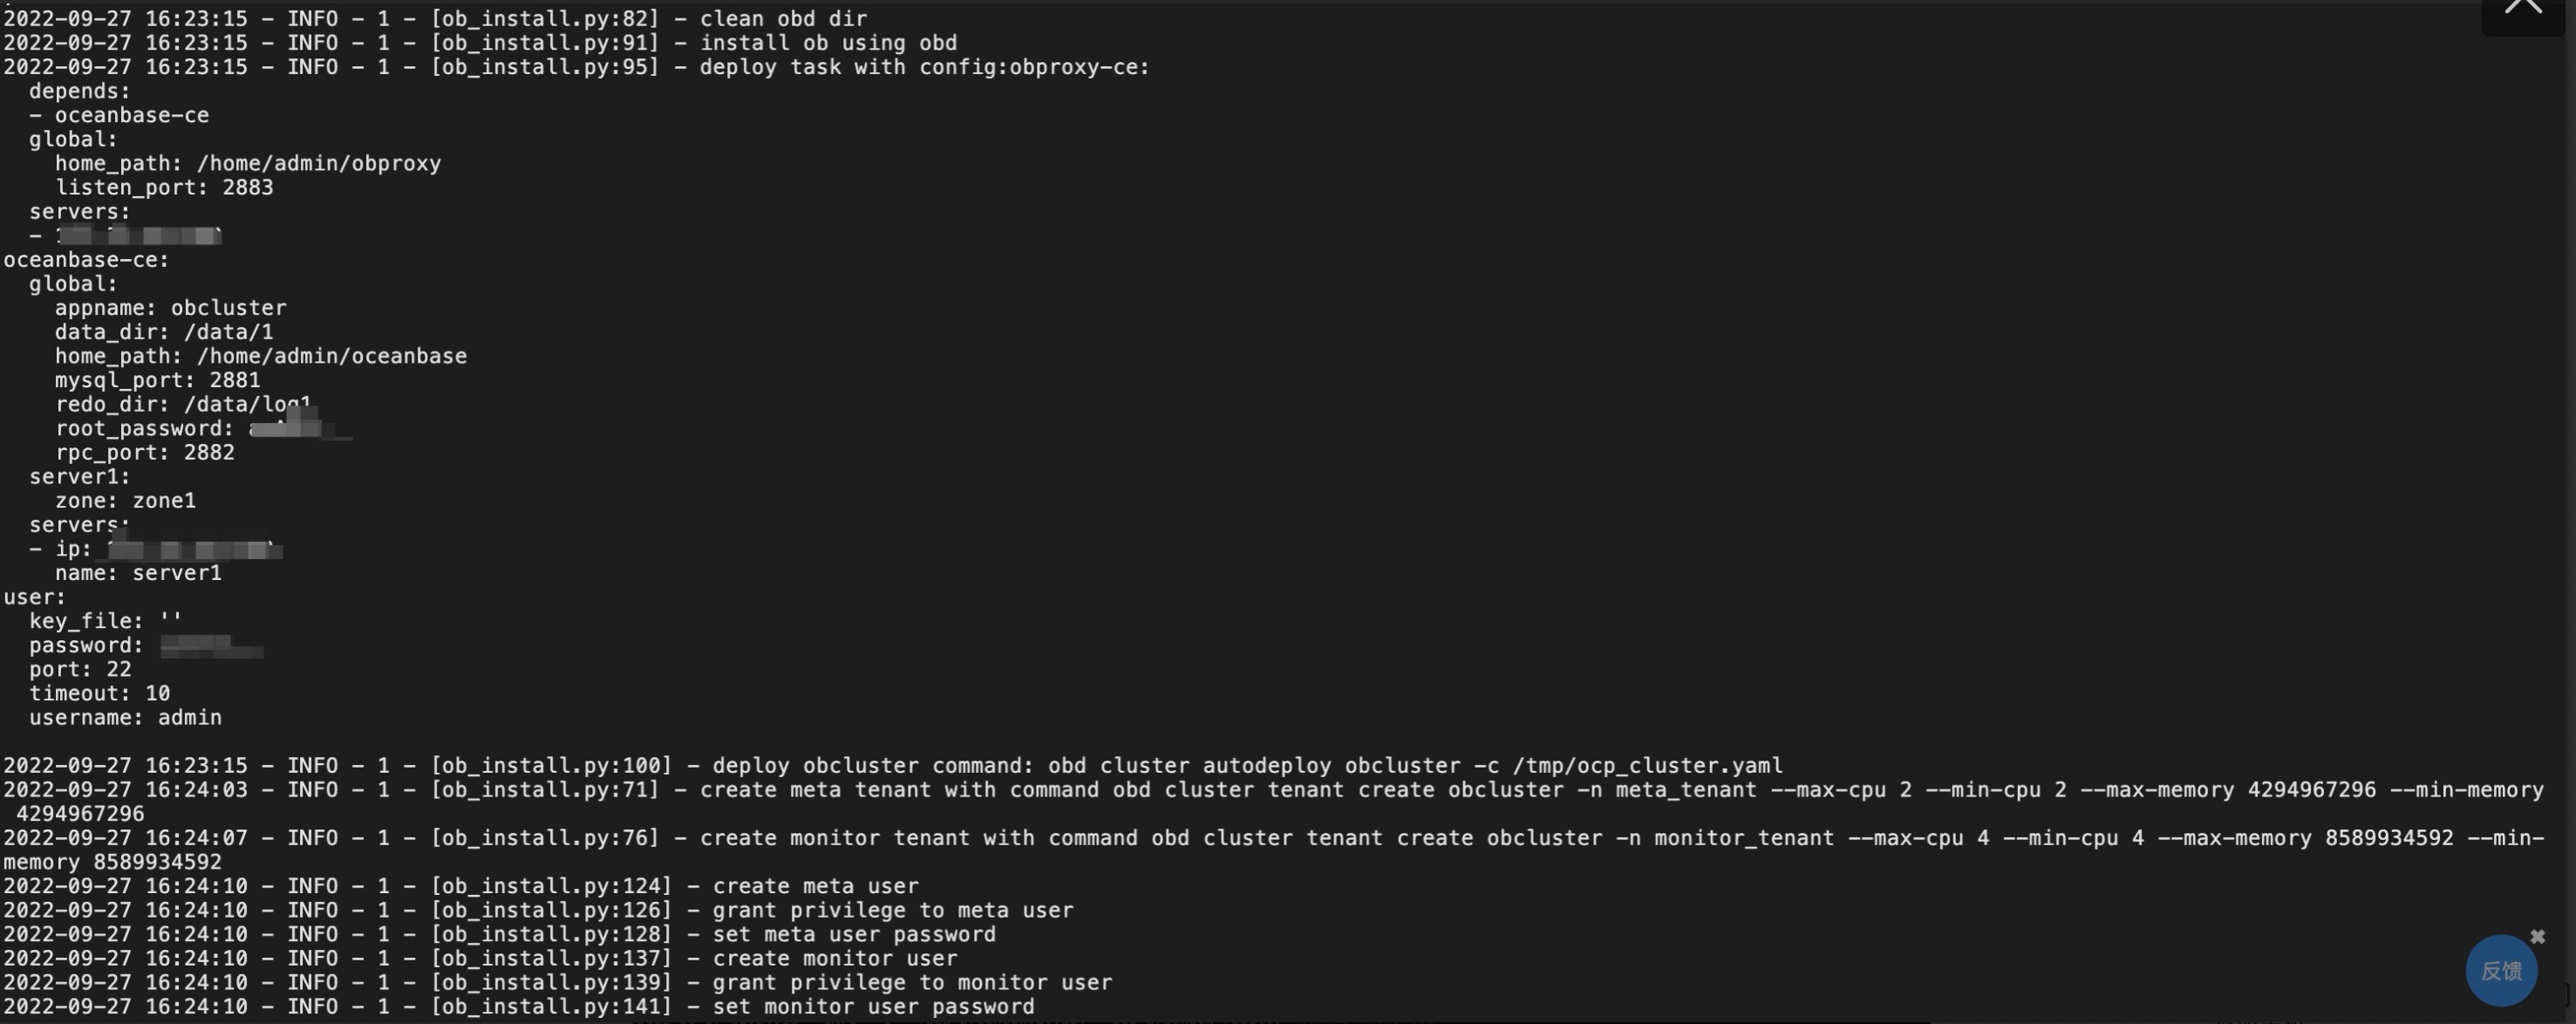
-
ocp_precheck.py: OCP 安装预检查,包括主机状态、CPU (> 8C)、可用内存 (> 32GB)、操作系统、用户权限和目录、防火墙等。

-
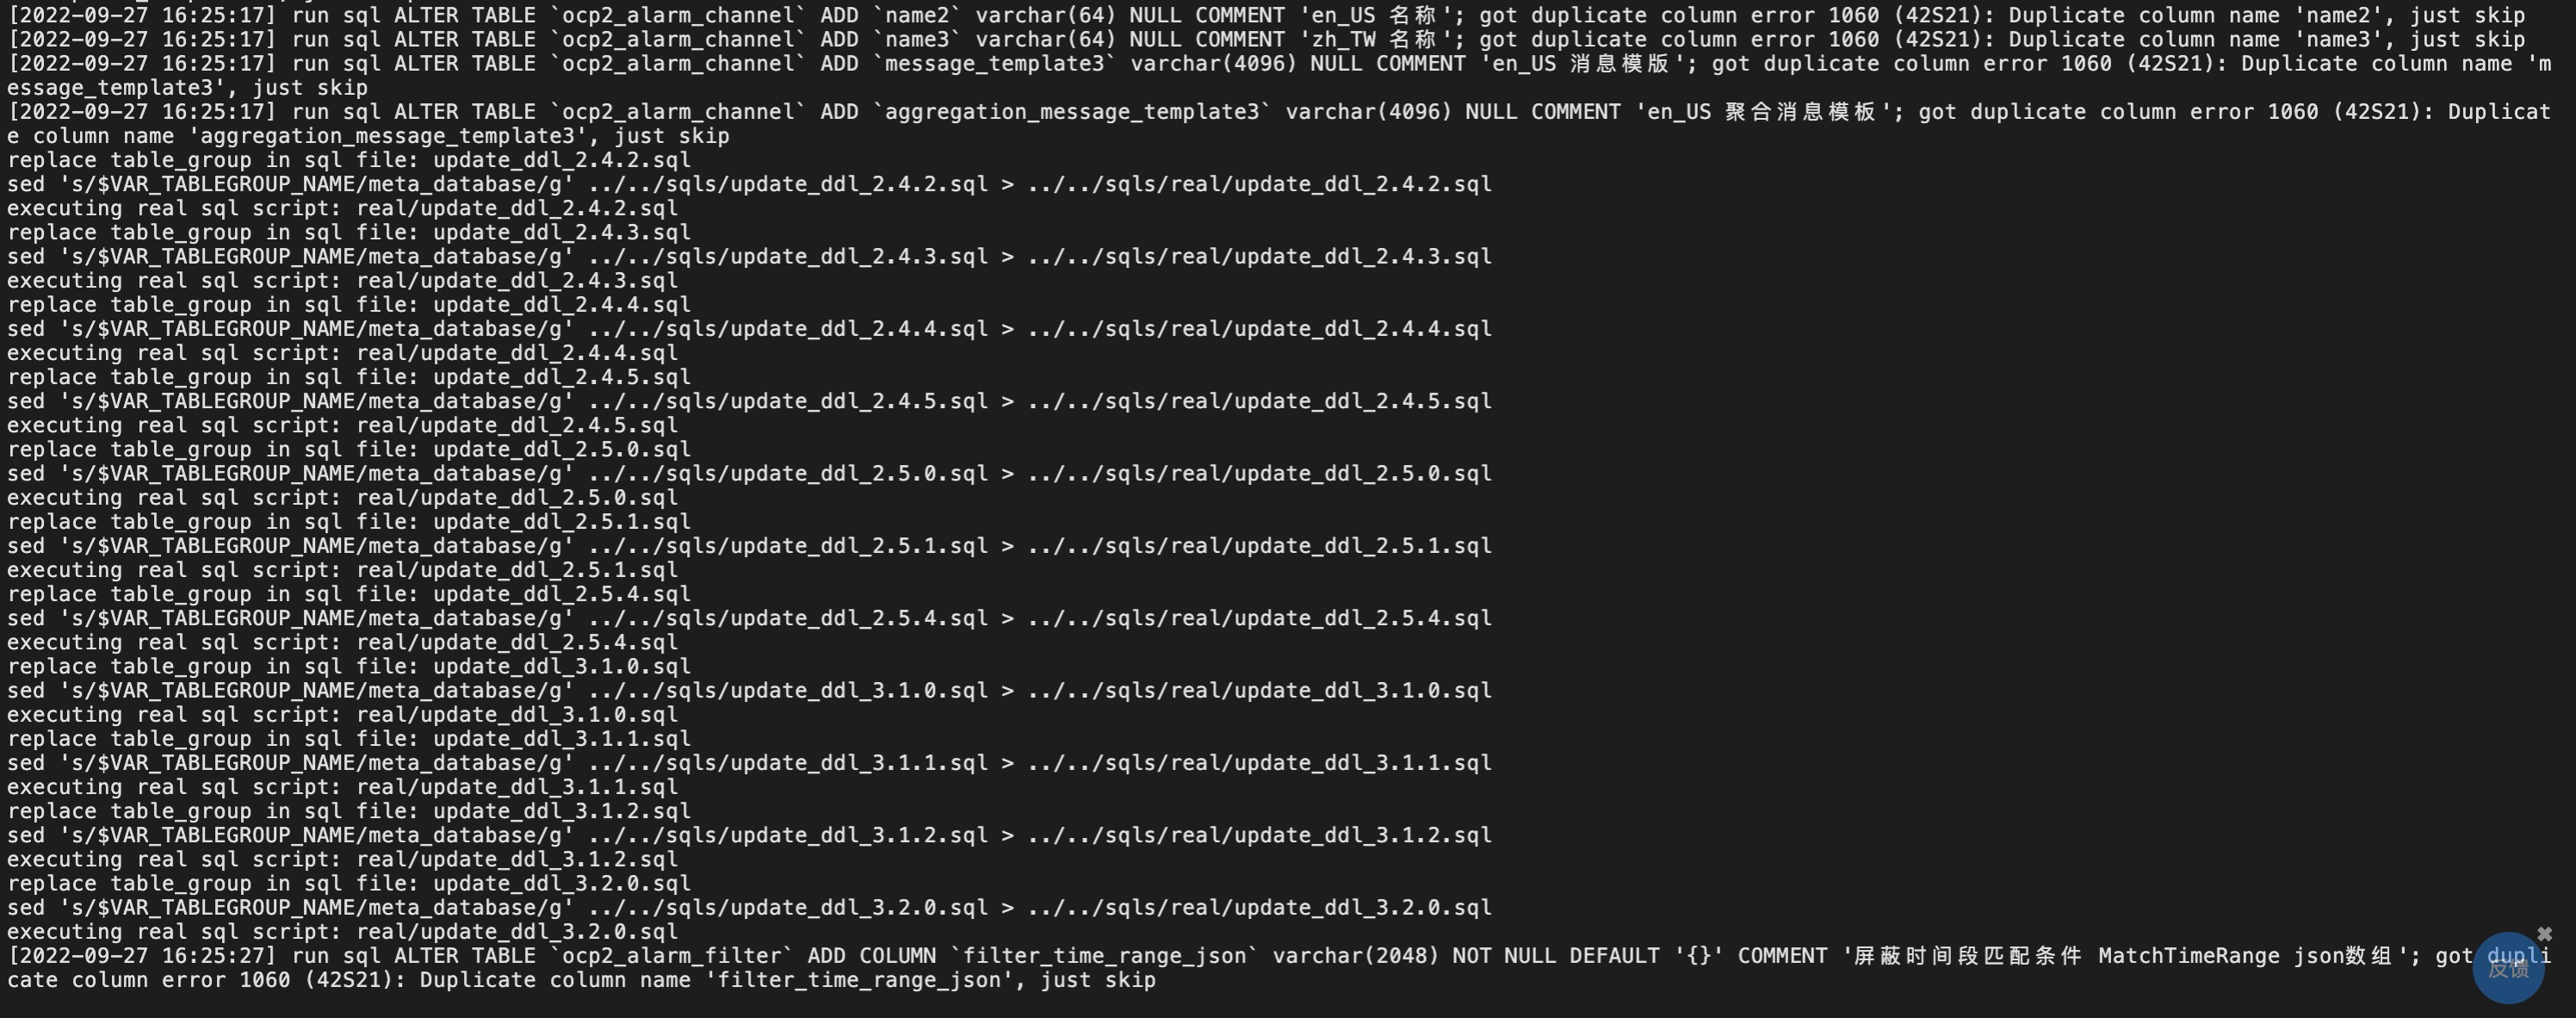
image_load.py: 加载 docker 镜像。 -
metadb_init.py: 初始化 OCP 的 metadb。
- 安装成功:
- 使用 docker stats ocp 命令查看当前 OCP 容器状态,确认 CPU、Memory 等信息正确。
$ docker stats ocp
CONTAINER ID   NAME      CPU %     MEM USAGE / LIMIT   MEM %     NET I/O   BLOCK I/O    PIDS
f39df9918811   ocp       6.66%     4.647GiB / 8GiB     58.08%    0B / 0B   0B / 119kB   591
- 测试 OCP 是否启动成功:
$ curl http://127.0.0.1:8080/api/v2/time
"2022-09-27T16:54:20.014+08:00"
启动 OCP
- 如果遇到操作系统或 Docker 重启,则 metadb 集群和 OCP 容器也会随之停止,需要手动拉起。
- 启动 OBServer:
# OBServer 进程启动需要依赖 libmariadb.so.3,这个动态库通常放在 $OB_HOME/lib 目录
# 因此首次手动启动 OBServer 需要设置 lib 的环境变量
# 详见: http://ask.oceanbase.com/t/topic/13700904/2
$ export LD_LIBRARY_PATH=$LD_LIBRARY_PATH:/home/admin/oceanbase/lib/

# 切换到 OceanBase 的安装目录
$ cd /home/admin/oceanbase

# 启动 OBServer
$ ./bin/observer
- 启动 OBProxy:
# 切换到 OBProxy 的安装目录
$ cd /home/admin/obproxy

# 启动 OBProxy
$ ./bin/obproxy
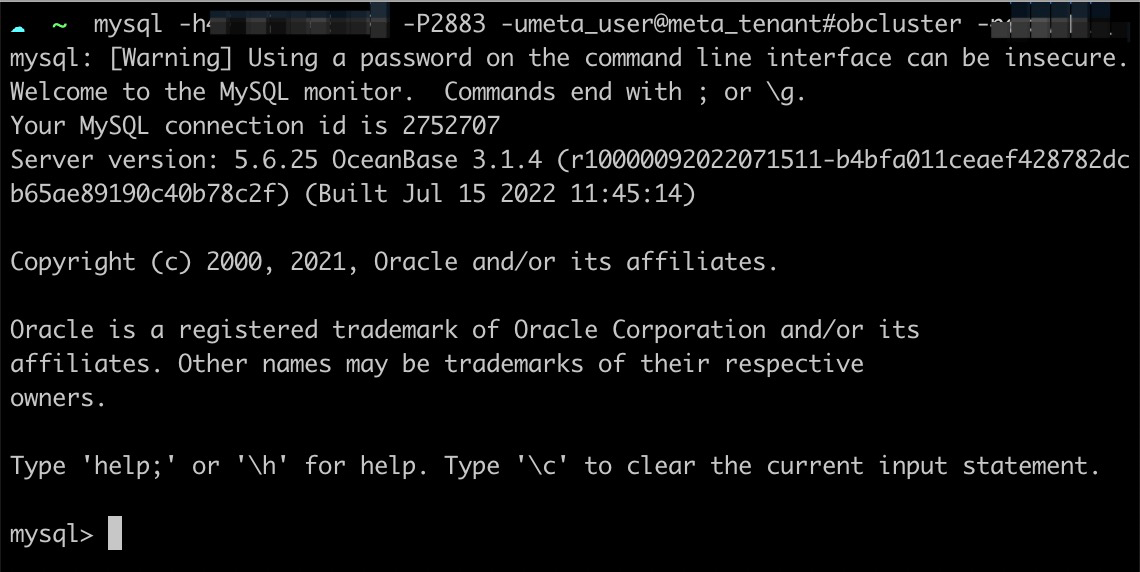
- 验证 metadb 集群是否可以通过 OBProxy 进行连接:
- 启动 Docker 服务和 OCP 容器:
# 如果是系统重启,需要先启动 Docker
$ systemctl start docker

# 进入 OCP 安装程序的目录
$ cd ~/ocp-3.3.0-ce-bp1-x86_64/

# 启动 OCP 容器
$ ./ocp_installer.sh replace
卸载 OCP
- 运行以下命令可卸载 OCP。如果要保留元数据集群,可以修改 config.yaml 中的
clean_metadb_cluster: false配置后再执行卸载命令。
$ ./ocp_installer.sh uninstall -c config.yaml -i ./ocp-installer.tar.gz
更多 OCP 操作
$ ./ocp_installer.sh help
Usage:
./ocp_installer.sh COMMAND -c config_file -i installer_image_file [-o ocp_image_file] [-k ssh_key_file] [-v] [-h]
Description:
OCP installer

Commands:
  launch       launch installer
  install      install OCP
  uninstall    delete OCP and metadb(if configured)
  upgrade      upgrade OCP
  replace      replace OCP container, used for upgrade to the bp version, or just restart

Options:
  -c           required, path to config file
  -i           installer image file
  -o           ocp image file
  -k           ssh_key_file
  -v           show verbose messages
  -p           expose port of installer container
  -h           show this help mesages
部署 OceanBase 集群
OBServer 软件环境准备
- 准备三台 ECS 用于部署三节点的 OceanBase 集群,安装 OceanBase 的宿主机我们称为 OBServer。
- 根据 OCP 社区版的 官方文档,OBServer 要求先安装 MySQL Client 和 python 2.7。
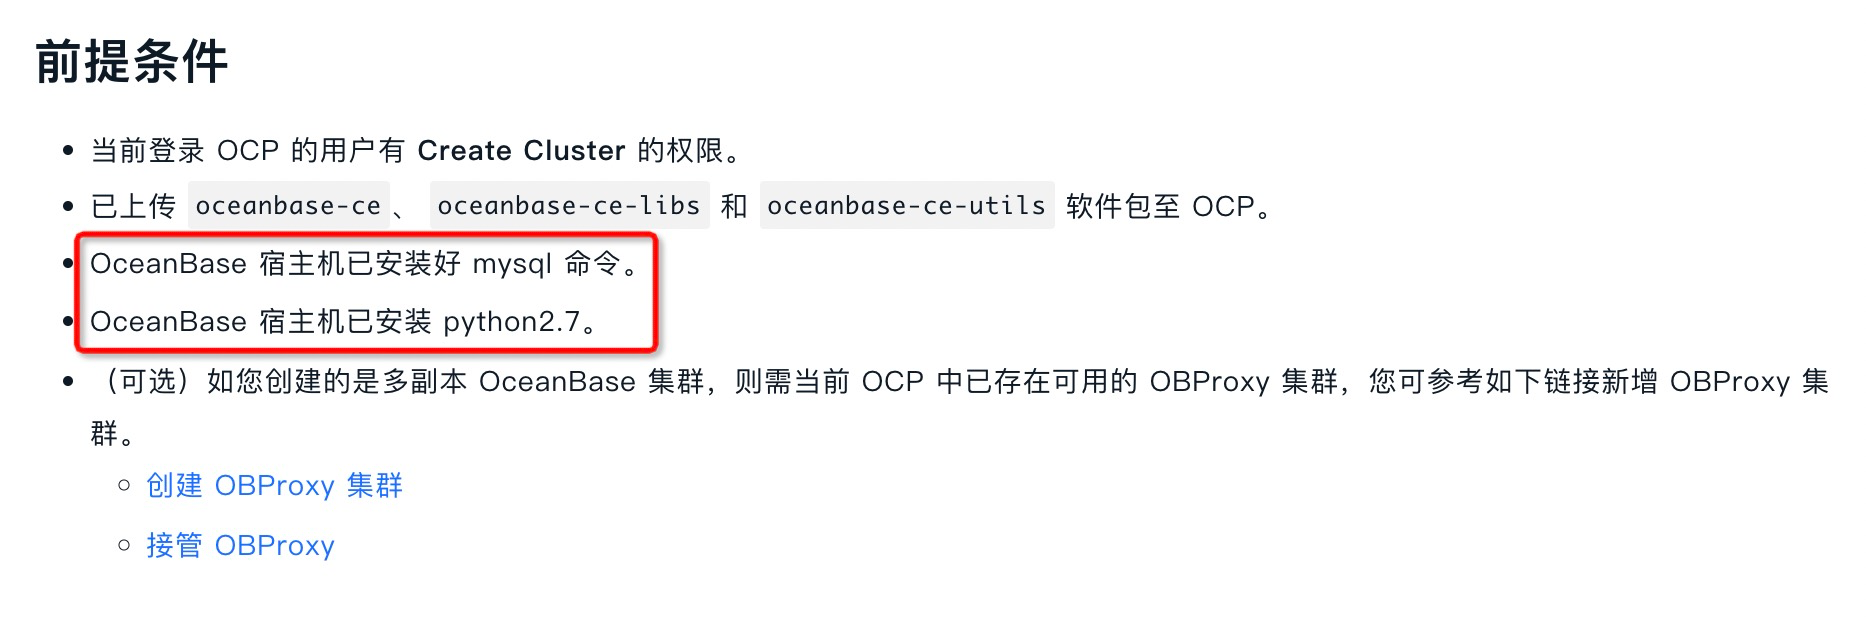
- 因此逐一登录到对应的 ECS 宿主机:
- 安装 MySQL Client:
# 安装 MySQL Client
$ yum install -y mysql

# 验证是否安装成功
$ mysql -V
mysql  Ver 15.1 Distrib 5.5.68-MariaDB, for Linux (x86_64) using readline 5.1
- CentOS 7.x 会自带 Python 2.7,因此无须安装:
# 验证 Python 是否安装
$ python -V
Python 2.7.5
OBServer 用户和目录规划
- 新建 admin 用户并设置密码:
# 创建 admin 用户
$ useradd -U admin -d /home/admin -s /bin/bash

# 设置 admin 用户的密码
$ passwd admin
- 打开
/etc/sudoers文件:
$ vim /etc/sudoers
- 为 admin 用户设置 sudo 权限 (注意,编辑完后需要使用
wq!才能保存退出):
## Same thing without a password
# %wheel        ALL=(ALL)       NOPASSWD: ALL
admin       ALL=(ALL)       NOPASSWD: ALL
- 新建
/home/admin/oceanbase、/data/1、/data/log1三个目录,并将目录权限赋予admin用户:
| 目录 | 说明 | 权限 |
|---|---|---|
| /home/admin/oceanbase | OceanBase 安装目录 | admin 用户可读可写 |
| /data/1 | OceanBase 数据目录 | admin 用户可读可写 |
| /data/log1 | OceanBase 日志目录 | admin 用户可读可写 |
# 新建目录
$ mkdir -p /home/admin/oceanbase
$ mkdir -p /data/1
$ mkdir -p /data/log1

# 将目录权限赋予 admin
$ chown -R admin:admin /home/admin/oceanbase
$ chown -R admin:admin /data/1
$ chown -R admin:admin /data/log1
OBServer & OBProxy 端口规划
- 用到的端口如下,要求未被其他程序占用:
| 说明 | 端口 | 协议类型 |
|---|---|---|
| OBServer 的 SQL 端口 | 2881 | TCP |
| OBServer 的 RPC 端口 | 2882 | TCP |
OBProxy 访问端口 (可选,因为后面会把 OBProxy 和 OceanBase 安装到同一台 ECS 上,因此在这里一并配置) |
2883 | TCP |
- 执行以下命令可查看端口占用情况:
# 安装 lsof 工具
$ yum install -y lsof

# 查看 2881 端口占用情况,为空表示未被占用
$ lsof -i:2881
- 同时还需要在 ECS 安全组中开放 2881、2882 和 2883 端口:

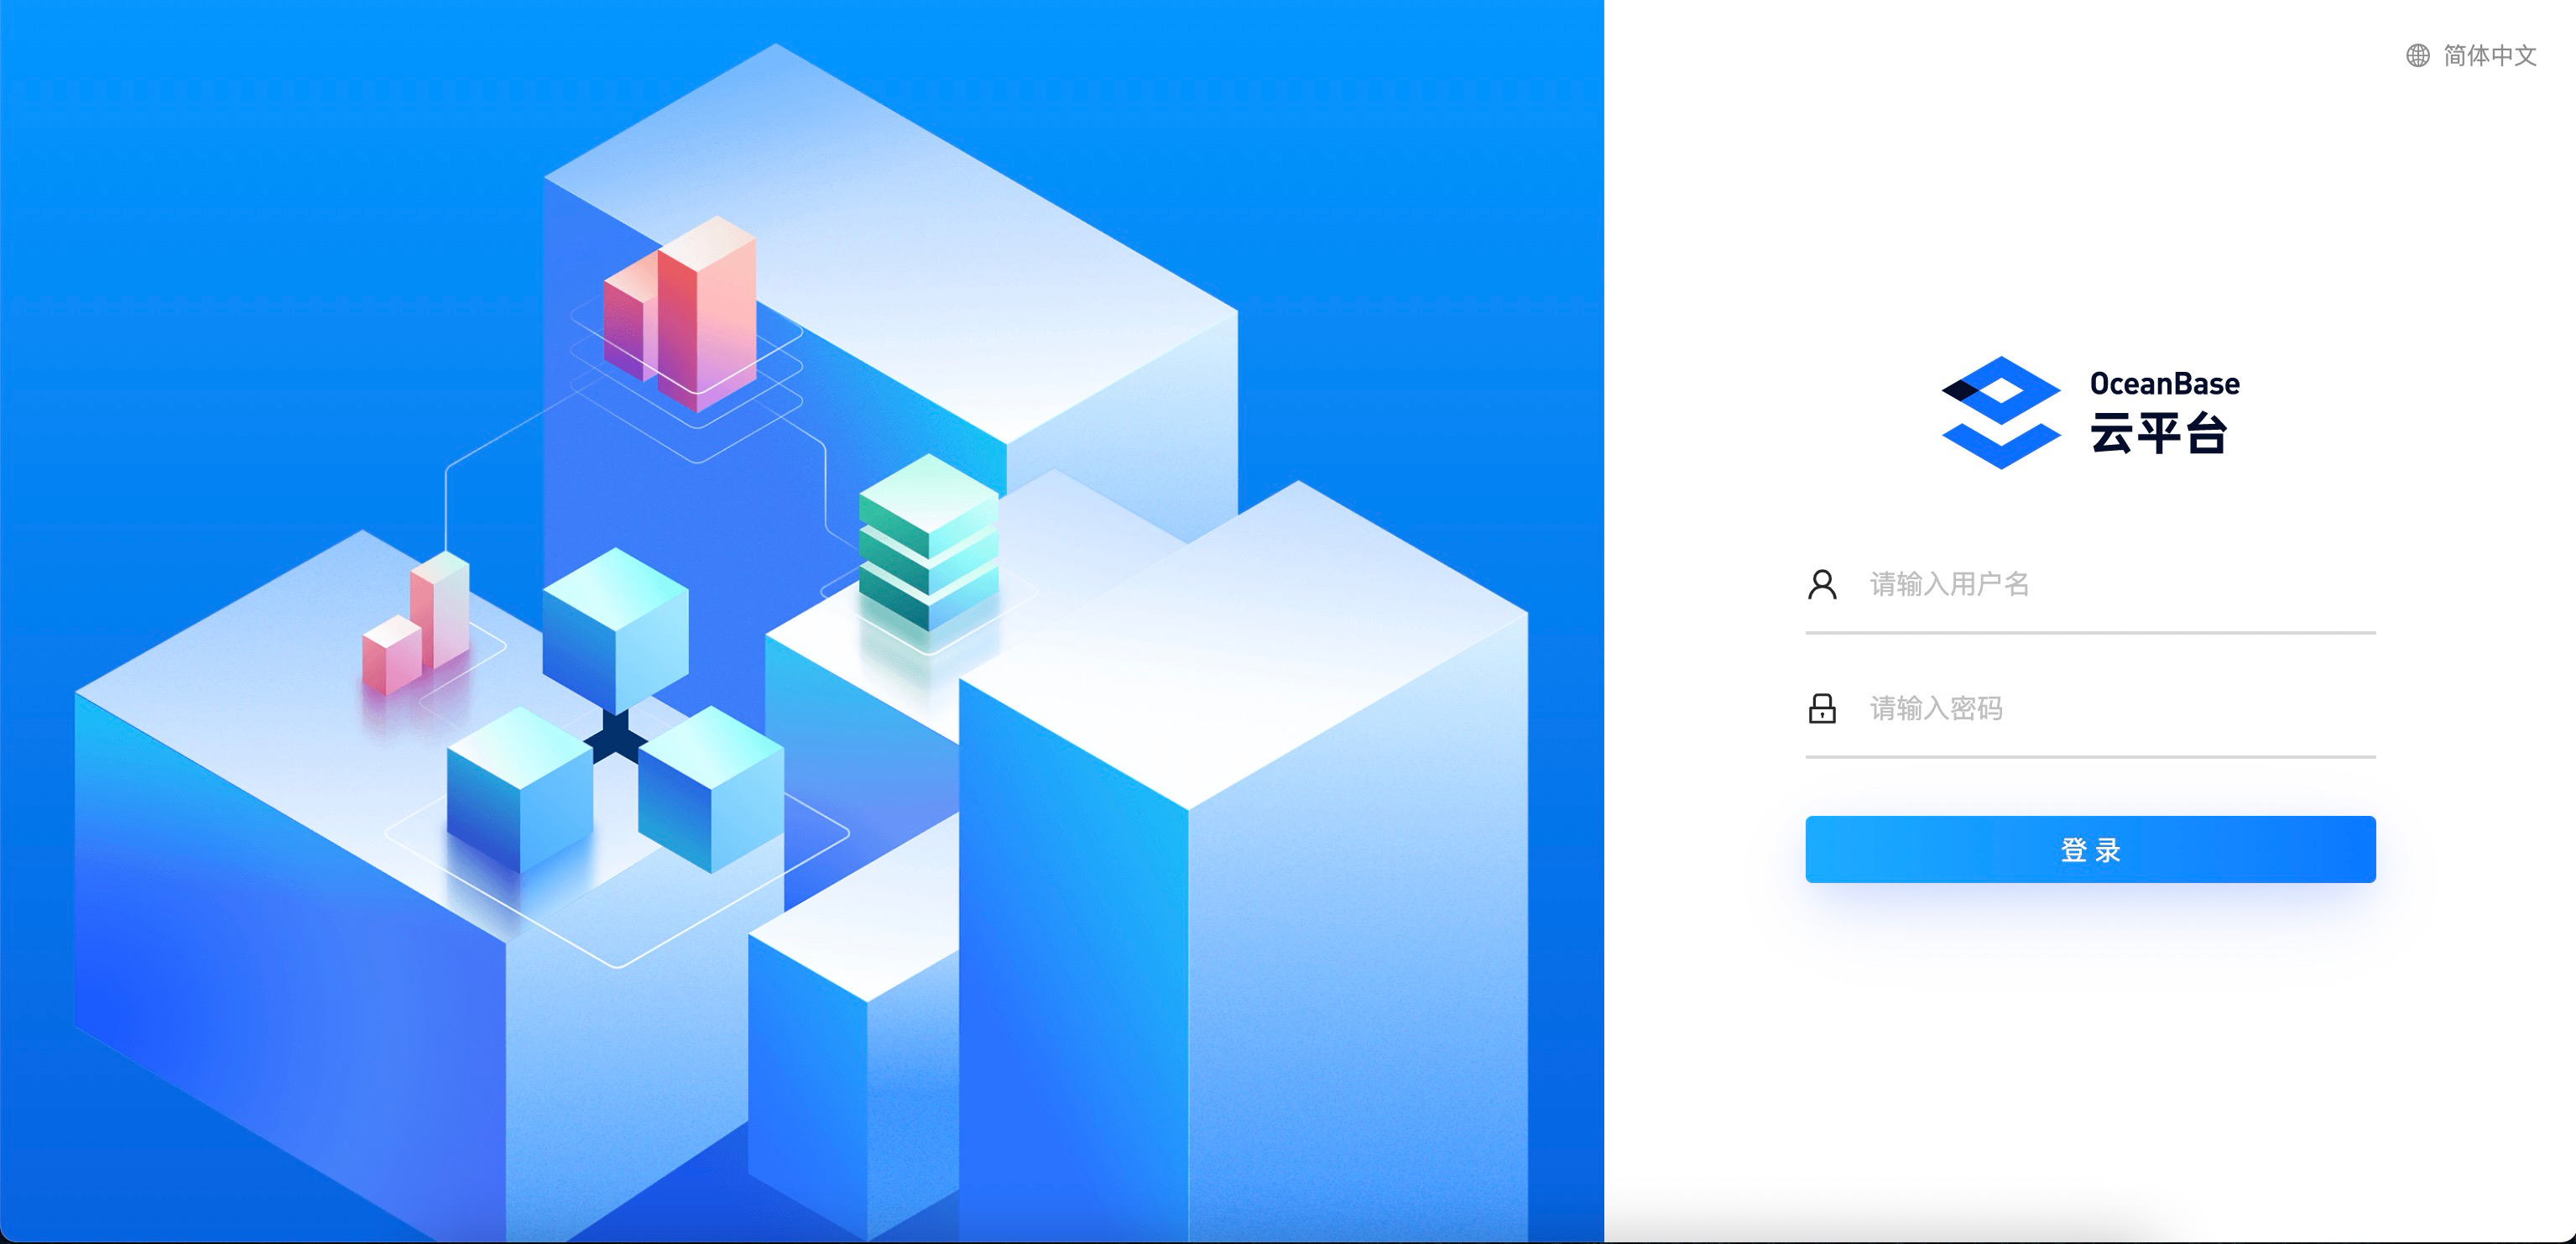
登录 OCP
- 通过公网地址访问 OCP 前端页面:
http://${公网 IP}:8080,可使用admin用户 (该用户为 OCP 用户,非 ECS 用户) 进行登录,默认密码为aaAA11__。
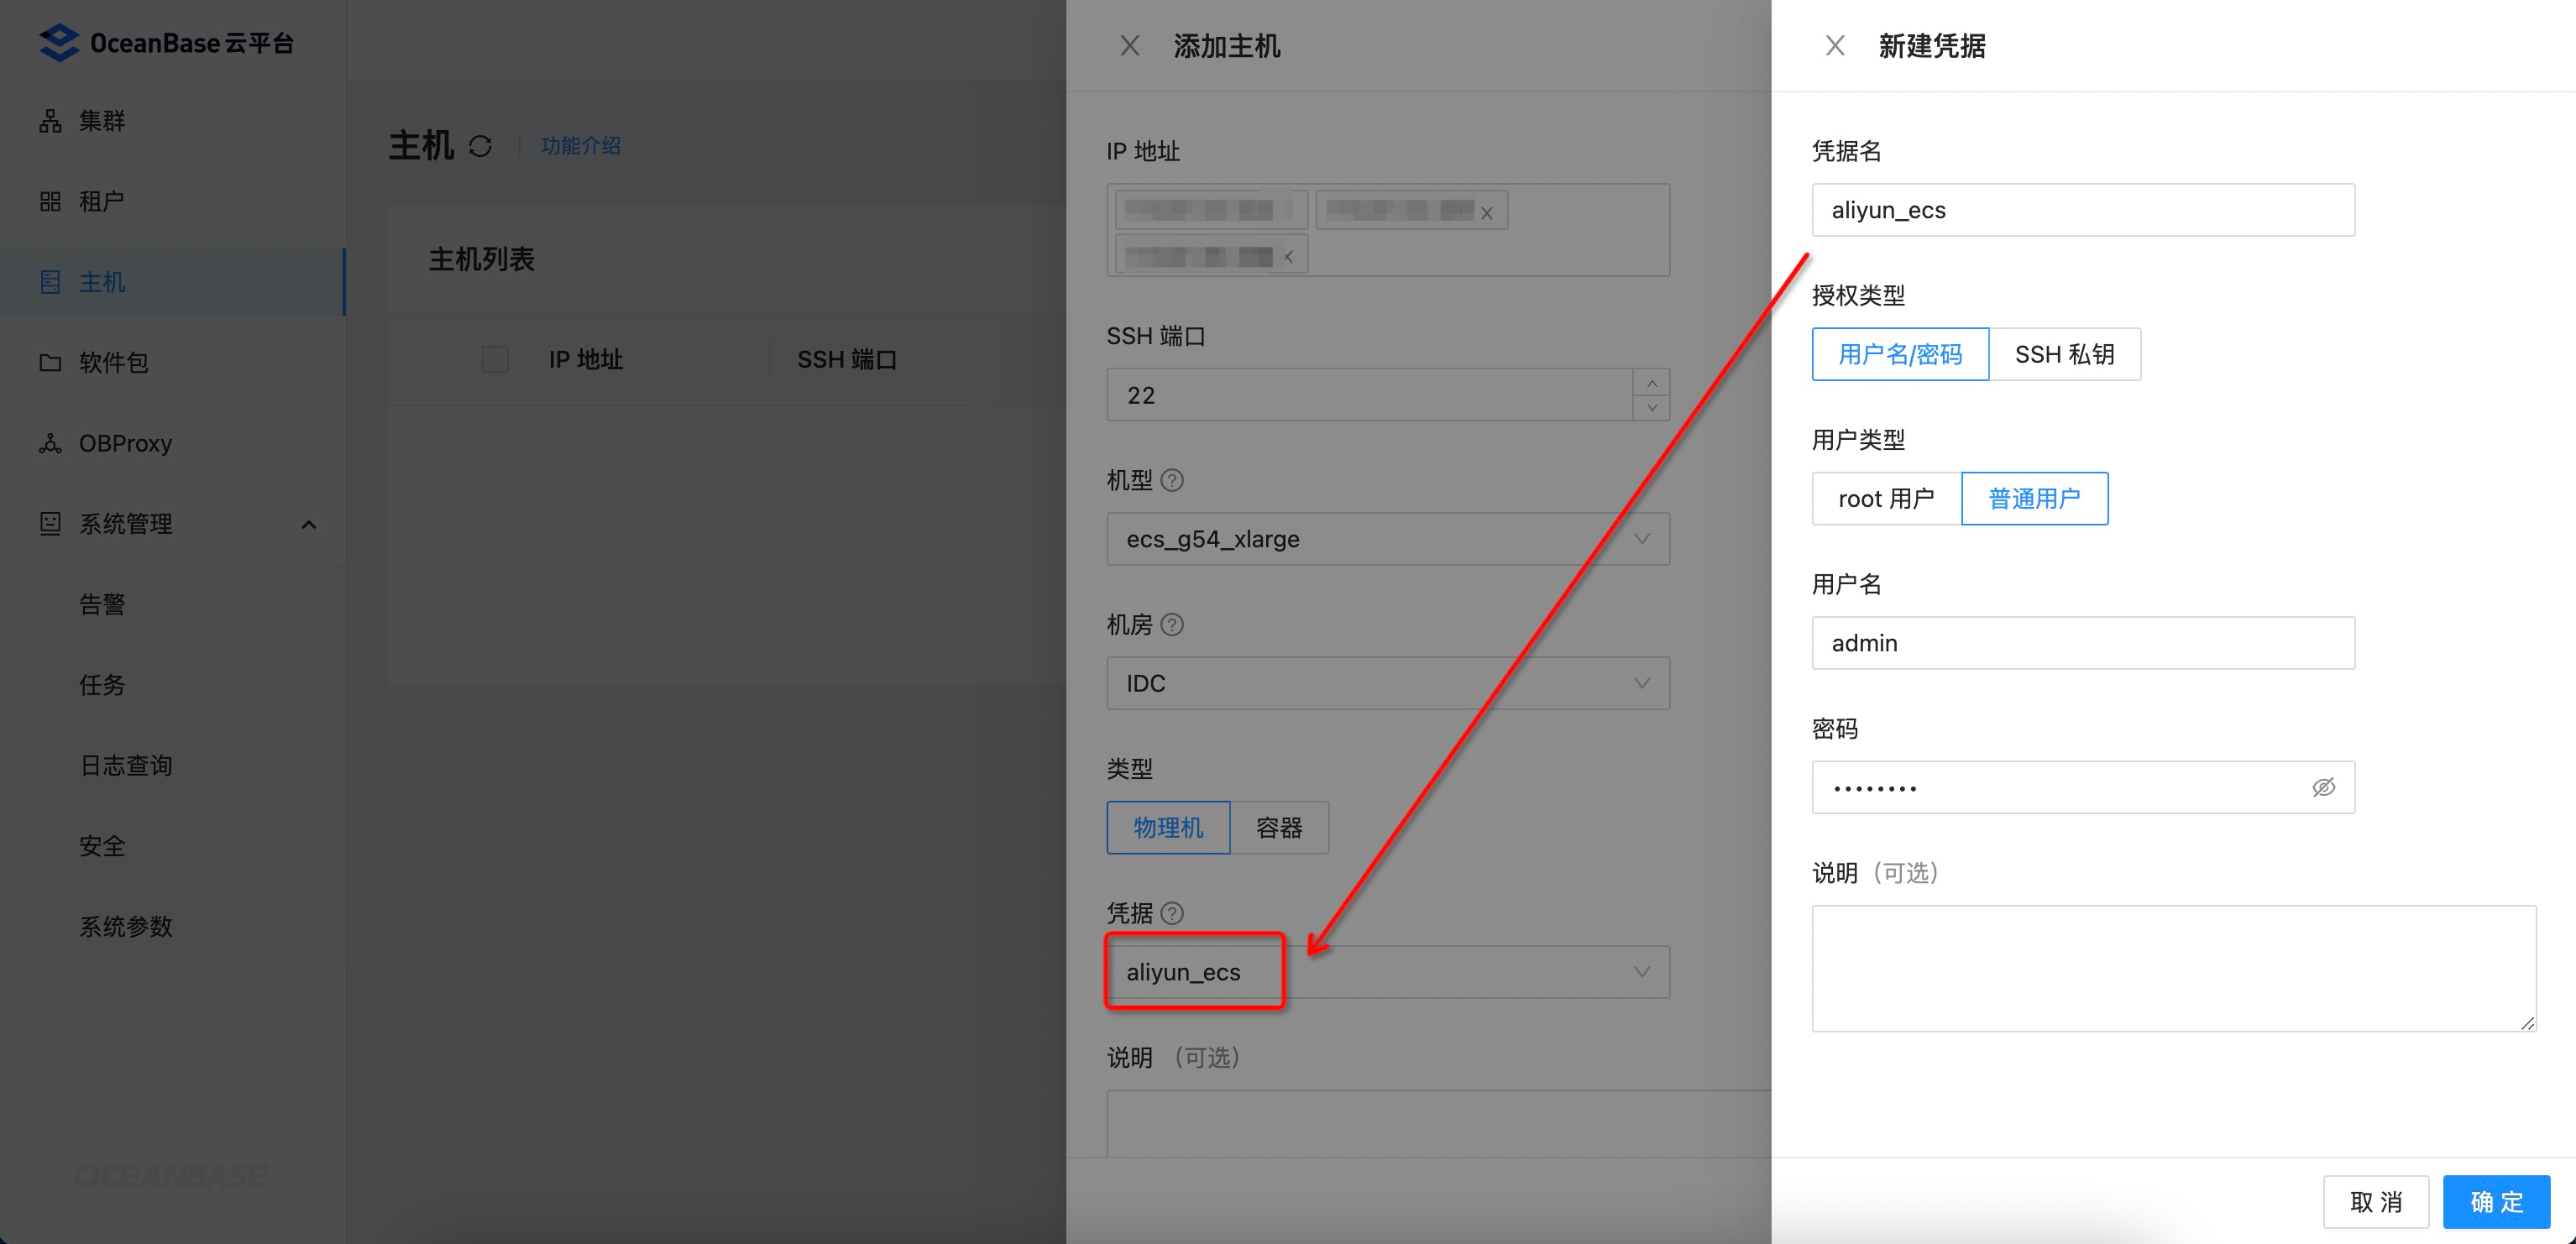
添加主机
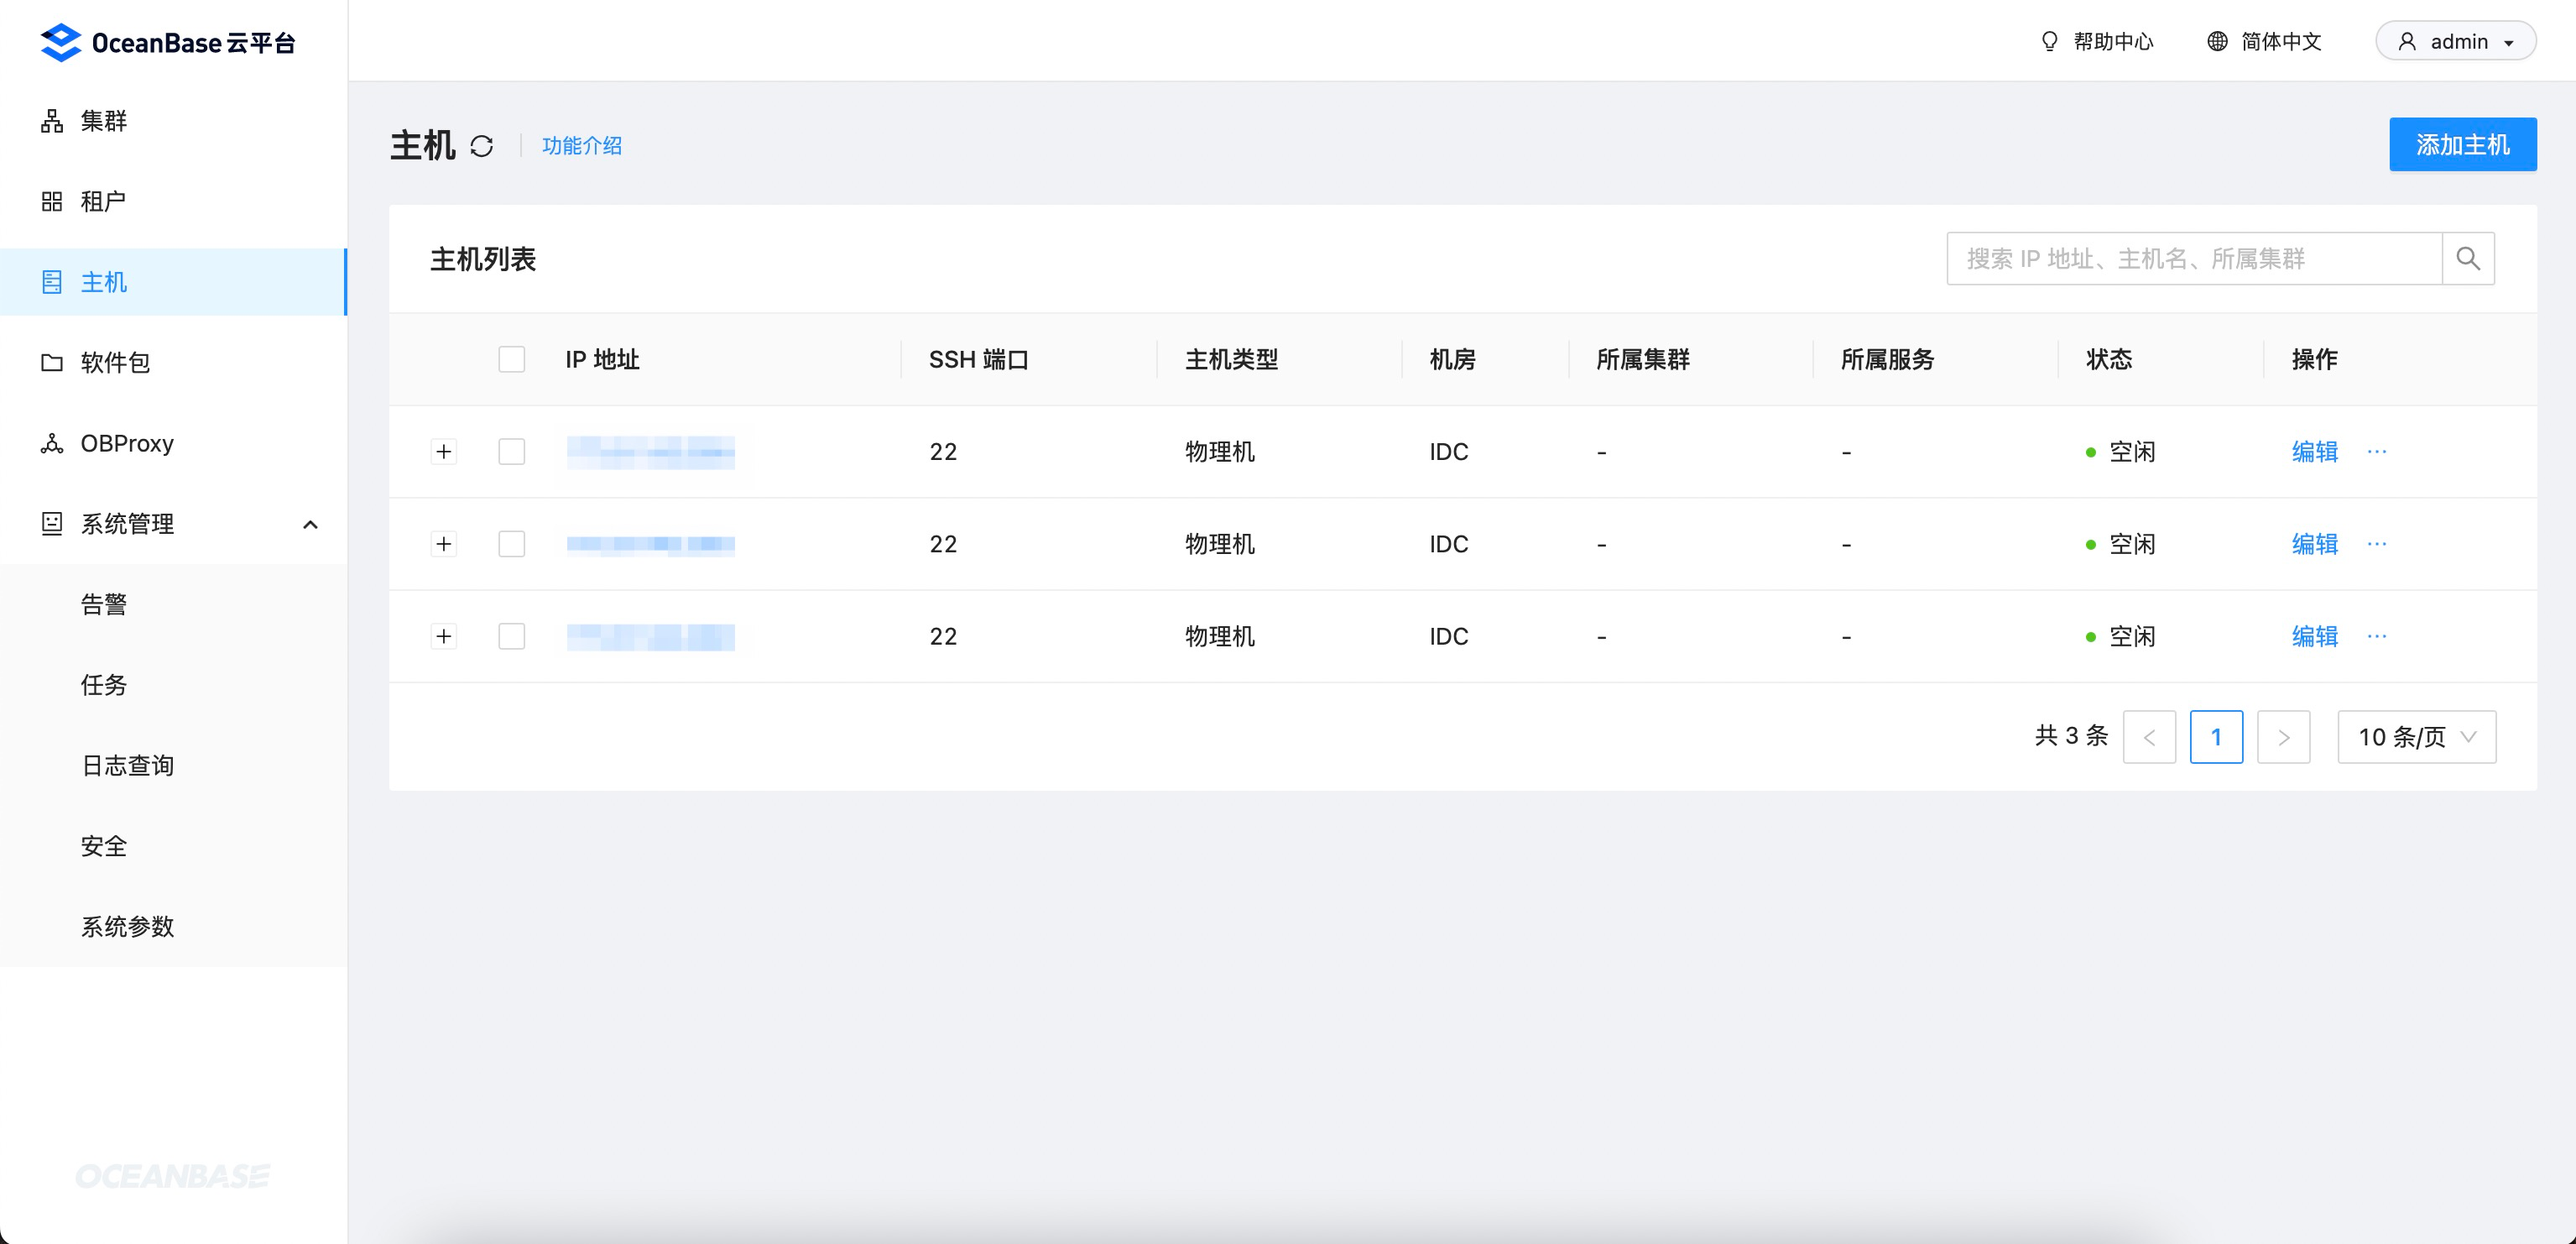
- 支持批量添加主机,需要填写 IP 地址、SSH 端口、机型、机房、主机类型和凭据等信息,其中凭据使用刚刚在 ECS 上创建的
admin用户。
- 批量添加主机各自生成
Prepare host的异步任务:
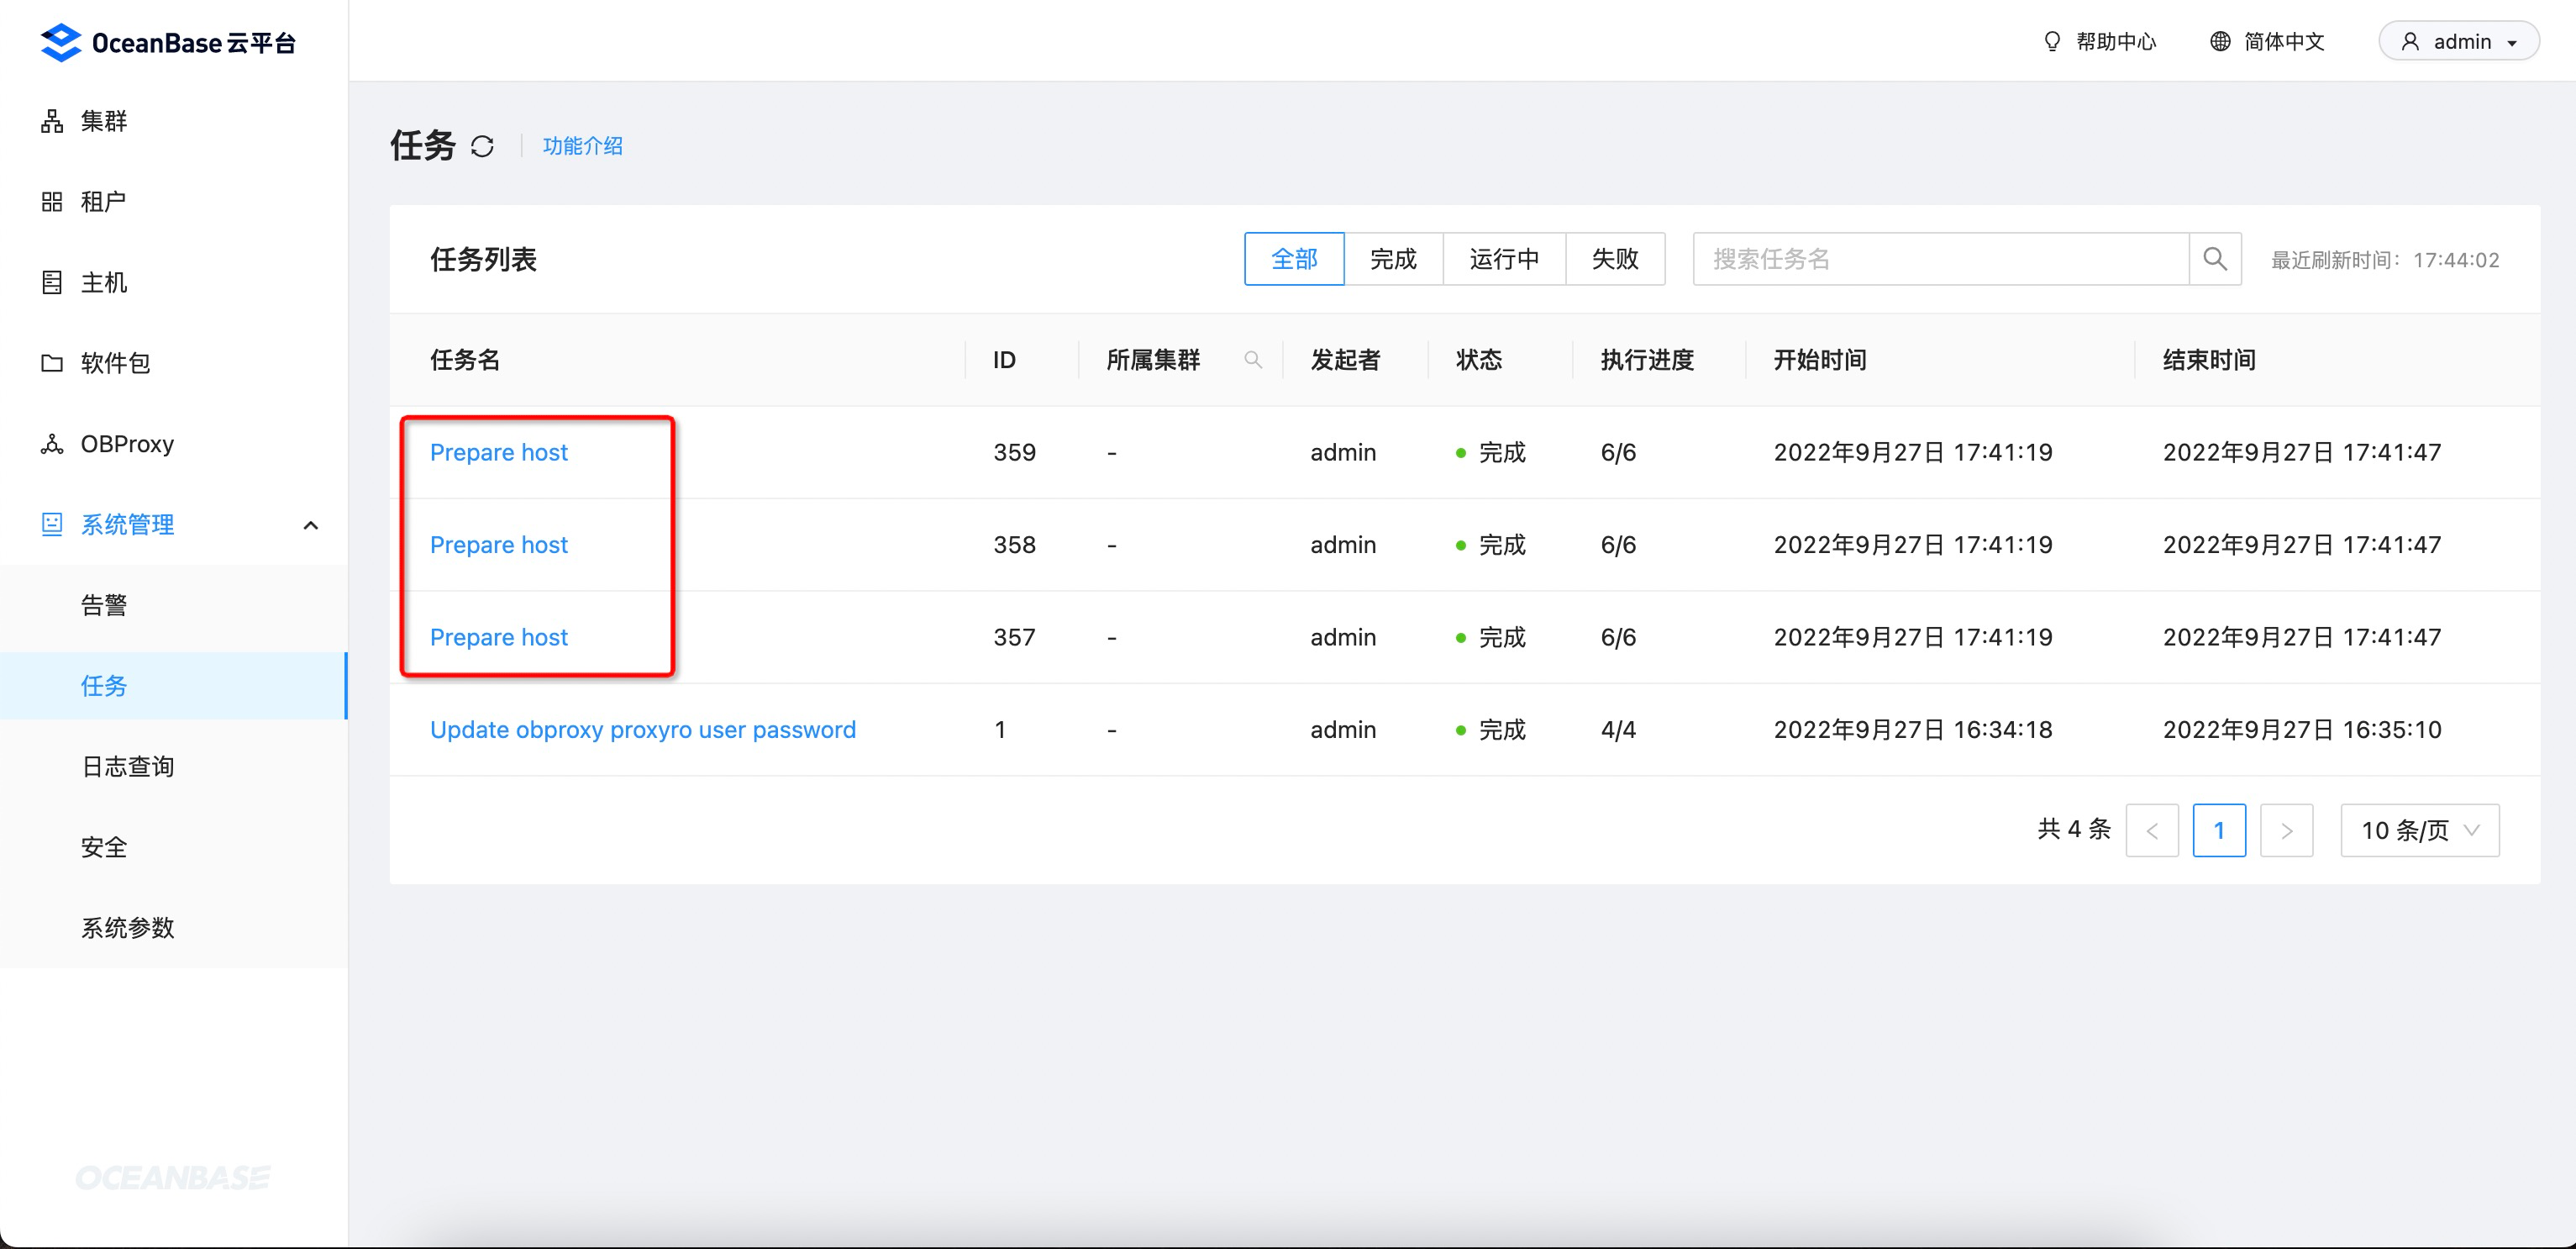
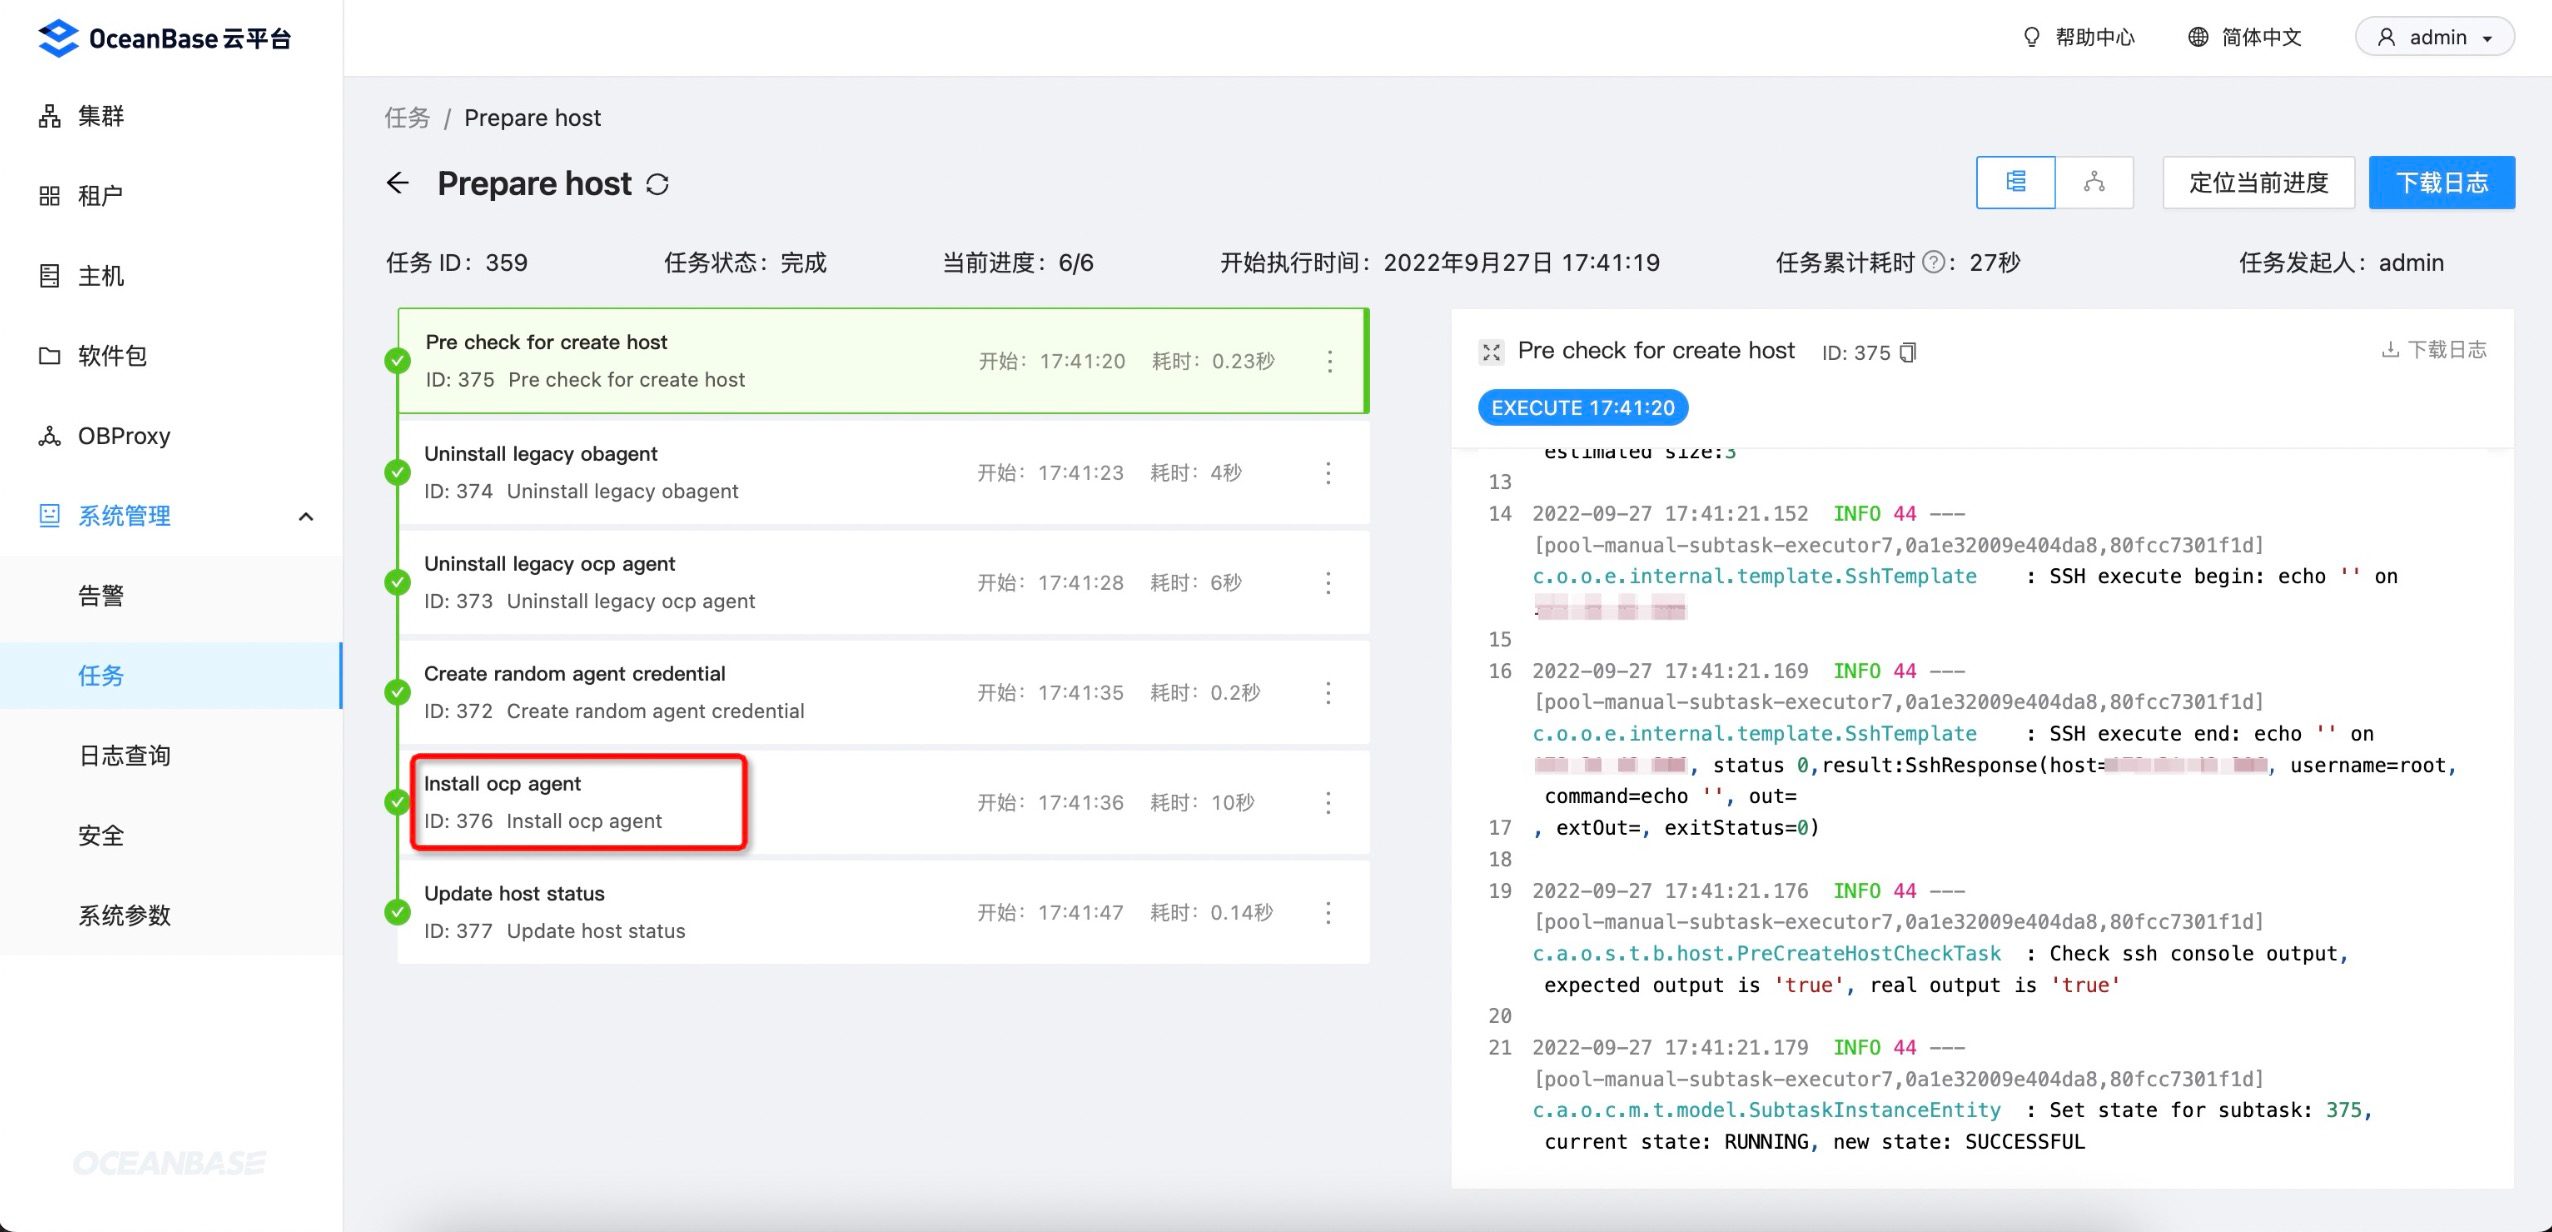
- 查看任务详情,可以看到 OCP 会在主机上安装一个
ocp-agent的组件。该组件是 OCP 实现命令下发、运维操作、监控/日志/SQL/事务/链路采集等的核心能力:
- 任务执行完成后,主机成功添加到 OCP。
上传软件包
- OCP 会内置
libaio和ocp-agent两个软件包:
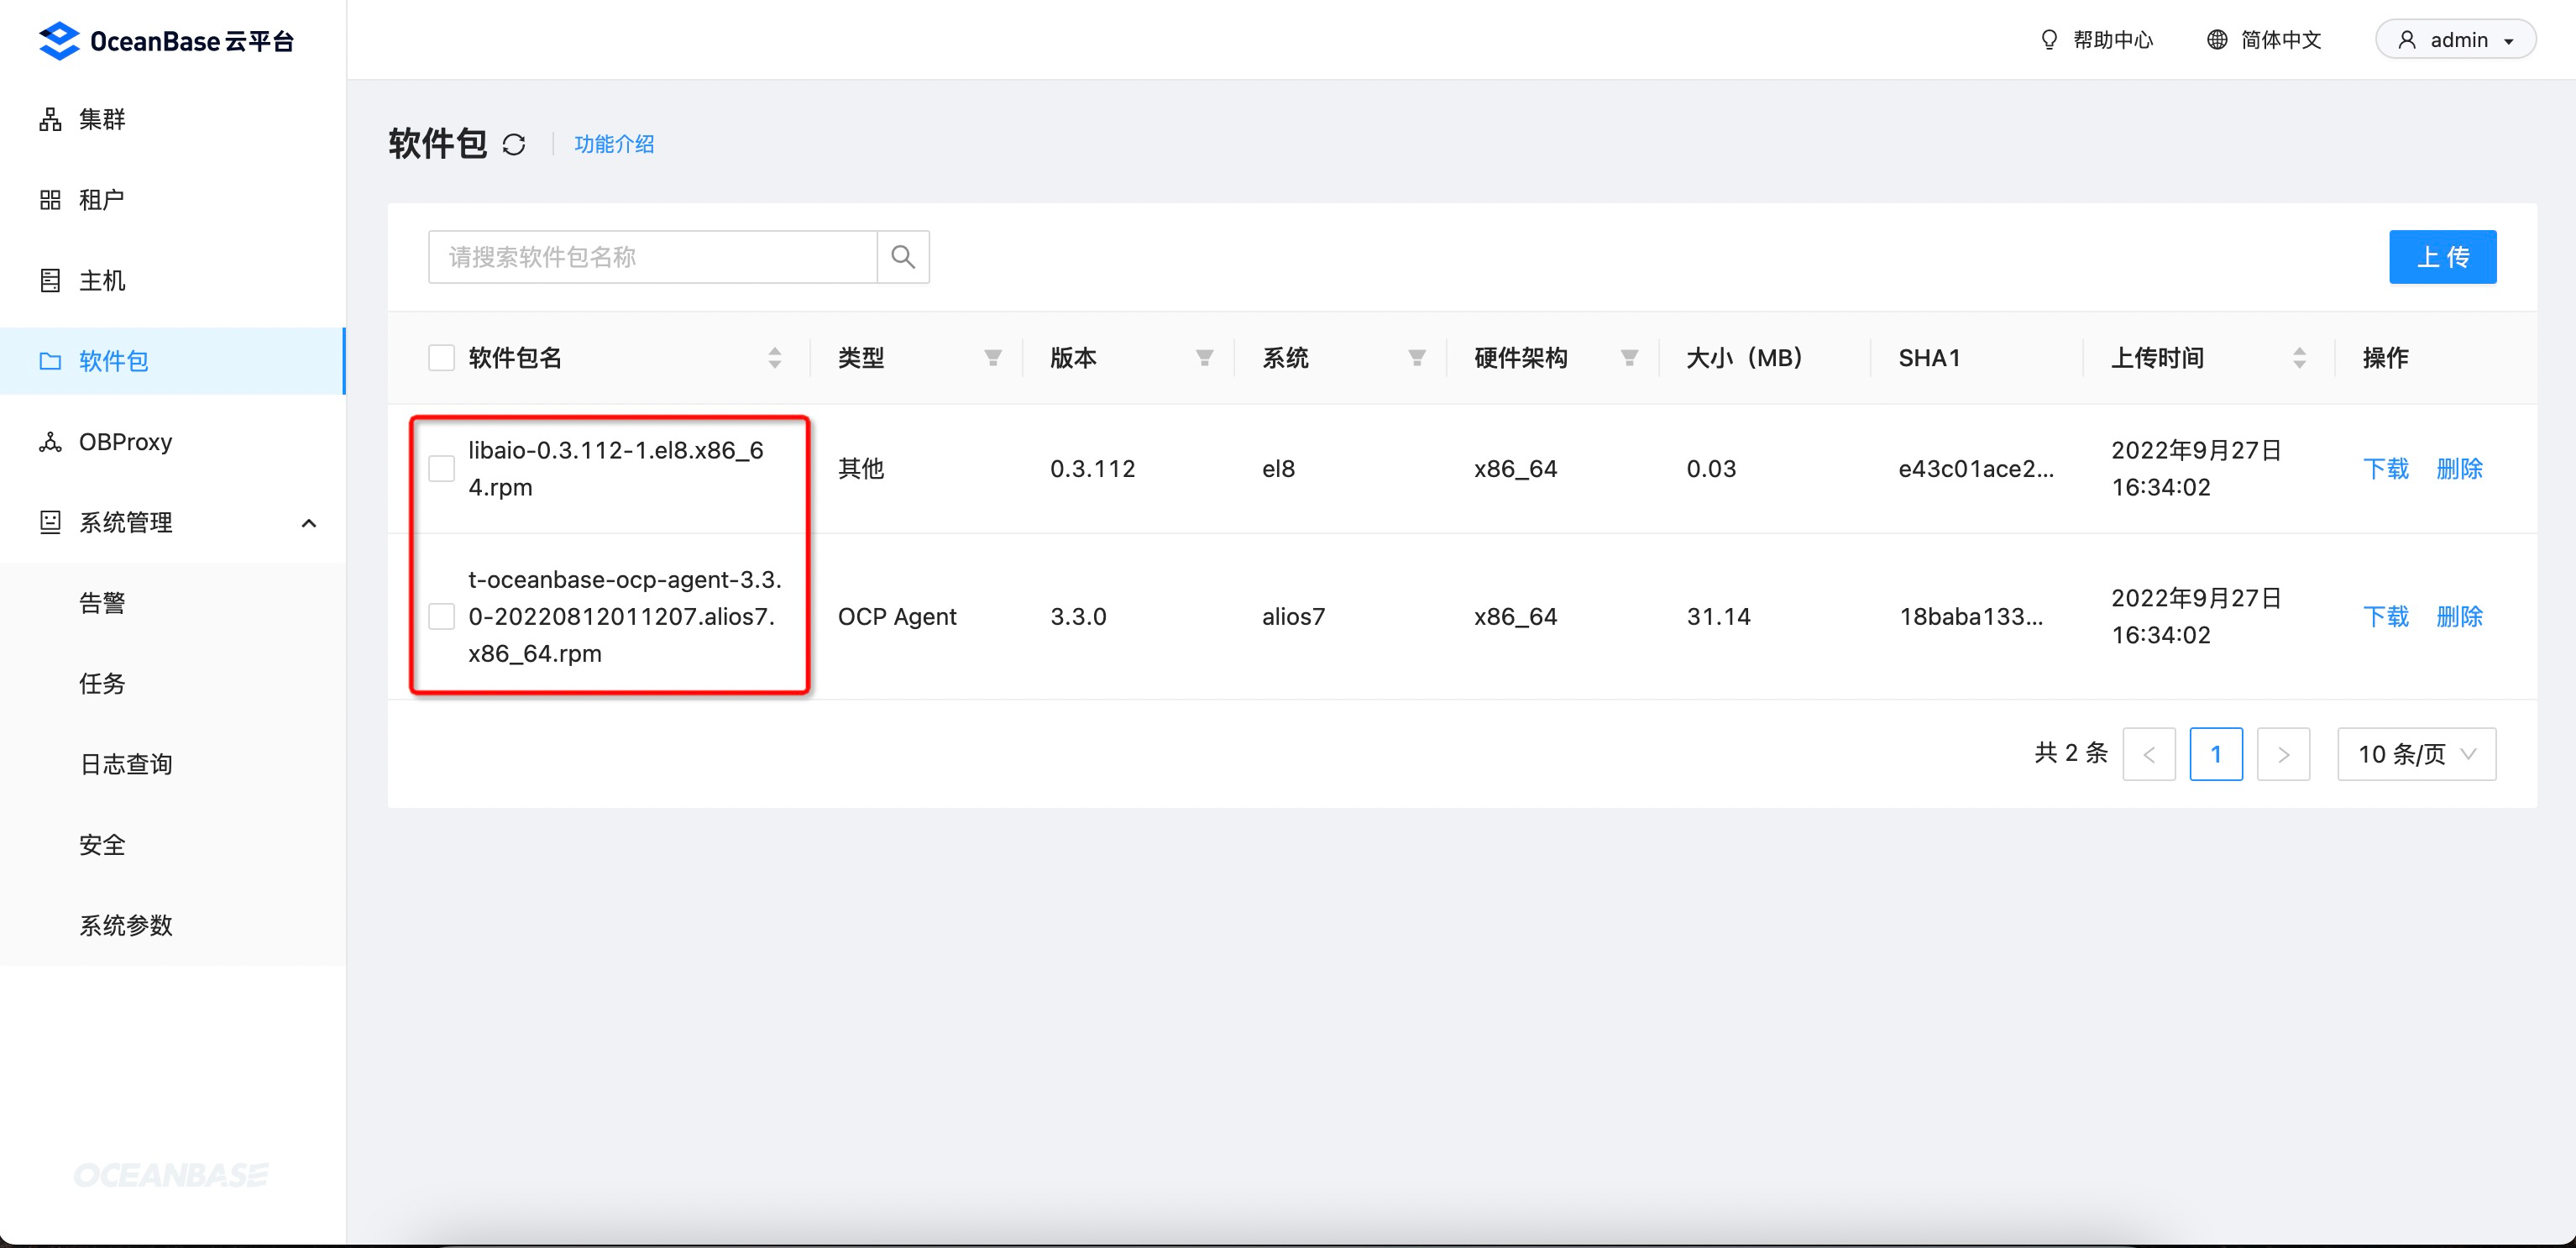
- OceanBase 开源相关的软件包可以在 https://mirrors.aliyun.com/oceanbase/community/stable/el/7/x86_64/ 获取,先下载软件包到本地,然后再上传到 OCP。如果需要 ARM 架构或其他操作系统的软件包,可以切换目录进行查找。
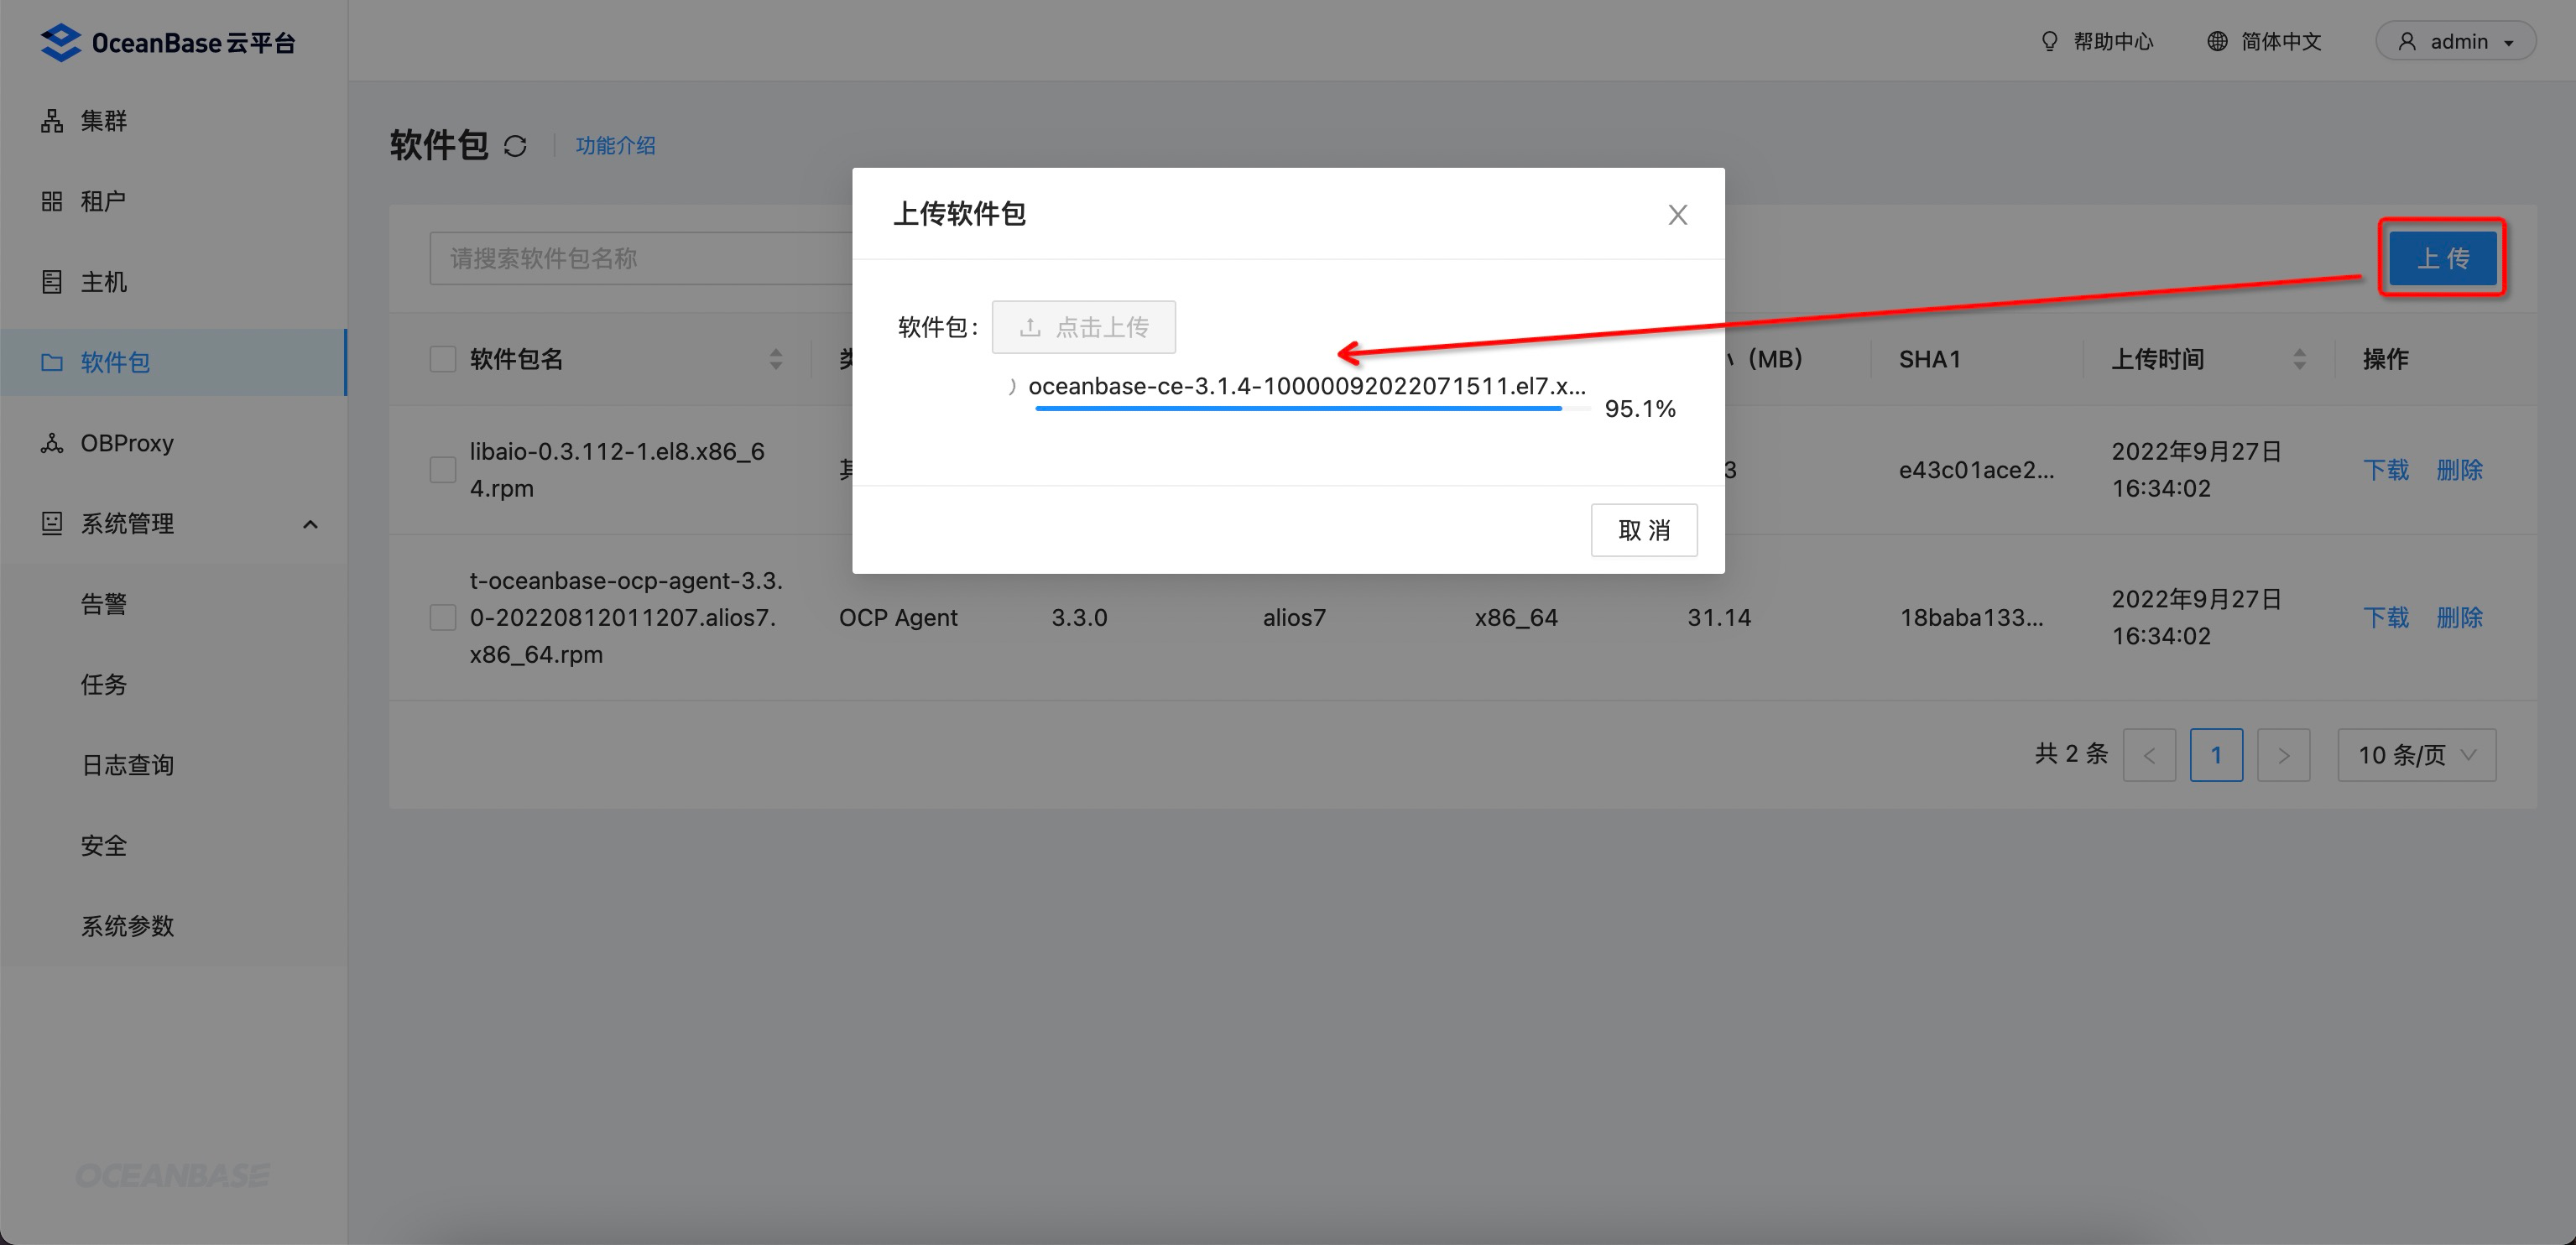
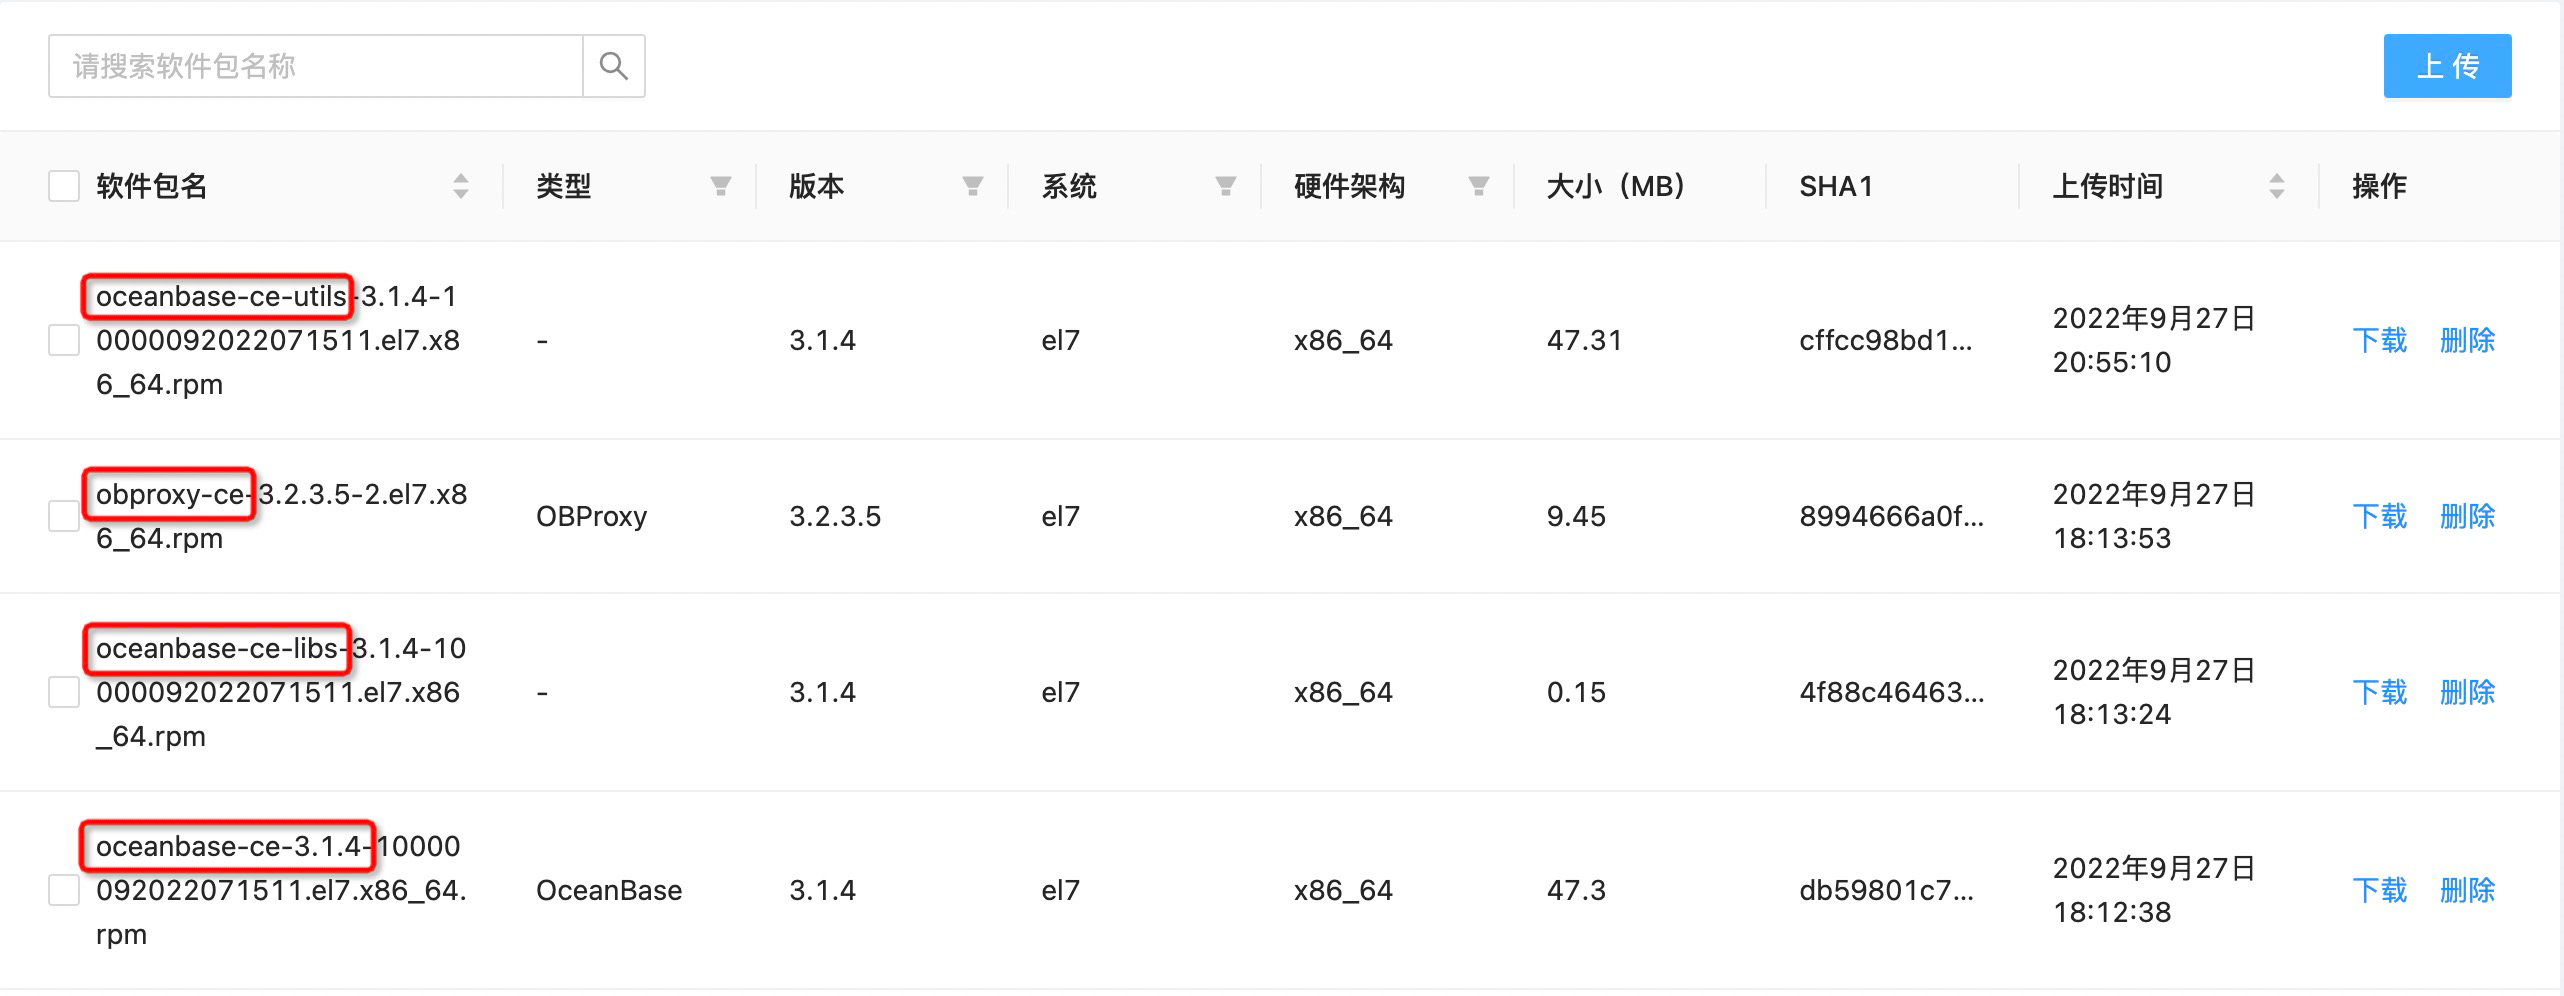
- 为了方便后续创建 OceanBase 和 OBProxy 集群,先预先上传相关软件包 (OceanBase 相关软件包的版本号要一致):
-
oceanbase-ce: OceanBase 软件包 -
oceanbase-ce-libs: OceanBase 运行时依赖的第三方库 -
oceanbase-ce-utils: OceanBase 工具库 -
obproxy: OBProxy 软件包
-
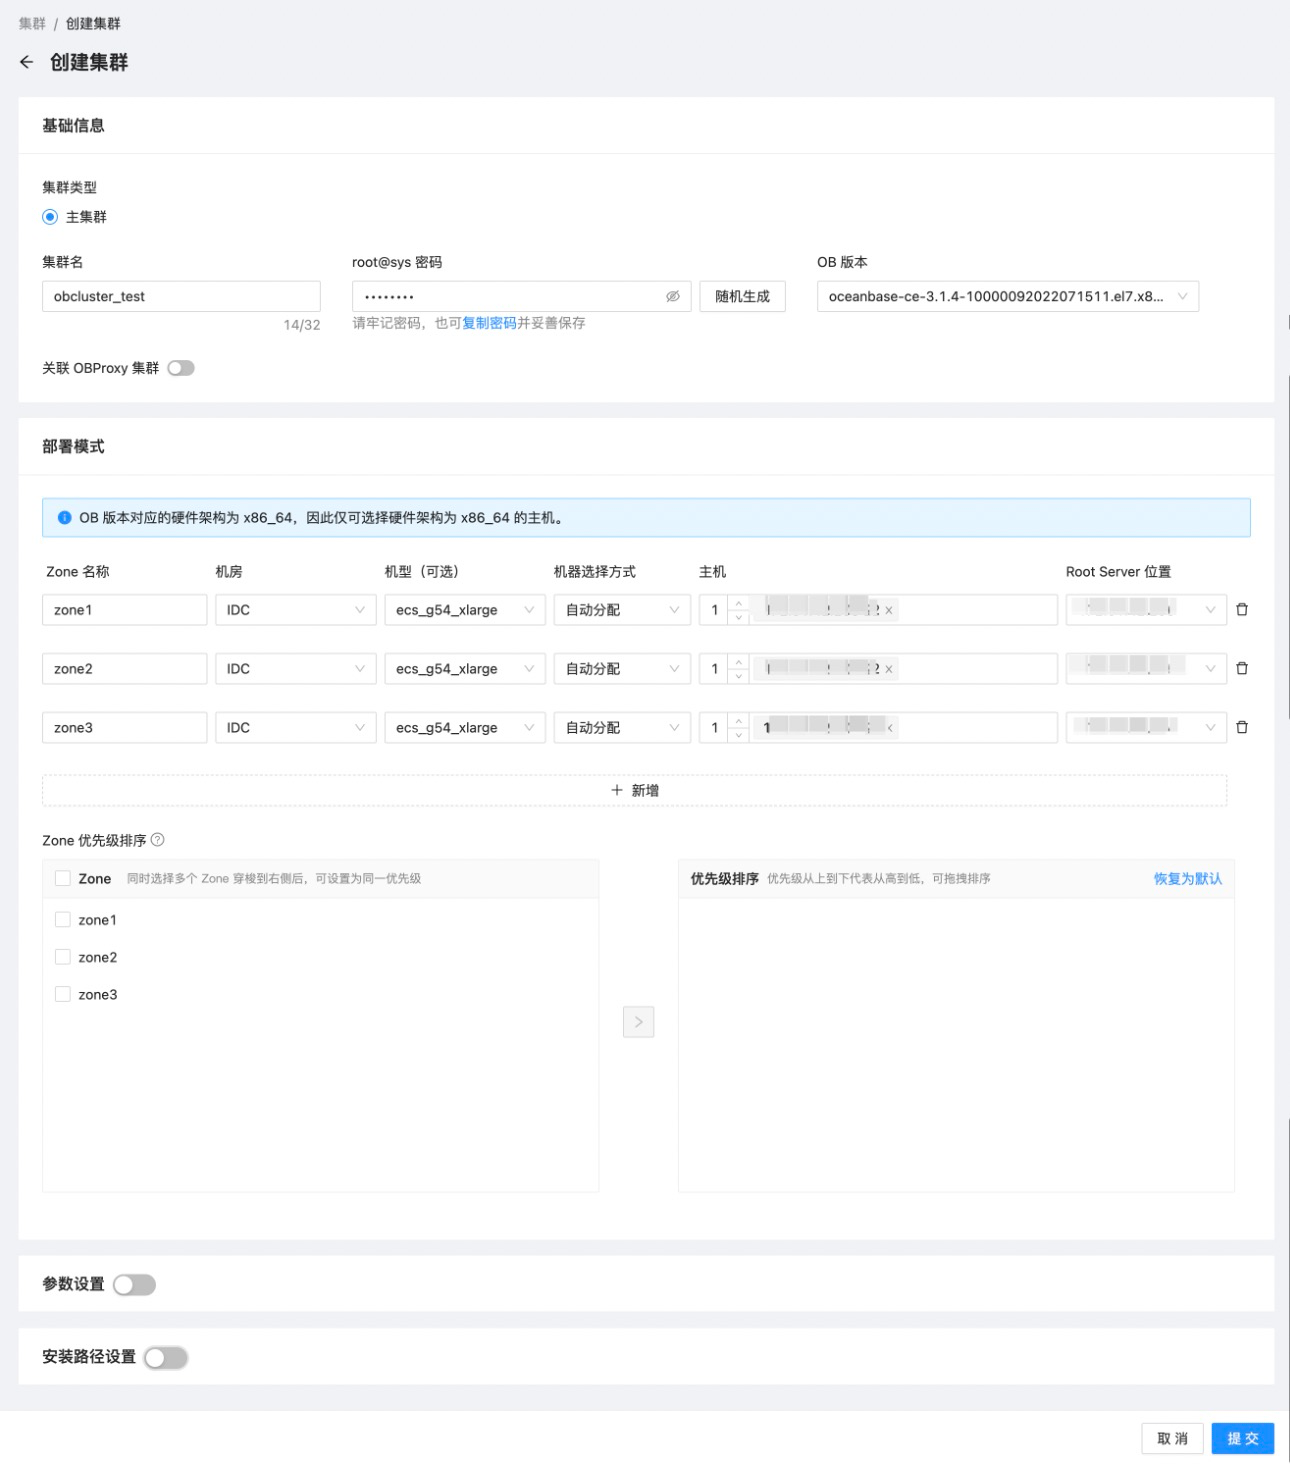
新建集群
- 新建一个三节点的 OceanBase 集群:
- 集群名: obcluster_test
- OB 版本: 3.1.4
- 部署模式: 1-1-1 (3 个 Zone,每个 Zone 下 1 台 OBServer)
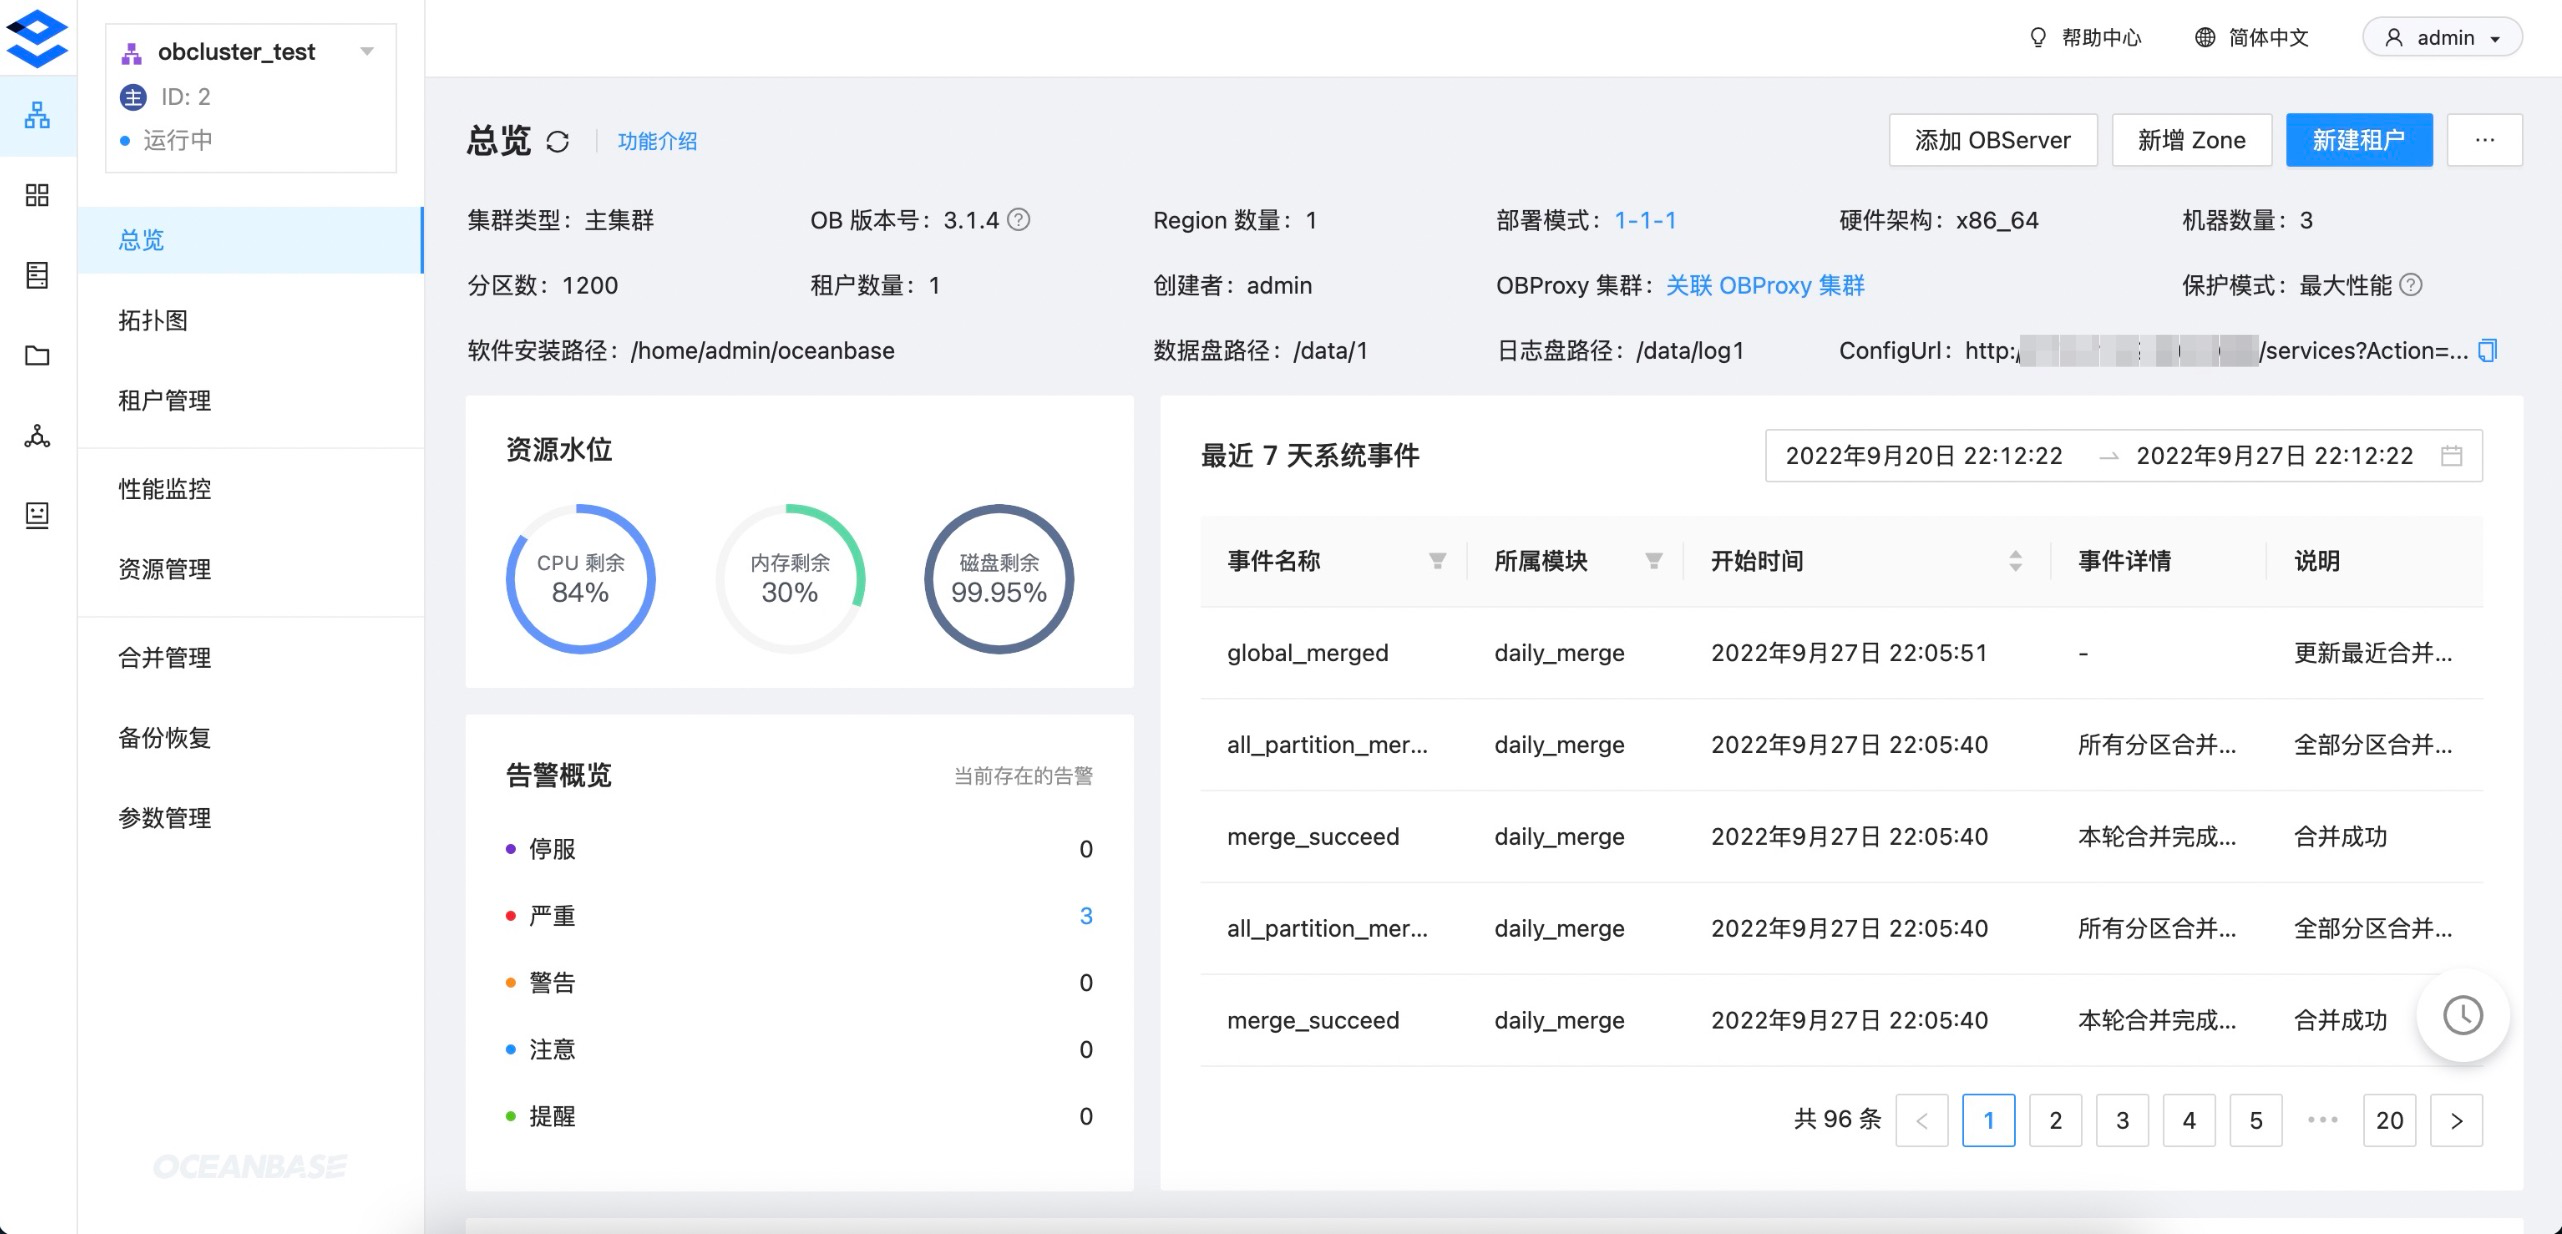
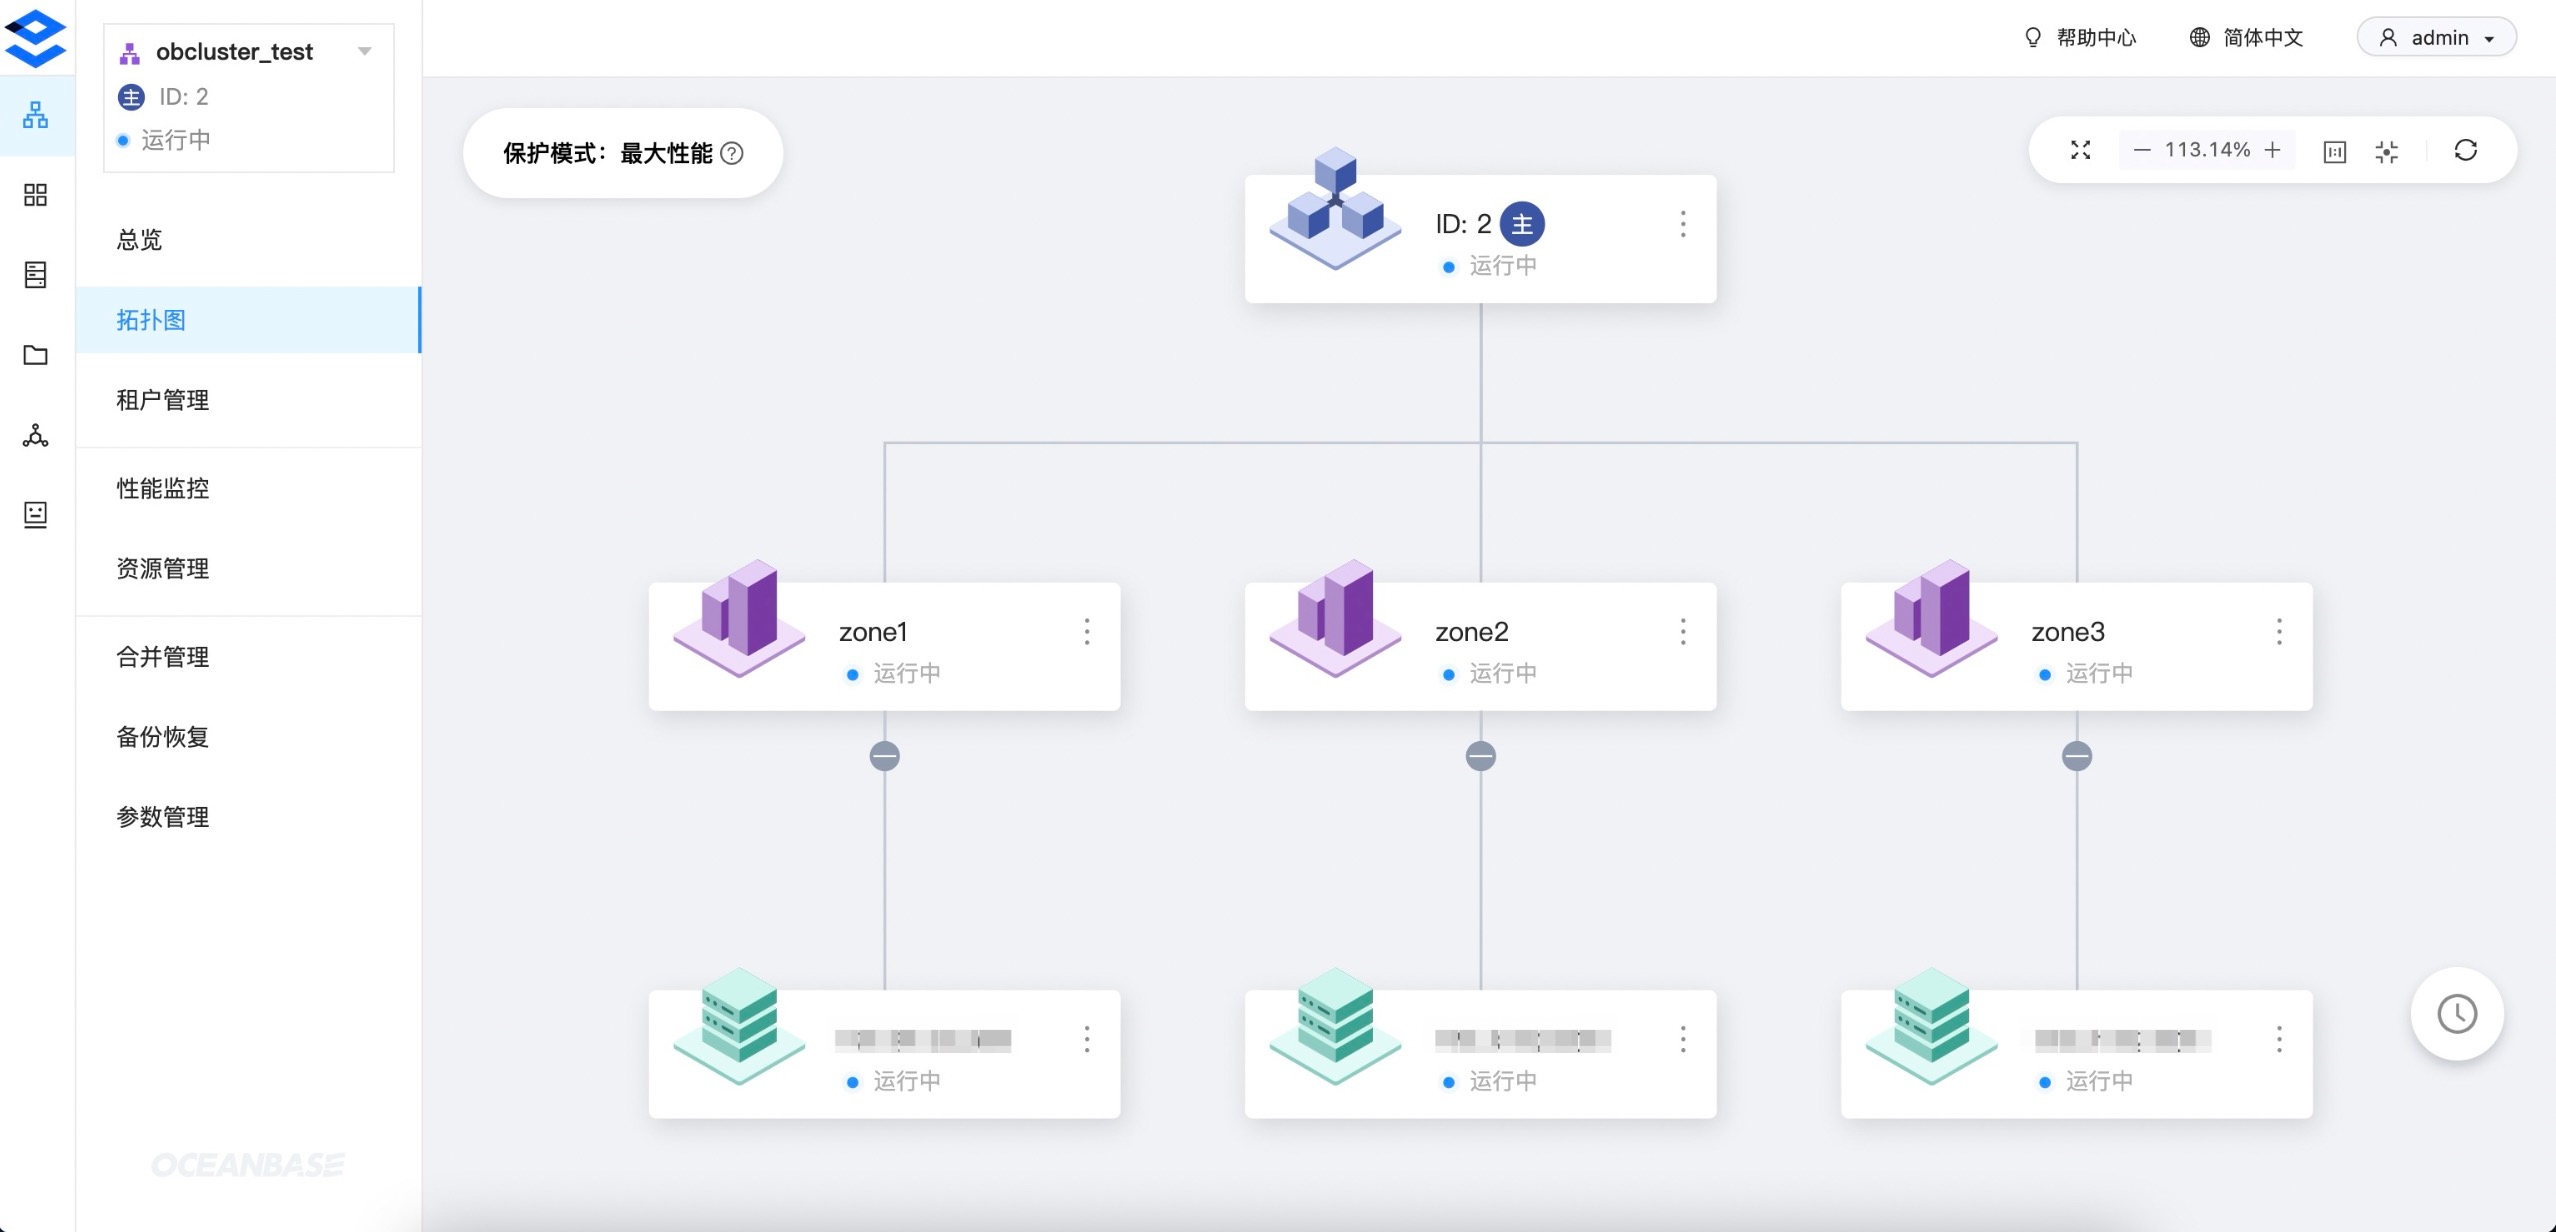
- 新建集群的异步任务,用时 4 分钟左右完成:

- 集群详情和拓扑图:
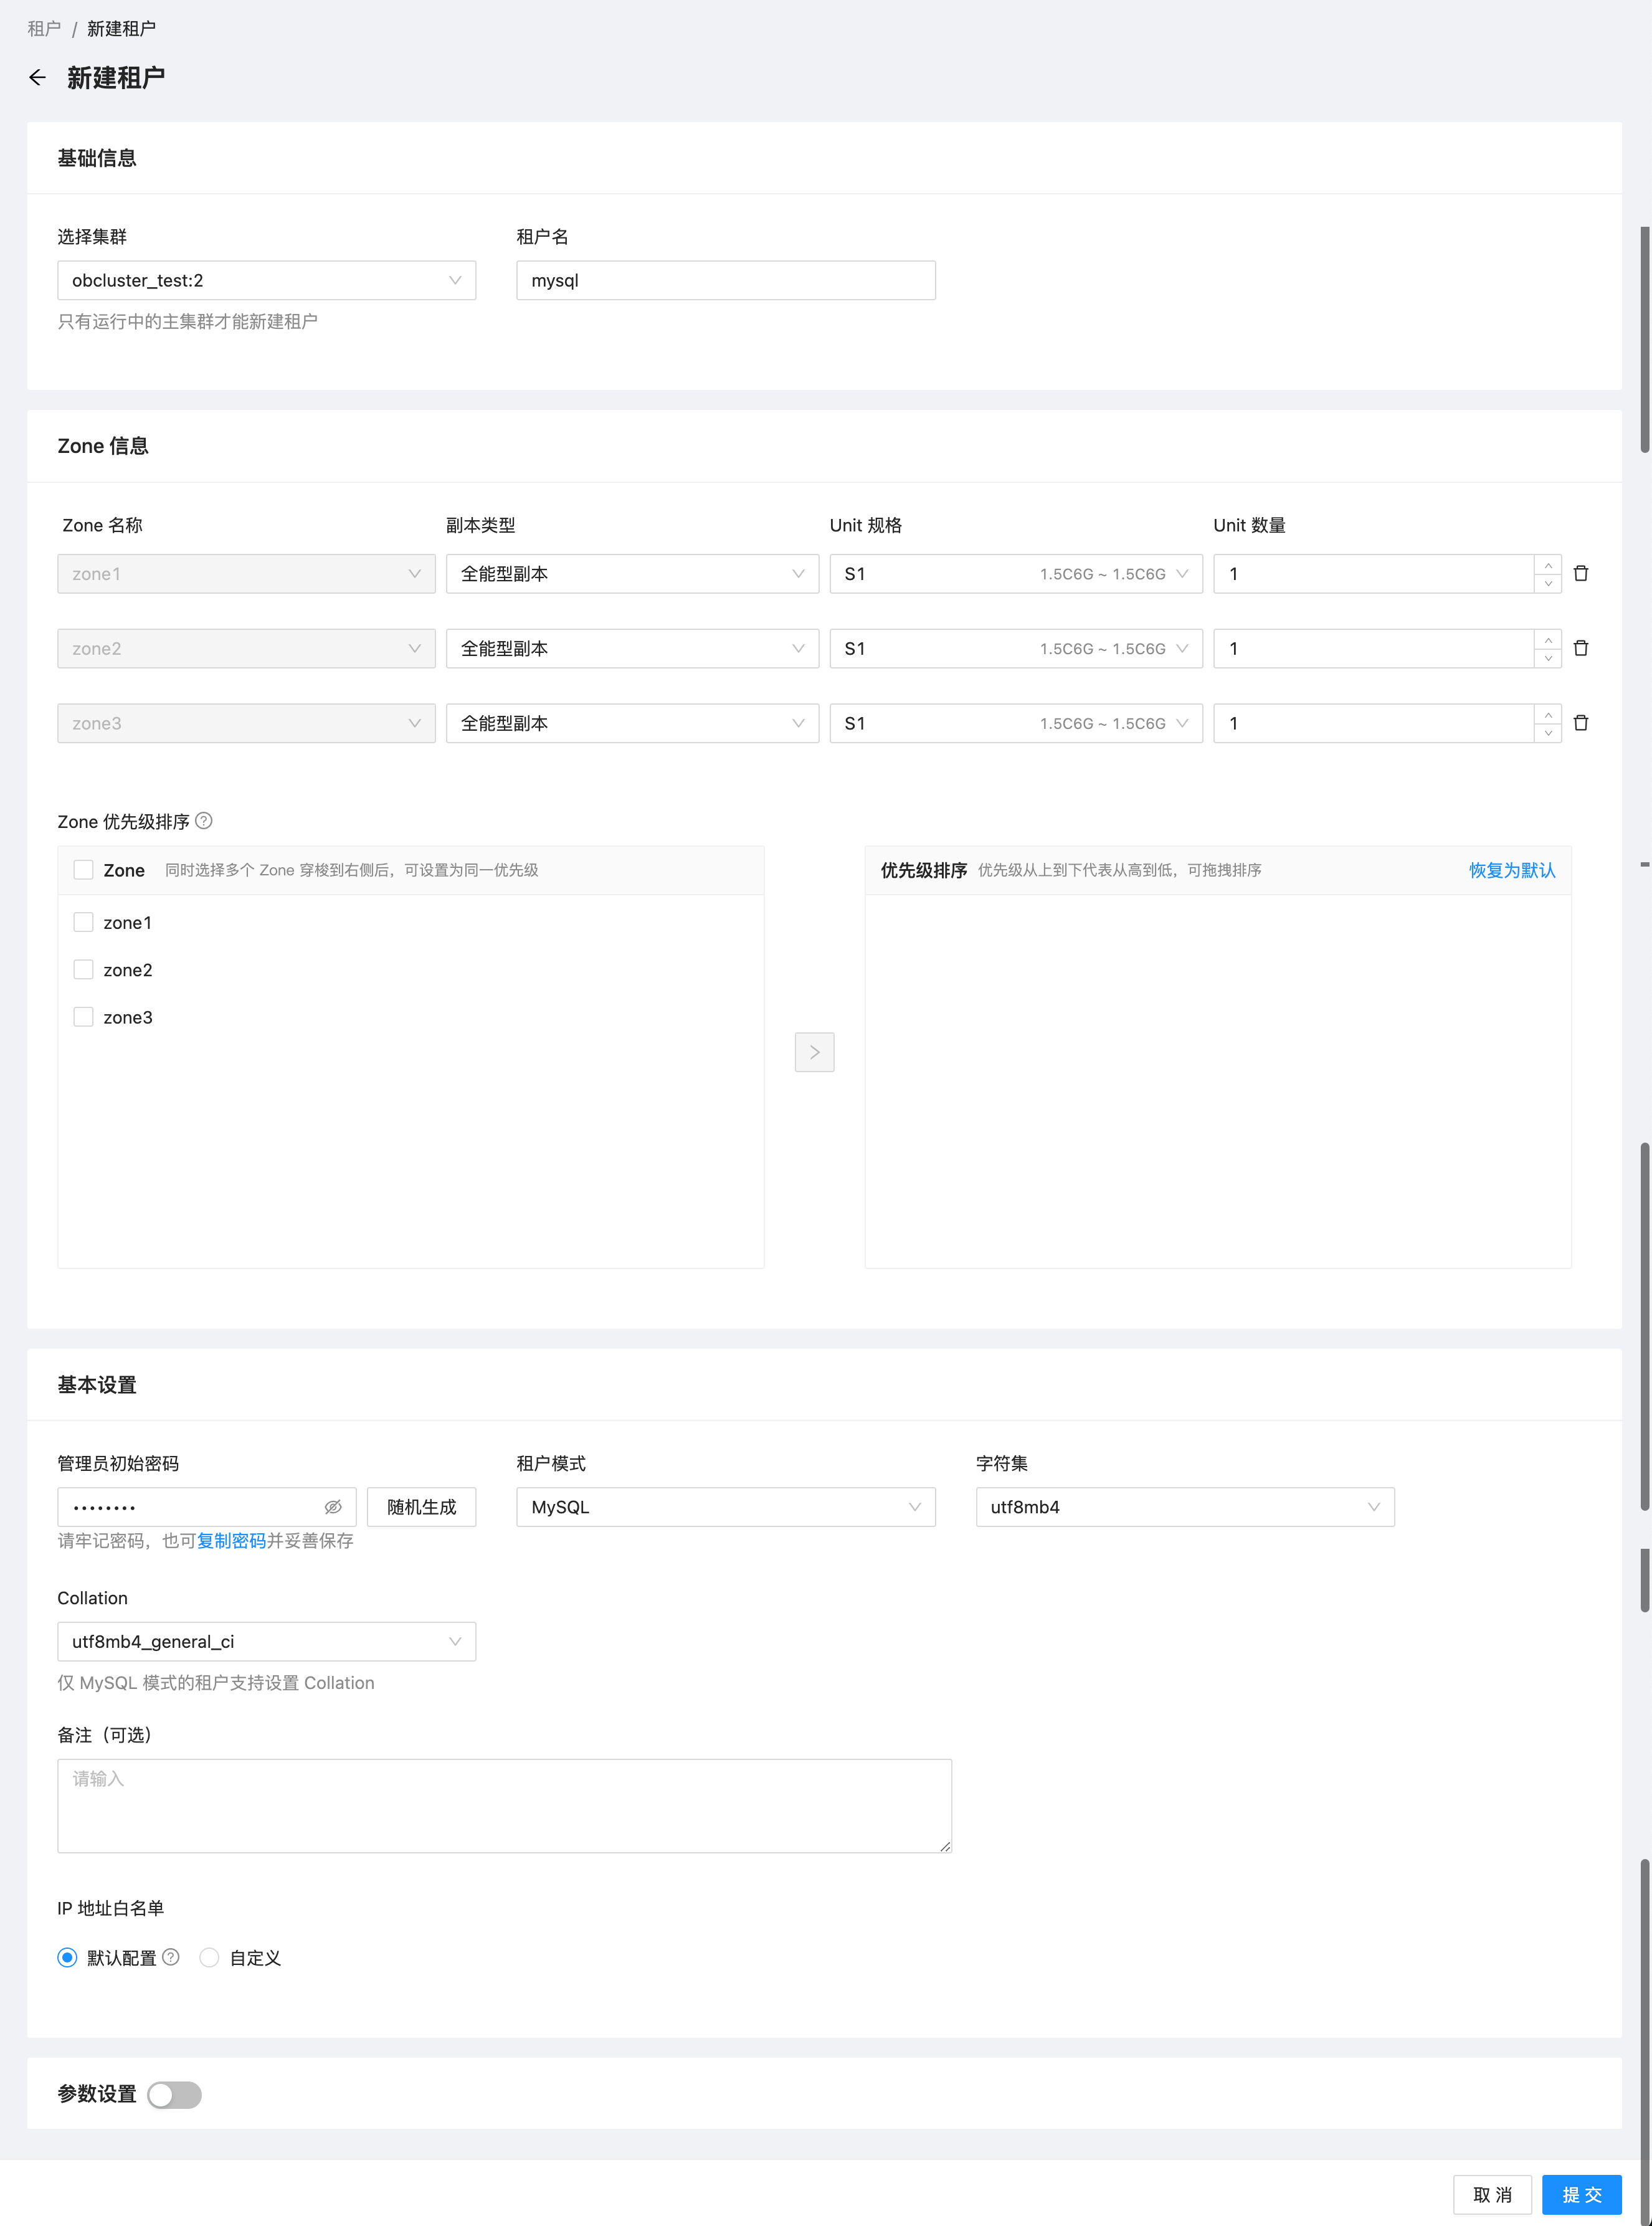
新建租户
- 新建一个三副本的 MySQL 模式租户:
说明: 社区版仅支持 MySQL 租户,商业版同时支持 MySQL 和 Oracle 租户
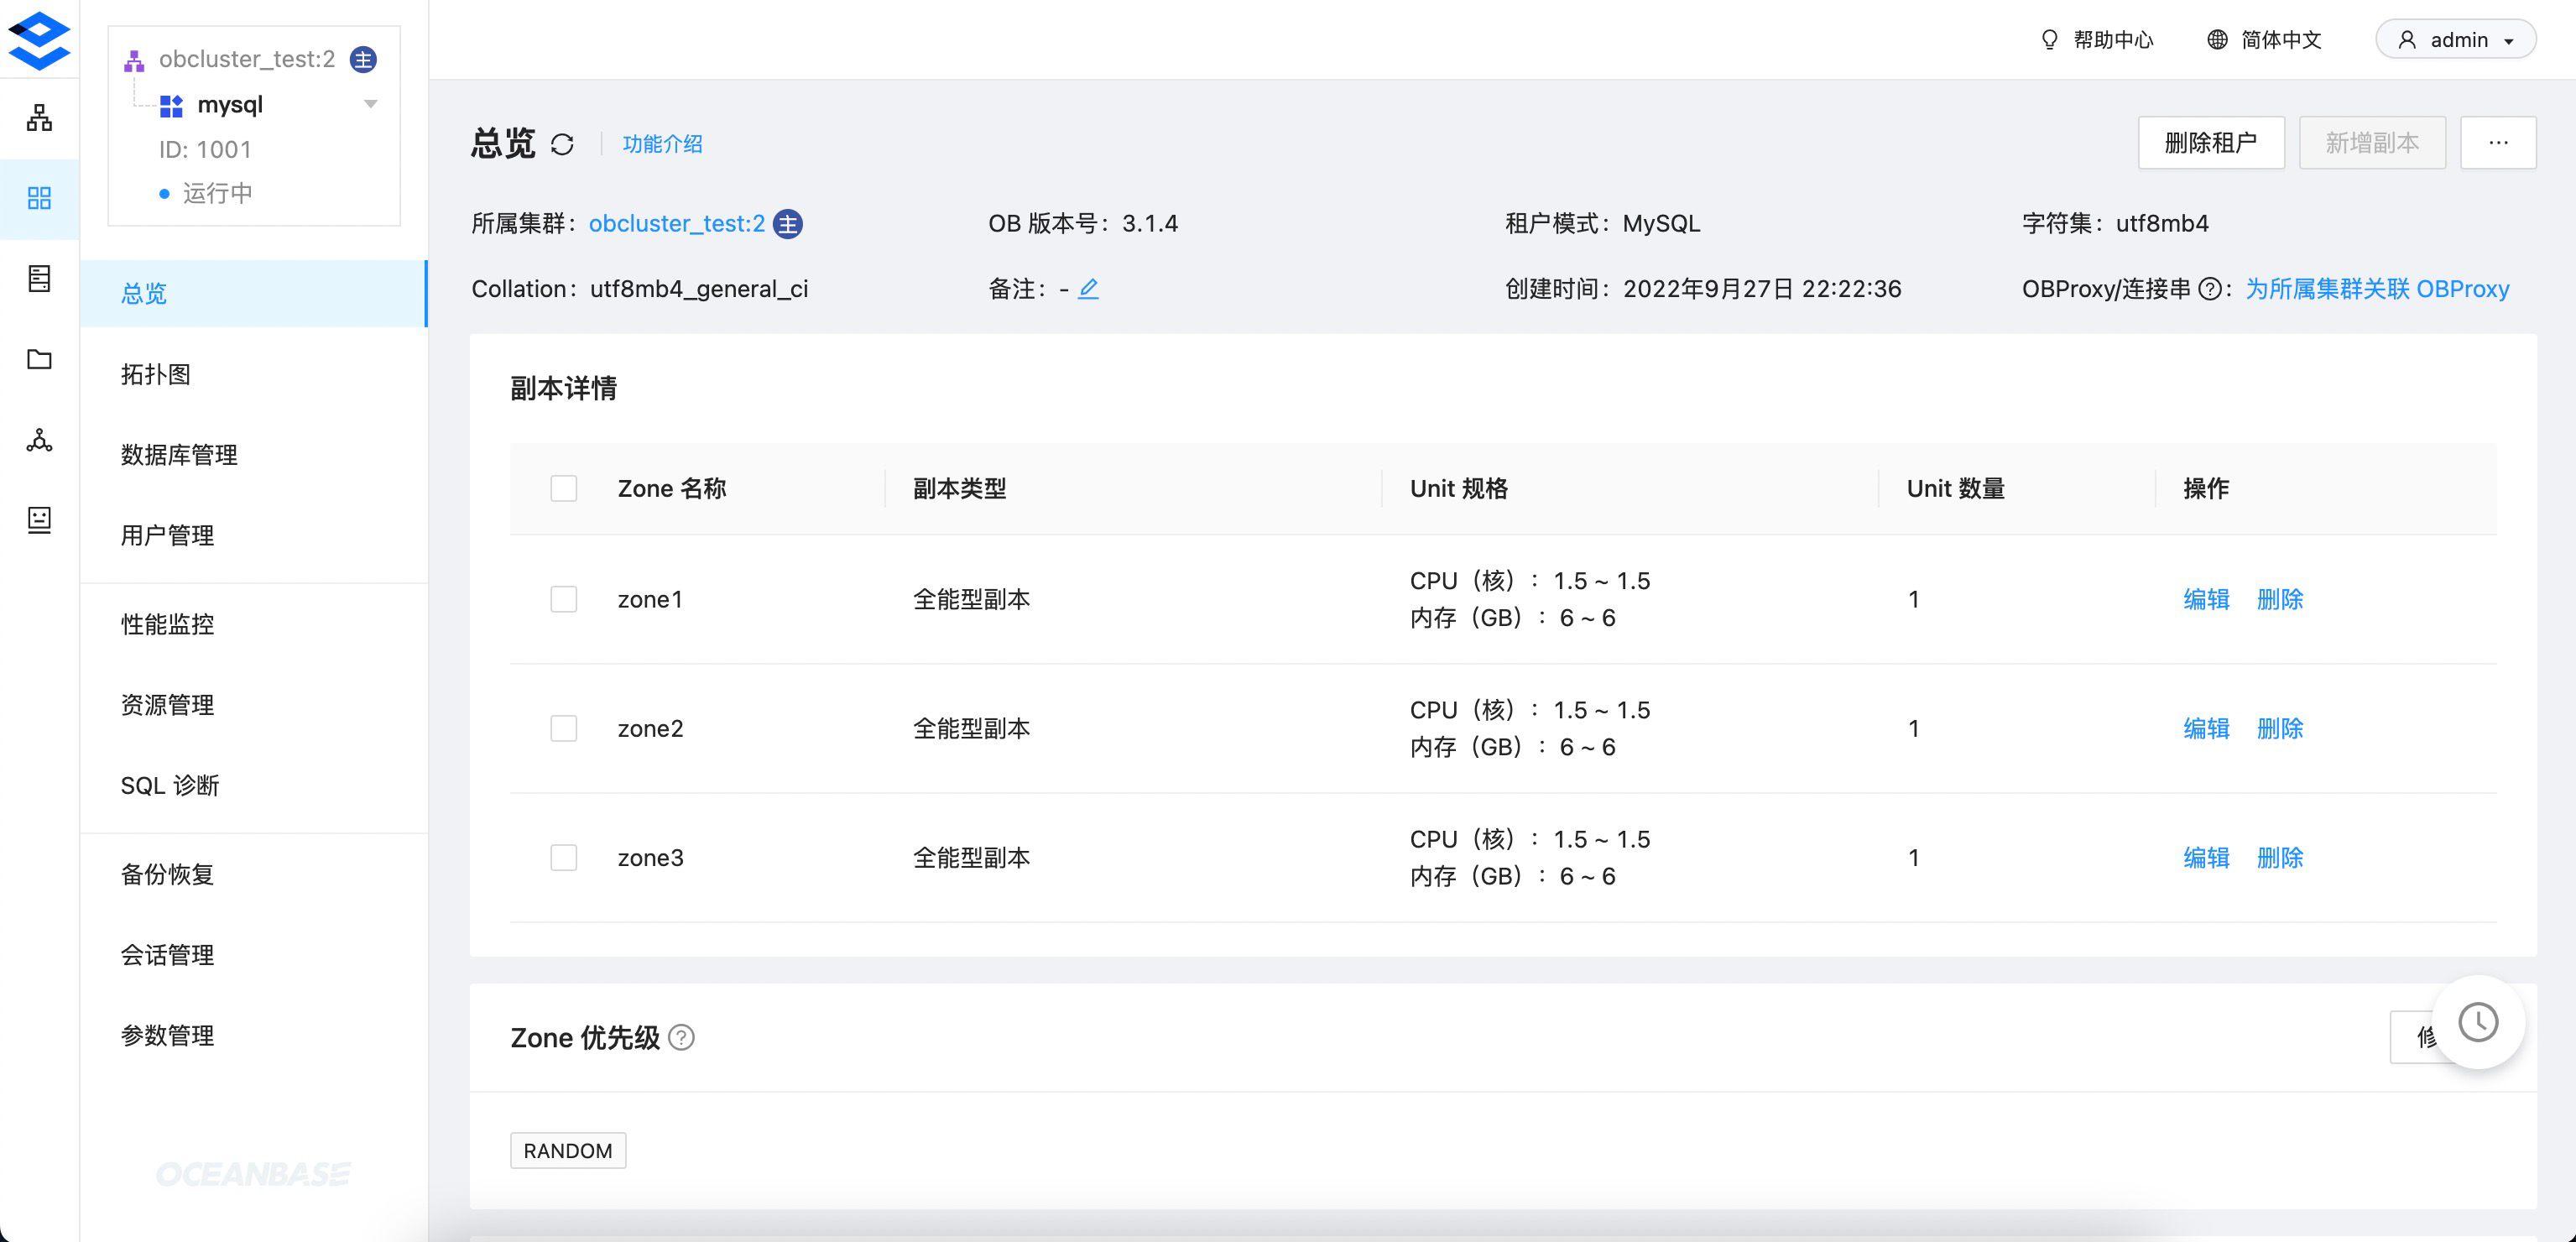
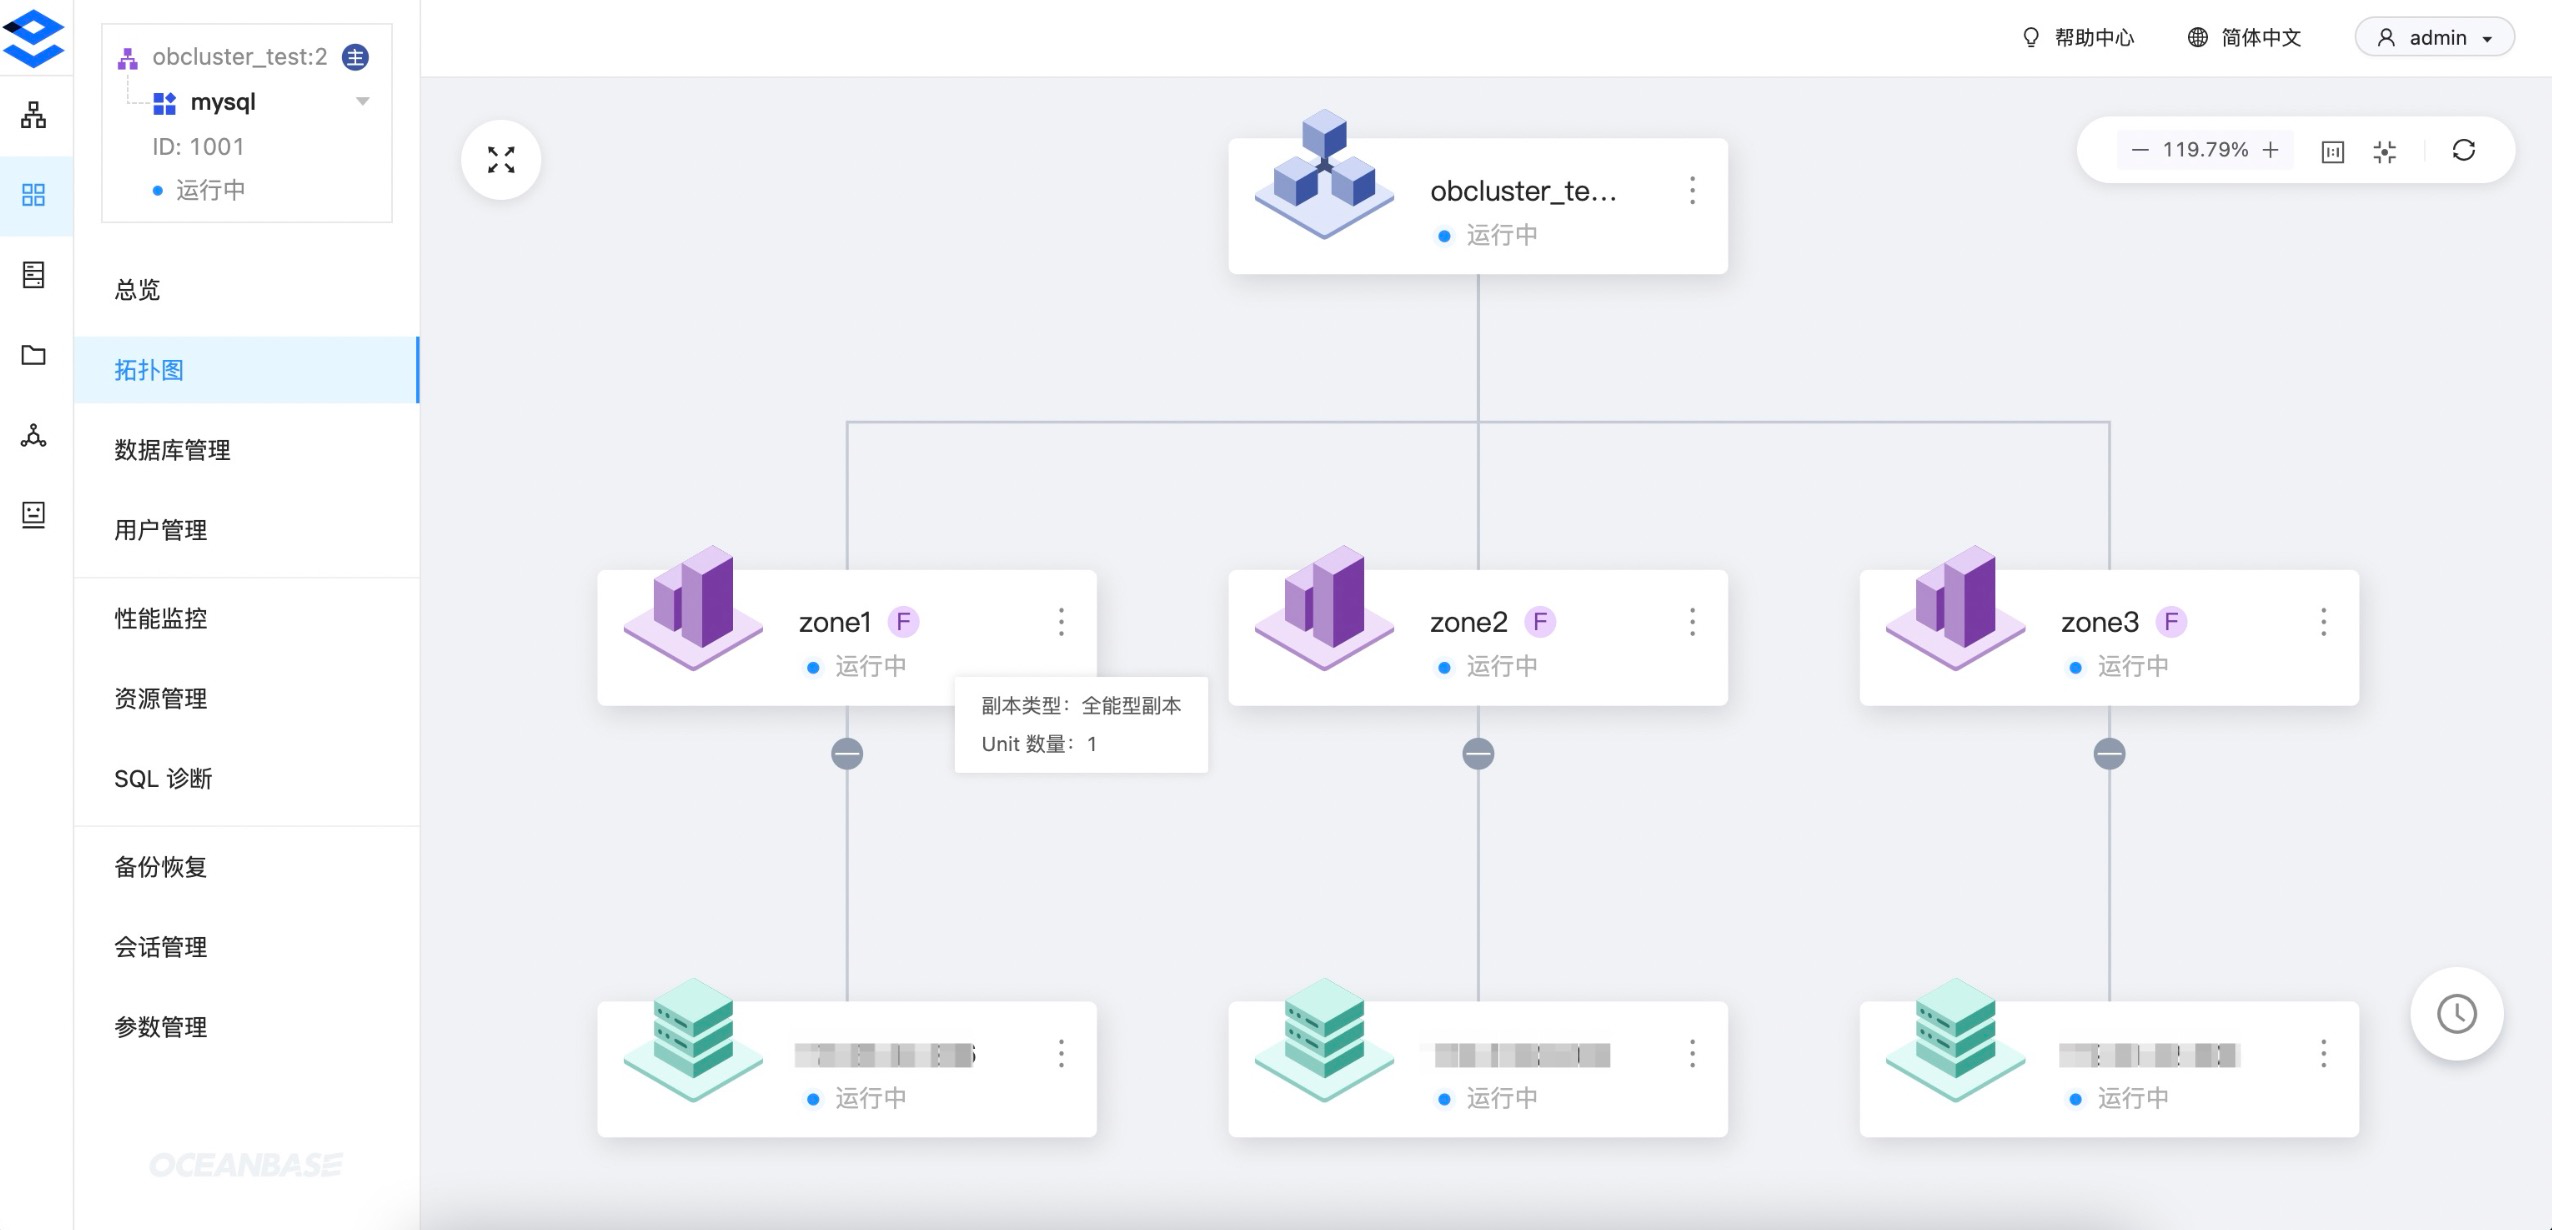
- 租户详情和拓扑图:
新建 OBProxy 集群
- 根据 OCP 社区版的 官方文档,OBProxy 宿主机上需要安装好
nc(即netcat)命令。
# 安装 nc
$ yum install -y nc
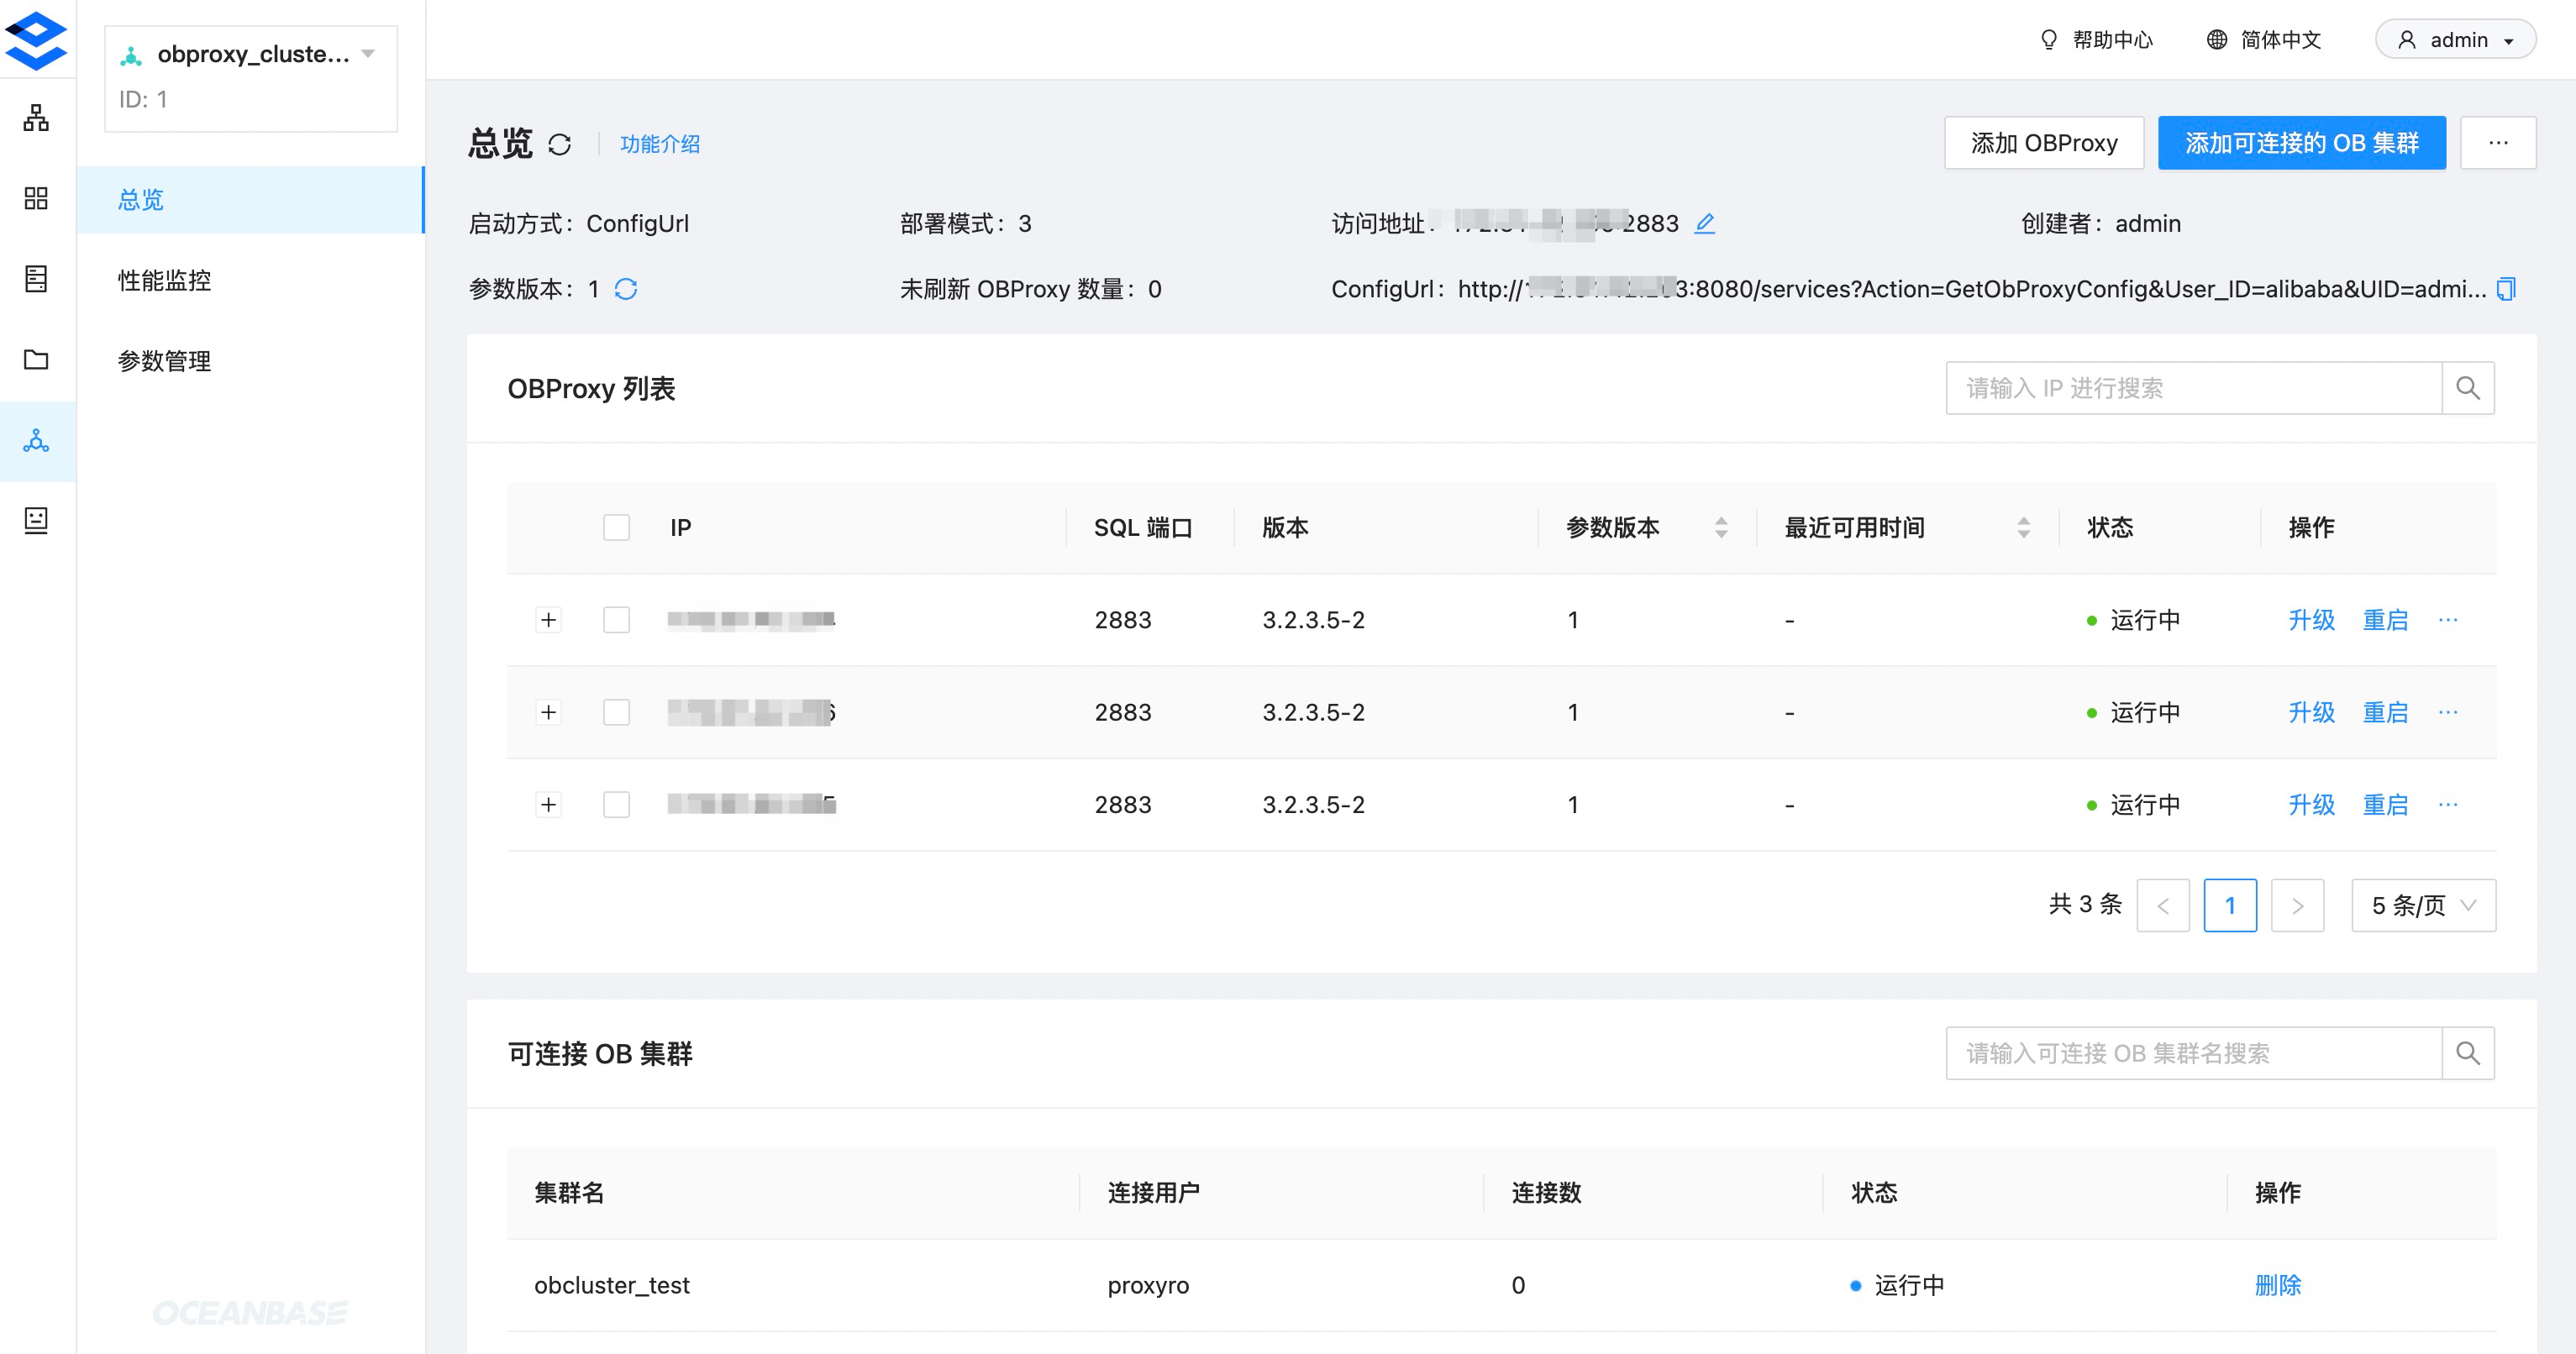
- 新建三节点的 OBProxy 集群,将 OBProxy 和 OceanBase 安装在同一台宿主机上。
-
访问地址: 一般是用作负载均衡的 SLB 地址,需要额外申请和配置。这里我直接用其中一台 OBProxy 的 IP 地址。 -
可连接 OB 集群: 指定通过当前 OBProxy 集群可连接哪些 OceanBase 集群。
-

- OBProxy 集群详情页:
连接数据库
- 直连 OceanBase:
-
连接地址: OBServer 的 IP 地址 -
端口: OBServer 的 SQL 端口 2881 -
用户:root@mysql,格式为{用户名}@租户名。由于通过连接的 OBServer 就能唯一确定集群,因此直连可以不指定集群。
-
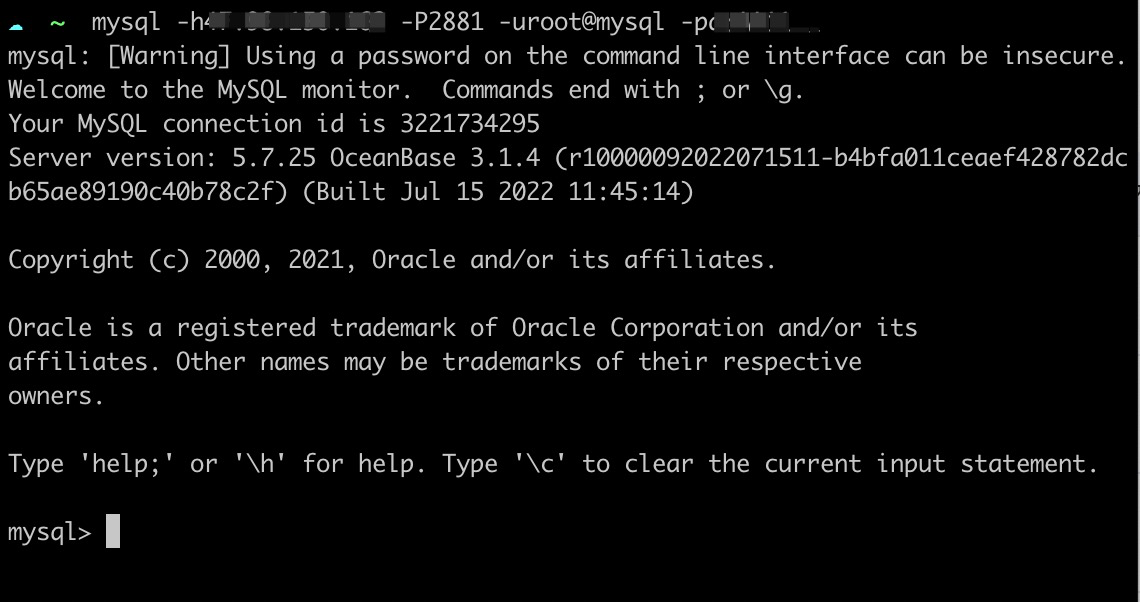
- 通过 OBProxy 连接:
-
连接地址: OBProxy 集群的访问地址 -
端口: OBProxy 集群的访问端口 2883 -
用户:root@mysql#obcluster_test:2,完整格式为{用户名}@租户名#{集群名}:{集群 ID}。由于 OBProxy 可以同时代理多个集群,因此这里需要指定集群信息,其中集群 ID 大部分情况可以省略,只要 OBProxy 不同时关联多个同名集群即可。
-

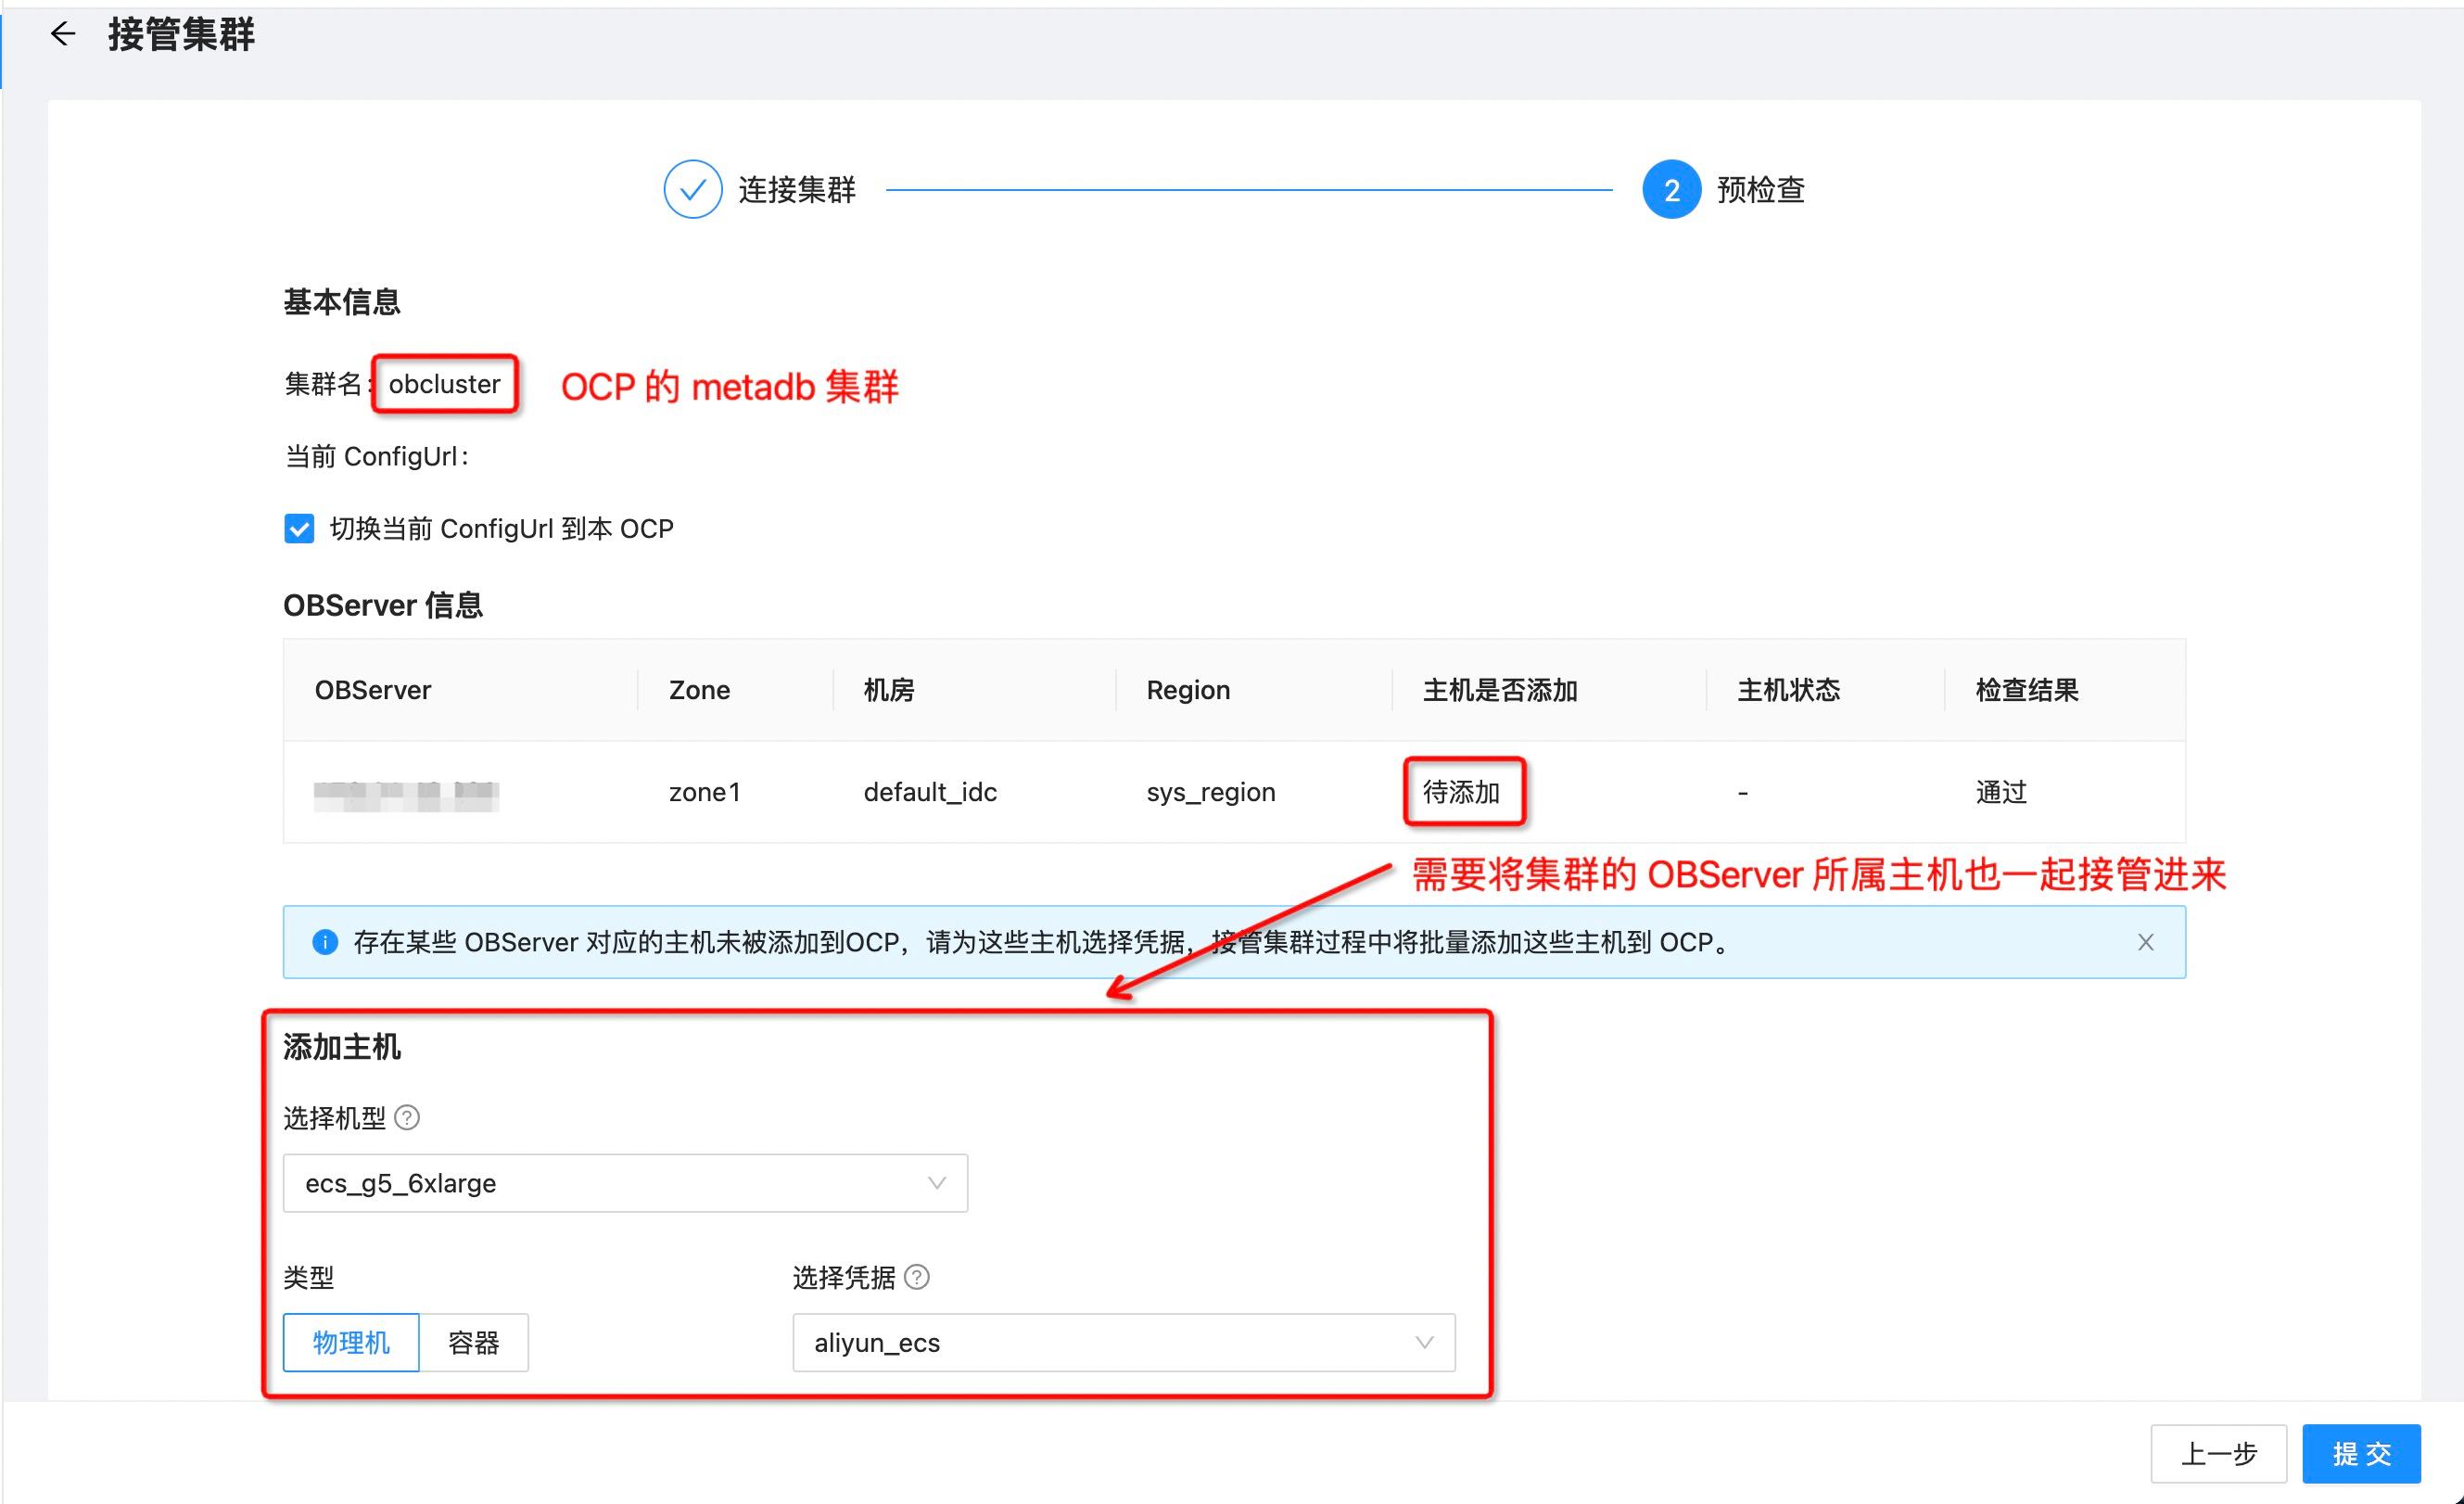
接管集群
- 指接管黑屏或其它 OCP 创建的 OceanBase 集群,并通过当前 OCP 对新接管的集群进行运维和管理。这里我们演示如何将当前 OCP 的 metadb 集群接管进来,为了简单直接使用
直连方式:
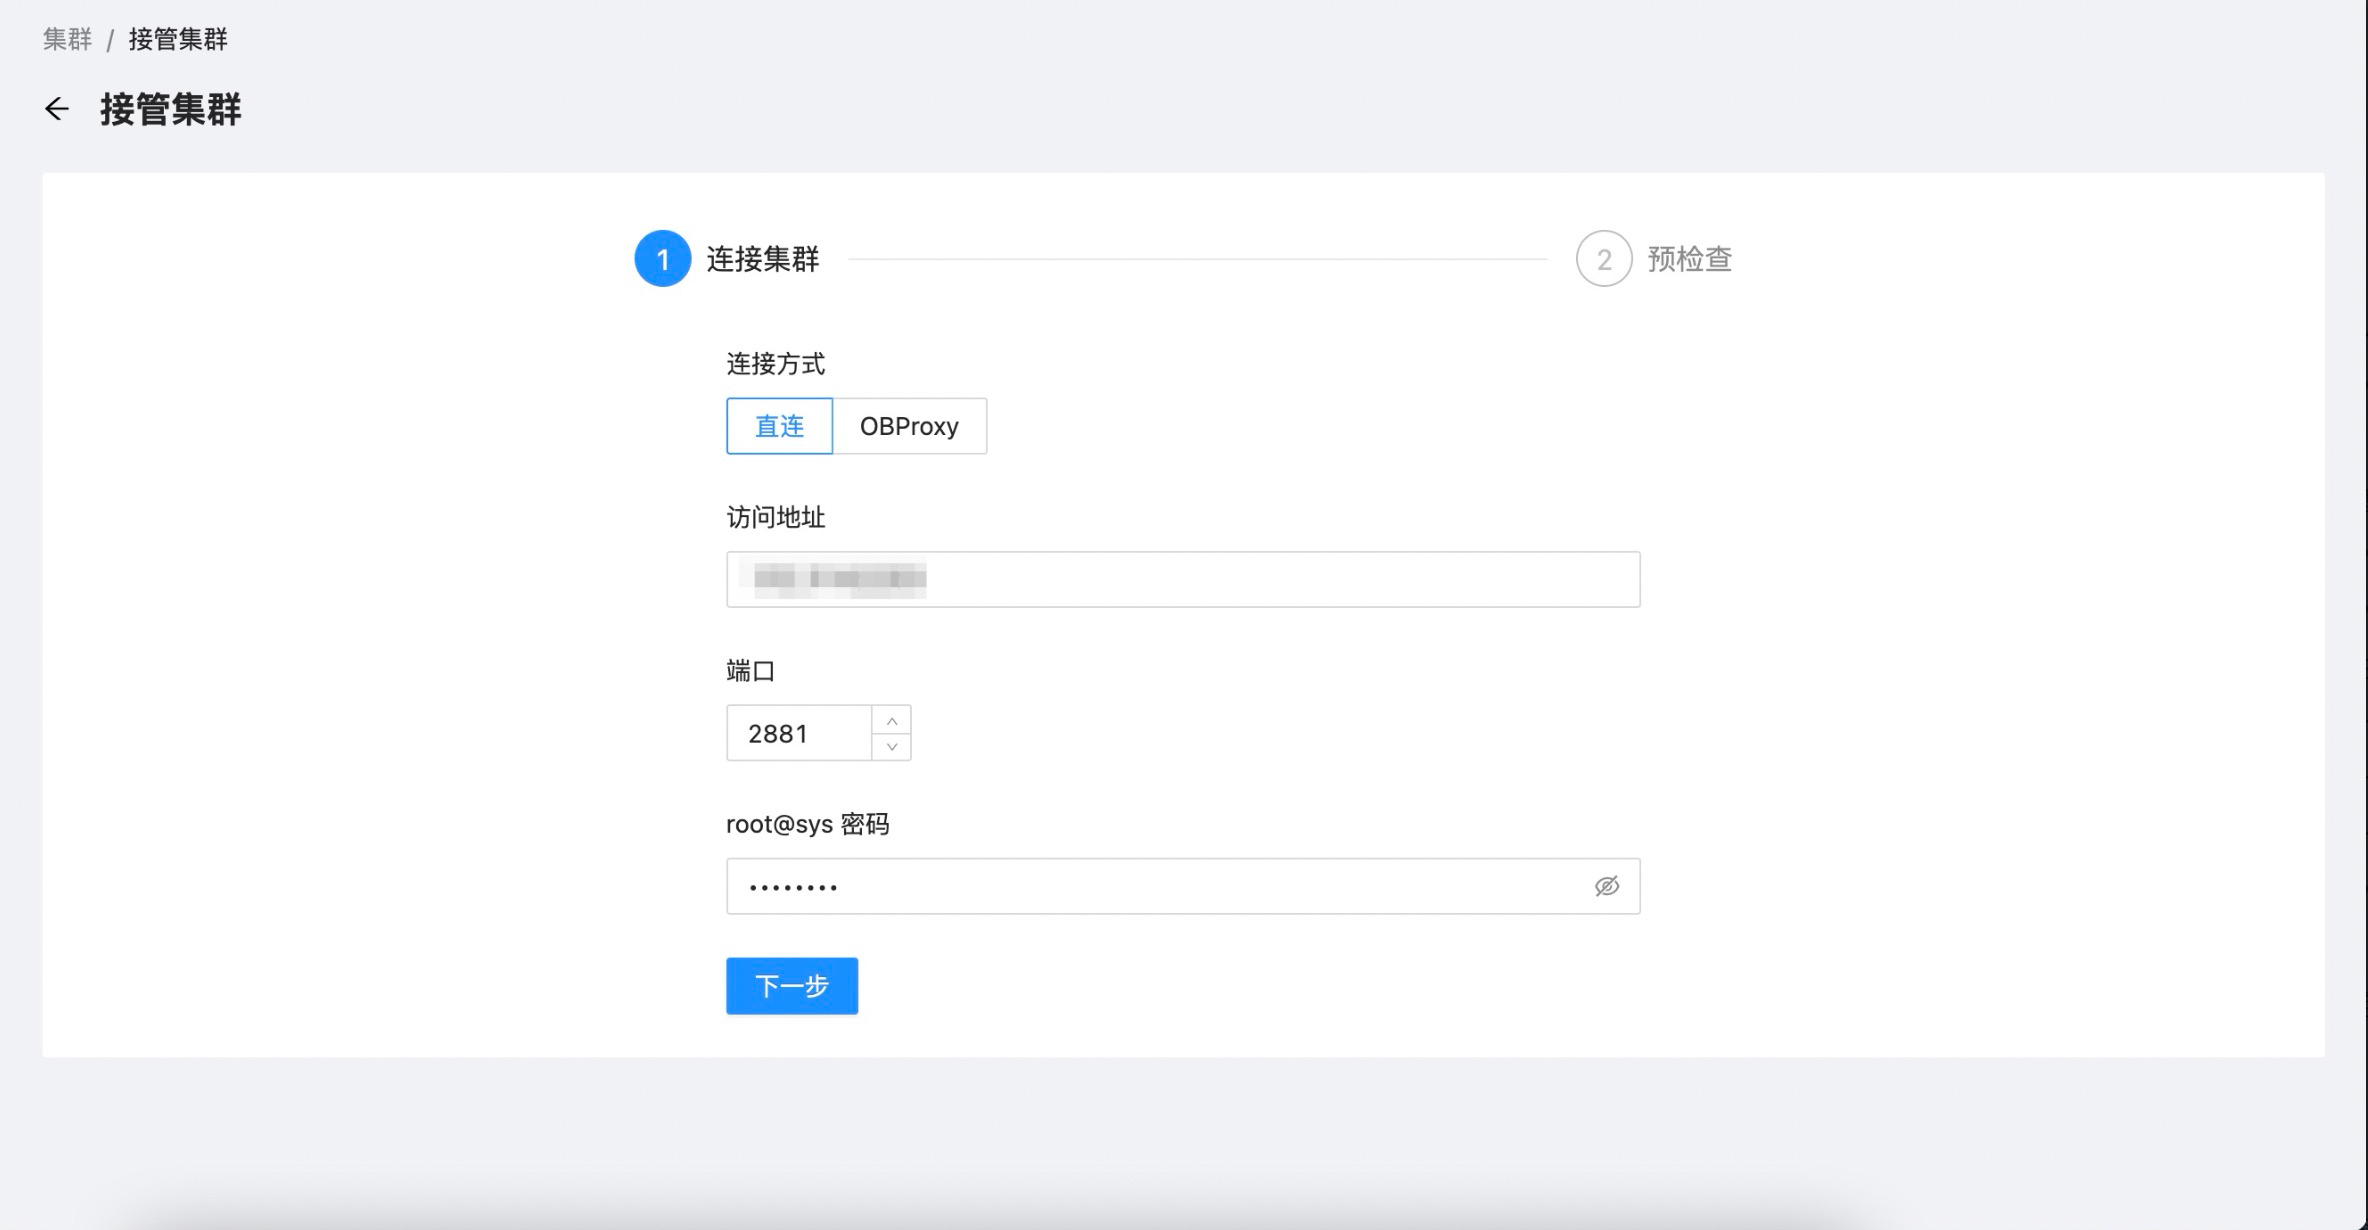
- 接管集群预检查,其中需要将集群的 OBServer 所属主机也一起接管进来。
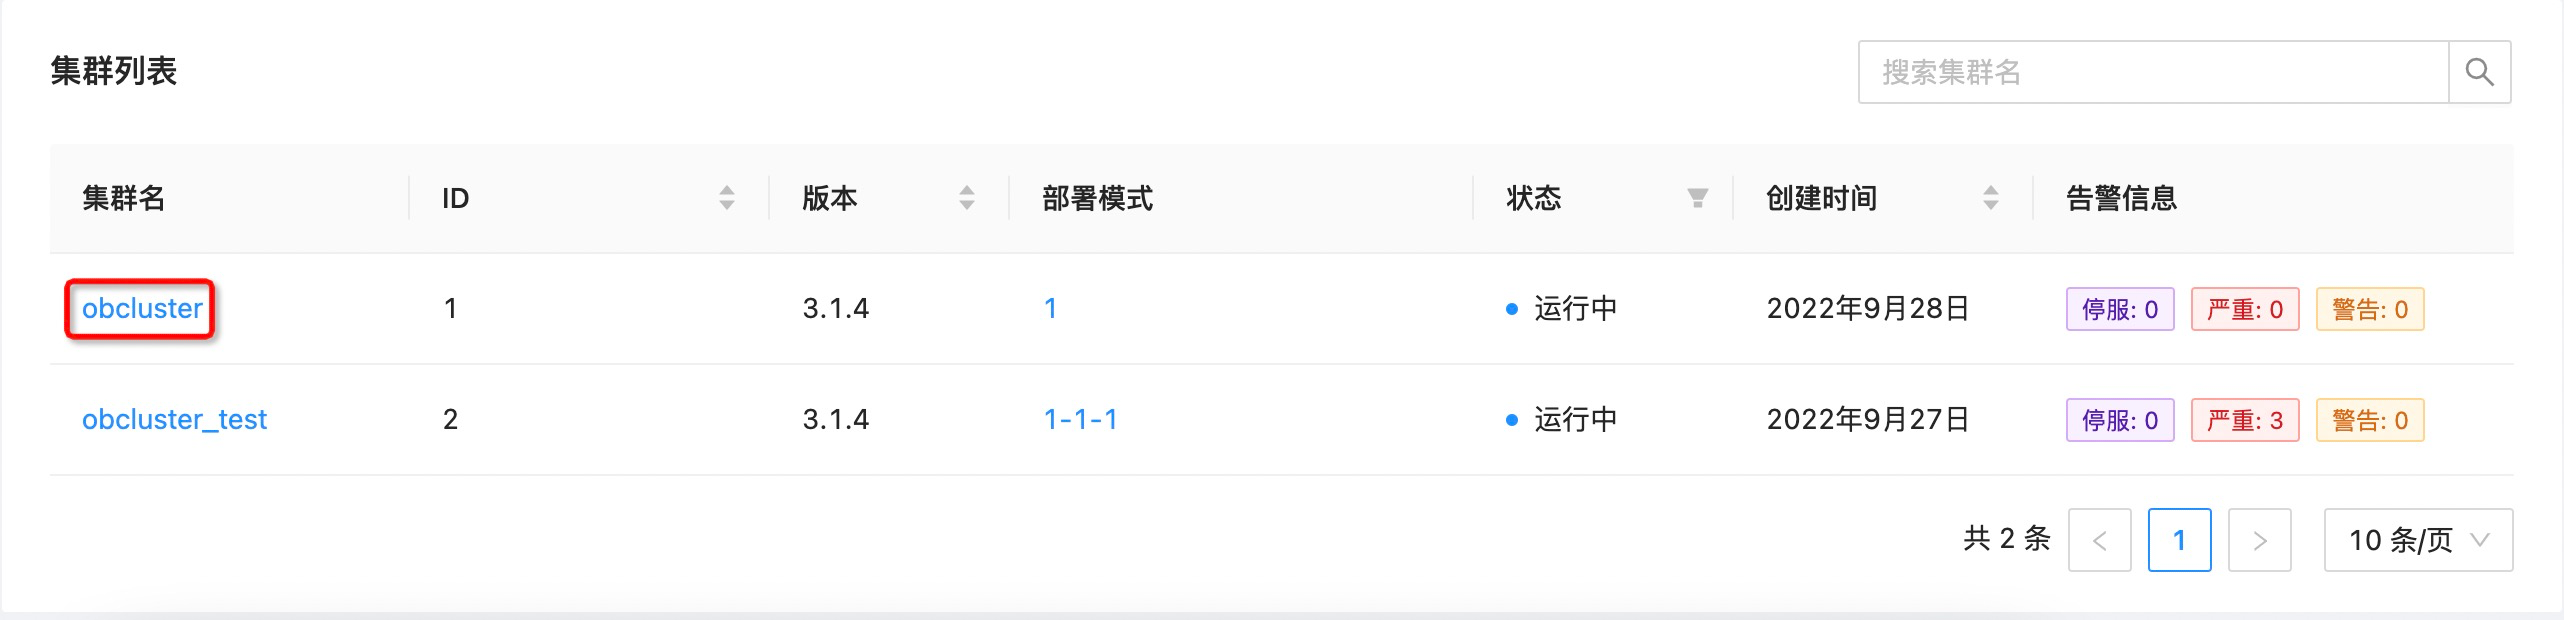
- 接管成功后 metadb 集群就会出现在集群列表:
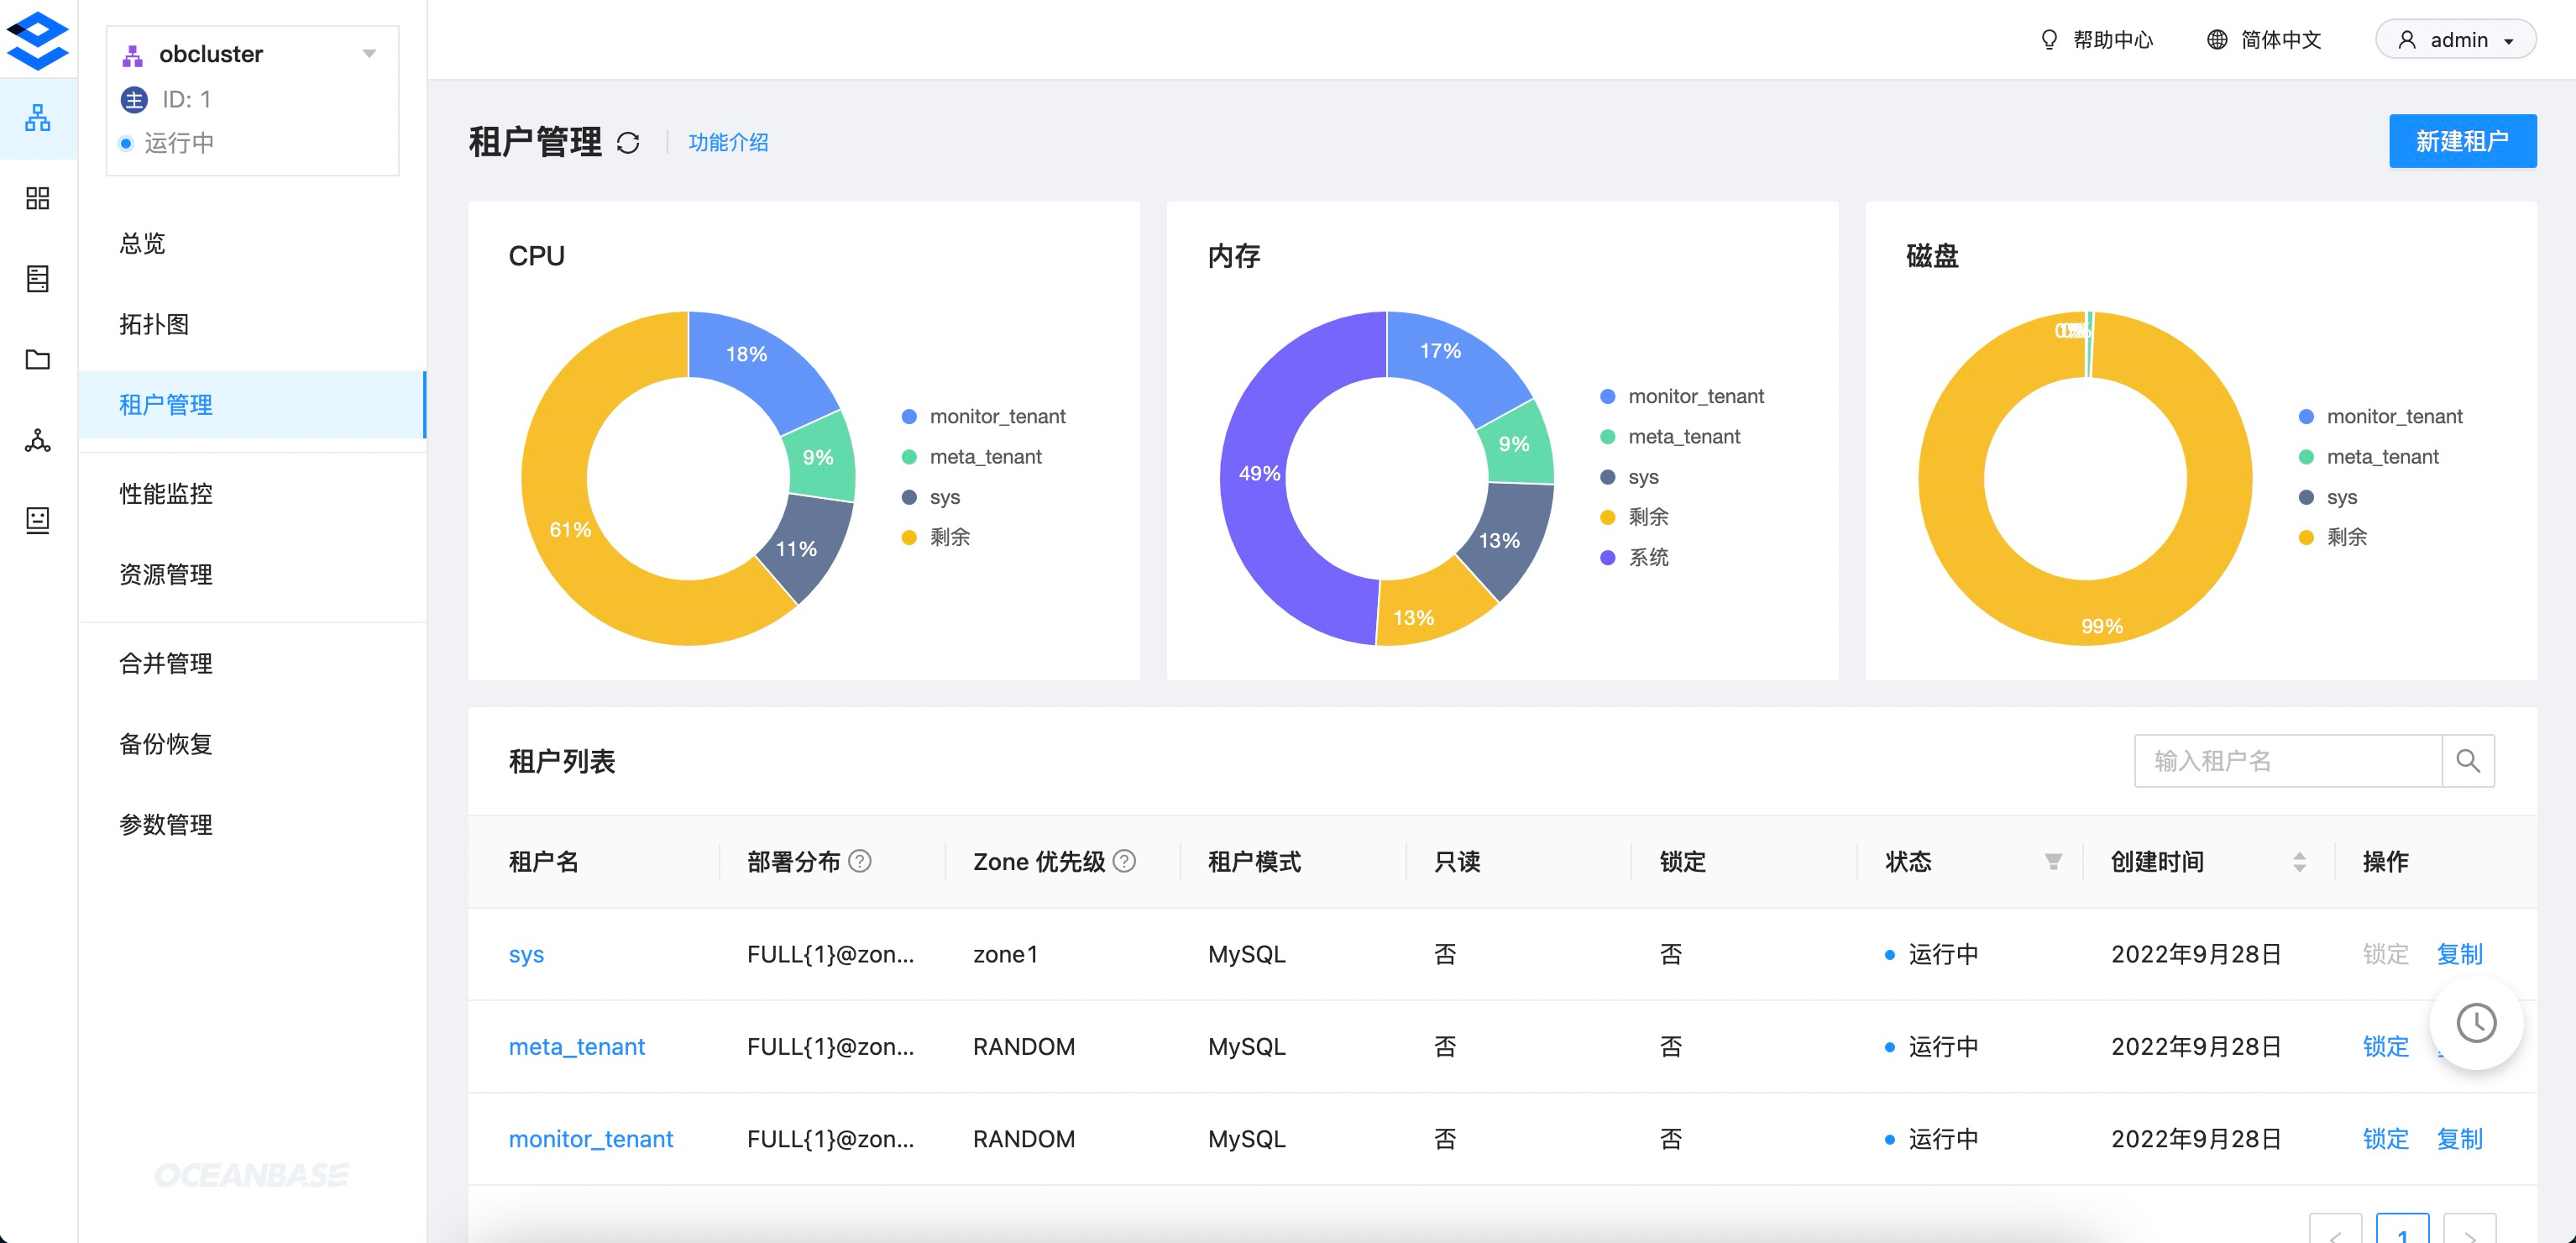
- metadb 集群中的租户:
-
sys: 系统租户,OB 集群都有,不多赘述。 -
meta_tenant: 元数据租户,用于存储 OCP 的系统数据。 -
monitor_tenant: 监控数据租户,用于存储 OCP 采集的监控、SQL、事务、性能等数据。
-