

OceanBase 是一款分布式 HTAP 数据库,部署形态与集中式数据库不同,一套集群通常会有很多组件构成,最简单的组件拆分有:
- OBServer - 用户提供数据存储和查询的核心服务层,包含 rootService 总控服务用于集群资源管理、OBServer 管理和 DDL 操作等功能。
- OBProxy - OB集群的代理层,通常用来作为 SQL 的访问入口,提供无状态访问服务,屏蔽底层 OBServer 的有状态机制,让应用访问更顺滑。
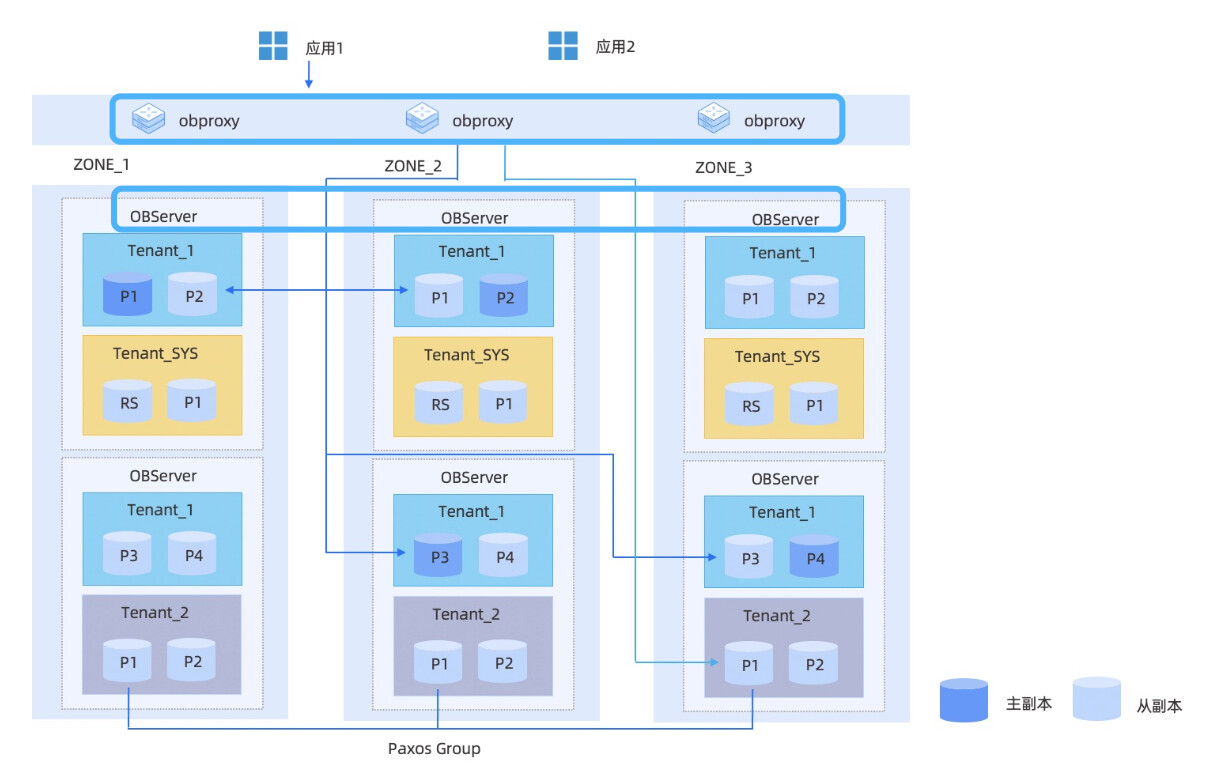
当然一套 OB 集群肯定还有其他的组件,比如 OCP、ogagent等等,但是最主要的部分就是以上两块。从上图中可以看出,在 OB 集群中,这两大组件均可以进行多节点部署(图上有 3 个 obproxy 和 6 个 observer),以保证高可用和负载均衡。
相信大家在 OB 社区里混了一段时间,没吃过猪肉也见过猪跑了,OB 的高可用能力有目共睹。在昨晚刚结束的直播分享中,力虾老师也对高可用和负载均衡进行了很详细的阐述,没有参与直播的小伙伴可以到社区钉钉群(群号:33254054)中查看视频回放《深入浅出OceanBase第五期》。下面我们开始今天的主题讨论吧~
一、开局一只狗,打怪全靠浪
今天我们讨论的主题是 “用 obd 给已有 OceanBase 集群增加 obproxy”,为什么会有这篇文章的想法呢?因为,我们在群里讨论后发现,文档中没有一个完整的论述教给大家如何给 obproxy 增加高可用节点。其实整体的操作并不麻烦,所以索性整一篇文章总结一下了。
如果大家对 OBServer 的节点添加感兴趣,可以参考文档:OceanBase 社区 。这里面说的已经很详细了。
在开始操作部分之前,必须要说说 obd 这只“狗”(没有贬低的意思)。我用了很多年的 Greenplum,没有接触 OB 这一类分布式数据库之前,我觉得 gpstart、gpssh、gpinitxxx已经很酷了,可以从管理节点一键发起操作命令,不必再来回切换机器做一些恼人的操作。没想到 obd 太狗了,一个命令打天下,用 obd,你可以:
- 一键部署 OB 集群
- 一键部署 OBAgent 监控
- 一键启动/停止/查看集群
- 统一修改集群配置
- 一键添加节点
- 离线安装 OB 集群(rpm本地仓库)
- 在线安装 OB 集群(rpm远程仓库)
- 其他
二、开心的三板斧
第一斧.准备集群
首先你需要自行部署一套 OB 集群,可以通过官方文档 使用 OBD 部署集群。来进行操作。
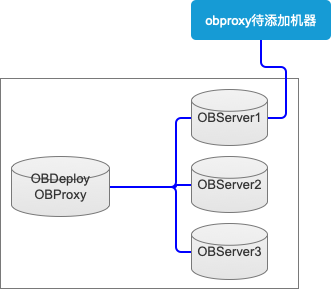
我这里的前置条件和部署完的状态如下图:
集群部署的配置文件如下,仅供参考:
[chris@obd ~]$ cat obd.yml
oceanbase-ce:
  servers:
    - name: server1
      ip: 10.211.55.74
    - name: server2
      ip: 10.211.55.75
    - name: server3
      ip: 10.211.55.76
  global:
    home_path: /home/chris/observer
    data_dir: /data
    redo_dir: /data/redo
    devname: eth0
    mysql_port: 2881
    rpc_port: 2882
    zone: zone1
    datafile_size: 30G
    appname: obcluster
    root_password: observer
    proxyro_password: obproxy
  server1:
    zone: zone1
  server2:
    zone: zone2
  server3:
    zone: zone3
obproxy-ce:
  depends:
    - oceanbase-ce
  servers:
    - 10.211.55.73
  global:
    home_path: /home/chris/obproxy
    skip_proxy_sys_private_check: true
    enable_strict_kernel_release: false
    listen_port: 2883
    prometheus_listen_port: 2884
    cluster_name: obcluster
    obproxy_sys_password: obproxy-sys
    observer_sys_password: obproxy
集群初始化命令如下,采用上面的配置一键初始化:
obd cluster autodeploy obcluster
初始化完成后,查看集群状态如下:
[chris@obd ~]$ obd cluster display obcluster
Get local repositories and plugins ok
Open ssh connection ok
Cluster status check ok
Connect to observer ok
Wait for observer init ok
+------------------------------------------------+
|                    observer                    |
+--------------+---------+------+-------+--------+
| ip           | version | port | zone  | status |
+--------------+---------+------+-------+--------+
| 10.211.55.74 | 3.1.3   | 2881 | zone1 | active |
| 10.211.55.75 | 3.1.3   | 2881 | zone2 | active |
| 10.211.55.76 | 3.1.3   | 2881 | zone3 | active |
+--------------+---------+------+-------+--------+

Connect to obproxy ok
+------------------------------------------------+
|                    obproxy                     |
+--------------+------+-----------------+--------+
| ip           | port | prometheus_port | status |
+--------------+------+-----------------+--------+
| 10.211.55.73 | 2883 | 2884            | active |
+--------------+------+-----------------+--------+
第二斧.新增配置文件
有了上面的前置条件,我们就开始给现有的 1 obproxy + 3 observer 集群,增加一个 obproxy,我们这里准备一个配置文件,如下:
obproxy-ce:
  depends:
    - oceanbase-ce
  servers:
    - 10.211.55.74
  global:
    home_path: /home/chris/obproxy
    skip_proxy_sys_private_check: true
    enable_strict_kernel_release: false
    listen_port: 2883
    prometheus_listen_port: 2884
    cluster_name: obcluster
    obproxy_sys_password: obproxy-sys
    observer_sys_password: obproxy
    rs_list: 10.211.55.74:2881;10.211.55.75:2881;10.211.55.76:2881
这里面,只需要声明 obproxy-ce 部分即可,在配置文件中,需要特别注意的是,我只修改了 servers 选项,然后增加了 rs_list 的 observer 映射关系;对应的目的就是:
- 在 .74 机器上增加一个新的 obproxy;
- obproxy 链接的集群还是原来的 74/75/76 OB 集群。
第三斧.一键添加与问题定位
重点来了,下面我们一键添加新的 obproxy 节点。
特别注意:这里添加新 obproxy 时,deploy name 要与第一斧中的初始集群部署名称区分开,比如我之前的部署名称为 obproxy,现在新增 obproxy 的部署名称为 obproxy2
在总控服务器上,发起命令:
[chris@obd ~]$ obd cluster deploy obproxy2 -c obd-proxy-add.yml
obproxy-ce-3.2.3 already installed.
+---------------------------------------------------------------------------+
|                                  Packages                                 |
+------------+---------+---------+------------------------------------------+
| Repository | Version | Release | Md5                                      |
+------------+---------+---------+------------------------------------------+
| obproxy-ce | 3.2.3   | 2.el7   | bdd299bda2bdf71fd0fd3f155b6a2e39dffd2be1 |
+------------+---------+---------+------------------------------------------+
Repository integrity check ok
Parameter check ok
Open ssh connection ok
Remote obproxy-ce-3.2.3-bdd299bda2bdf71fd0fd3f155b6a2e39dffd2be1 repository install ok
Remote obproxy-ce-3.2.3-bdd299bda2bdf71fd0fd3f155b6a2e39dffd2be1 repository lib check ok
Cluster status check ok
Initializes obproxy work home ok
obproxy2 deployed
验证可用性
首先采用 display 命令查看状态:
[chris@obd ~]$ obd cluster display obproxy2
Get local repositories and plugins ok
Open ssh connection ok
Cluster status check ok
Connect to obproxy ok
+------------------------------------------------+
|                    obproxy                     |
+--------------+------+-----------------+--------+
| ip           | port | prometheus_port | status |
+--------------+------+-----------------+--------+
| 10.211.55.74 | 2883 | 2884            | active |
+--------------+------+-----------------+--------+
然后分别登录两个 obproxy 节点,看是否能正常使用:
.73 节点登录、创建表、插入数据、查询:
[chris@obd obproxy2]$ obclient -h10.211.55.73 -P2883 -uroot@sys#obcluster  -c -A oceanbase -p
Enter password:
Welcome to the OceanBase.  Commands end with ; or \g.
Your MySQL connection id is 7
Server version: 5.6.25 OceanBase 3.1.3 (r10100032022041510-a09d3134c10665f03fd56d7f8bdd413b2b771977) (Built Apr 15 2022 02:16:22)

Copyright (c) 2000, 2018, Oracle, MariaDB Corporation Ab and others.

Type 'help;' or '\h' for help. Type '\c' to clear the current input statement.

MySQL [oceanbase]> use test;
Database changed
MySQL [test]> show tables;
Empty set (0.002 sec)

MySQL [test]> create table t1(id int); insert into t1 values(1),(2),(3);
Query OK, 0 rows affected (0.095 sec)

Query OK, 3 rows affected (0.059 sec)
Records: 3  Duplicates: 0  Warnings: 0

MySQL [test]> select * from t1;
+------+
| id   |
+------+
|    1 |
|    2 |
|    3 |
+------+
3 rows in set (0.002 sec)
.74 节点登录、查询:
[chris@obd ~]$ obclient -h10.211.55.74 -P2883 -uroot@sys#obcluster  -c -A oceanbase -p
Enter password:
Welcome to the OceanBase.  Commands end with ; or \g.
Your MySQL connection id is 3
Server version: 5.6.25 OceanBase 3.1.3 (r10100032022041510-a09d3134c10665f03fd56d7f8bdd413b2b771977) (Built Apr 15 2022 02:16:22)

Copyright (c) 2000, 2018, Oracle, MariaDB Corporation Ab and others.

Type 'help;' or '\h' for help. Type '\c' to clear the current input statement.

MySQL [oceanbase]> use test;
Database changed
MySQL [test]> select * from t1;
+------+
| id   |
+------+
|    1 |
|    2 |
|    3 |
+------+
3 rows in set (0.008 sec)
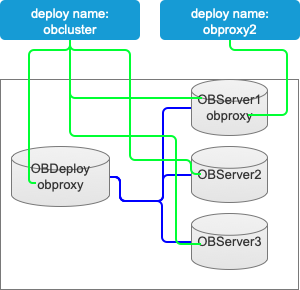
当前集群状态
第二个 obproxy 节点增加完成后,整个集群的架构图如下:
问题定位
其实整个过程中执行都很简单,如果跟随我的配置基本不会出问题,当然,也不能百分百的说一点问题都不可能出现。
出了问题,我们不要紧张,大家可以从 [配置文件] 和 [日志] 中寻找问题的蛛丝马迹。
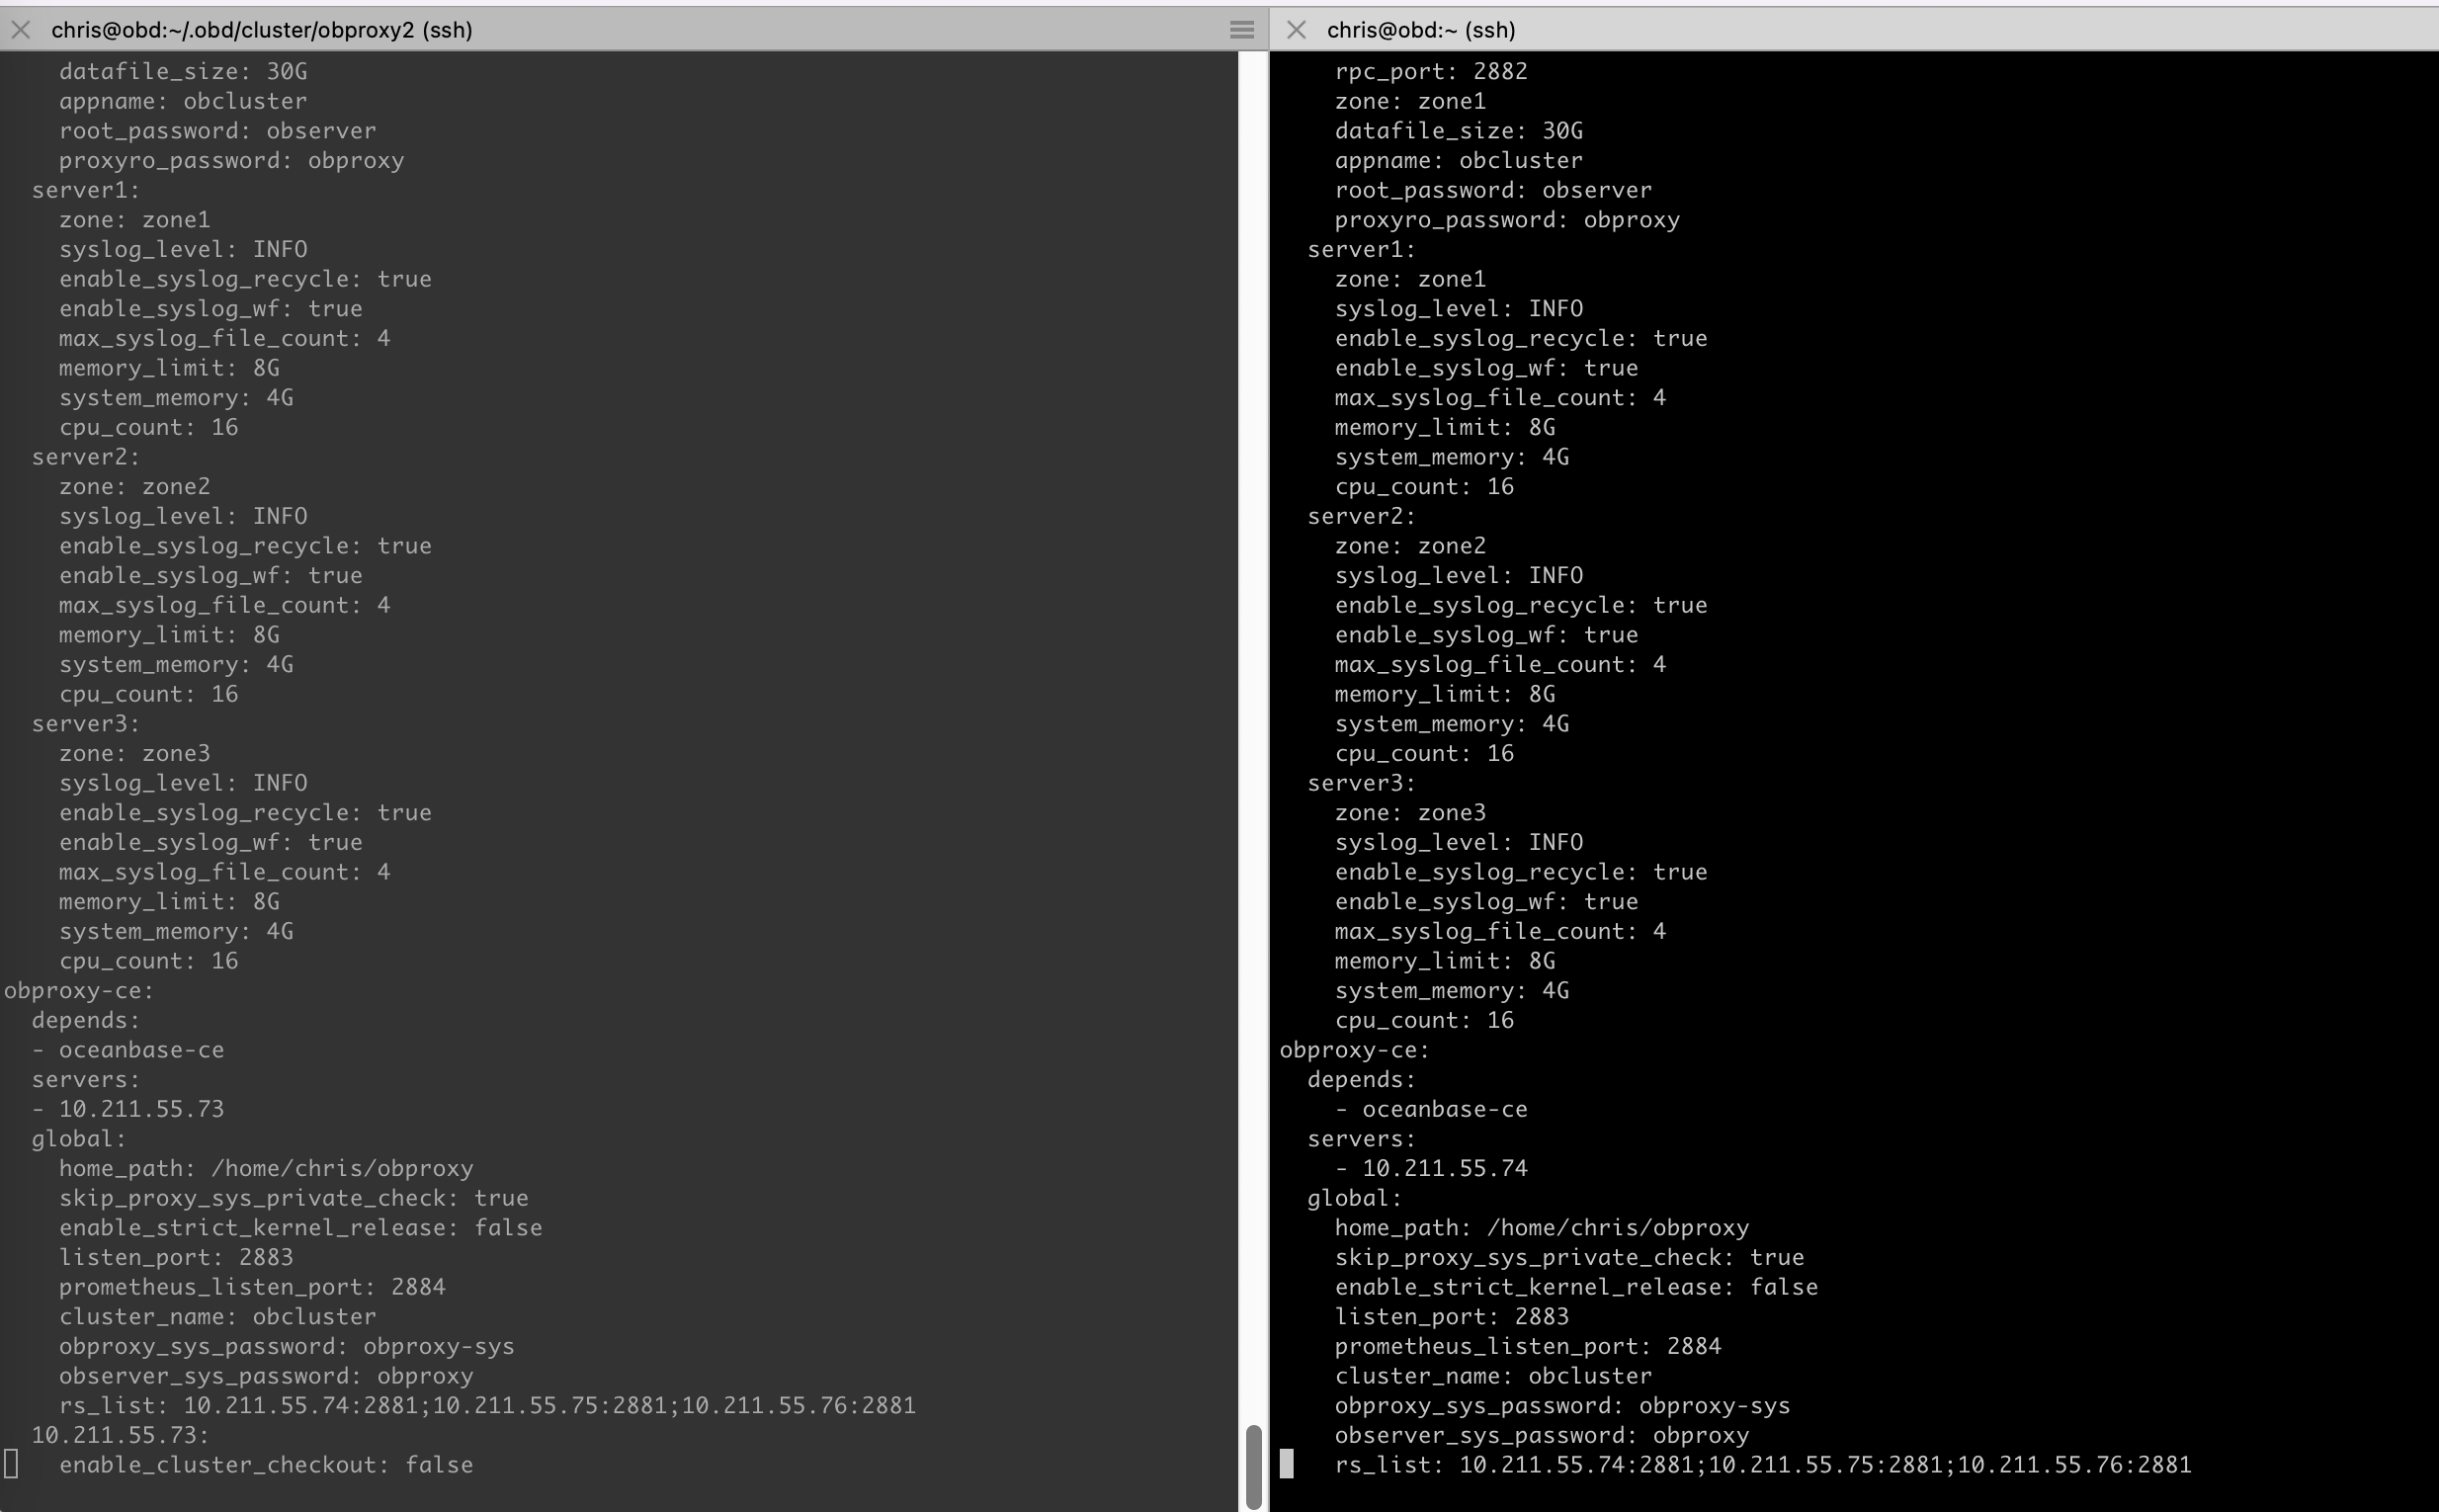
通过对比集群配置文件,查找是否存在不一致的信息,在这里我以我的环境为例,打开两个 terminal 终端,分别执行如下两条命令进行比较:
obd cluster edit-config obcluster
obd cluster edit-config obproxy
如下图:
通过日志查询,通常需要我们到目标机器上对应的目录下查看,这个操作还是避免不了夸机器,例如,我这里到 .74 机器上的 obproxy/log目录下,去查看相应的日志文件:
[chris@obd ~]$ ssh 10.211.55.74
Last login: Fri Jun 10 11:27:52 2022 from 10.211.55.2
[chris@observer1 ~]$ cd obproxy/log/
[chris@observer1 log]$ ls
obproxy_config.log  obproxy_limit.log  obproxy_pool.log       obproxy_stat.log
obproxy_digest.log  obproxy.log        obproxy_pool_stat.log  obproxy_xflush.log
obproxy_error.log   obproxy.log.wf     obproxy_slow.log
三、总结
感谢大家耐心看完我的文章,整篇文章看起来啰里八嗦说了一大堆,其实就是以下几个点:
- 前置条件:用 obd 提前创建好一个 OB 集群;
- 一键添加:新建一个配置文件,采用另外的 deploy name 部署一个新的 obproxy;
- 可用性检测:测试新增节点是否能正常使用。
其中最需要注意的两点有:
- 配置文件中,记得增加 rs_list,否则 obproxy 不知道该查询哪些 observer;
- 新增部署时,deploy name 一定不能与原集群同名,否则肯定会部署失败。
最后想说,任何问题都不可怕,大家要耐心,有问题及时在群里或论坛讨论,会有很多热心的朋友帮忙。